1. Remote Control Uses
[Go to table of contents]1.1. Pairing the Magic Remote
[Go to table of contents]Pair the Magic Remote prior to use as follows:
- Turn on the device. After about 20 seconds, point the remote towards the device and then press the Wheel (OK).
- The remote control will be registered automatically, and the pairing completion message is displayed on the screen.
- You can purchase the Magic Remote separately if it is not provided.
- If the Magic Remote failed to register, turn the device off and back on, and then try to register again.
Re-registering the Magic Remote
If the Magic Remote's pointer does not appear on the screen, you must re-register it.- Hold the remote control towards the device and press the
 and
 buttons at the same time for more than 5 seconds until instructions appear.
- The previously registered remote control is deregistered and then registered again.
Unregistering Magic Remote
If you have multiple LG Smart devices and want to register the Magic Remote currently in use to another device, you must unregister the previous one.- If you press the
 button and the button on the remote control at the same time for more than 5 seconds, the lamp on Magic Remote will blink and the registration will be canceled.
- If you want to unregister and register for another LG Smart device, please follow the registration method above.
1.2. Using the Magic Remote
[Go to table of contents]Press the
button on the remote control, then navigate to 
 General Accessibility Learn Remote Control on the screen.Press a button on the remote control following the on-screen instructions to get information about the button.
- The marks and positions of the remote control buttons may vary depending on the model.
- Depending on the model, some features may not be available.
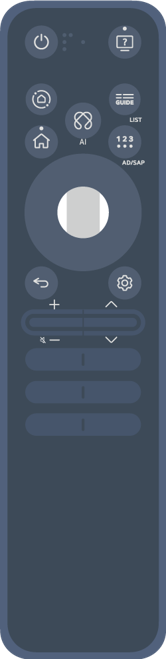
 , please long-press (hold for more than a second).
 : Entering into the Accessibility. : Displays the Accessibility Shortcuts.
 : Entering into the Home Hub. : Selects an input source.
- GUIDE: Launch Guide.
GUIDE : Displays Channels.  : Shows the recommended voice commands.You can use the voice recognition feature by holding down the button and speaking toward the remote control.
- : Displays the Home menu. : Zooms in on the screen.
 : Available features, numbers, and color buttons are displayed on the screen. : It reads the content of the screen out loud or sets the multiplex voice.
- : Move to the previous step. : Closes the menu.
- : Enter the Quick Settings menu. : Enter the All Settings menu.

 : Push the button up and down to adjust the volume.
Push down and hold the button to mute the device.
 : Push the button up and down to change channels.
Using the Magic Remote
- If you shake the Magic Remote left and right or turn its wheel while pointing it at the device, a pointer will appear on the screen.
If you move the remote control in the direction you want, the pointer follows the movement. - Move the pointer to the location you want and press the Wheel (OK) button on the remote control to execute the function.
- If the pointer has not been used for a certain period of time, it will disappear. When the pointer disappears from the screen, shake the Magic Remote right and left. It will then re-appear.
The pointer will disappear if you press /
 /
 /
 buttons on the remote control, and the remote will work as a standard remote control.
- You can operate the device by scrolling or pressing the Wheel (OK) button on the remote control.When viewing a screen that requires scrolling, you can easily move up and down by scrolling the Wheel (OK) button.When watching a video, you can press the Wheel (OK) button to pause/play.
- If the pointer is not responding smoothly, you can reset the pointer by moving it to the edge of the screen.
- Use the remote control within the working distance (within 10 meters or 33 feet).If there is an obstacle between the device and the remote control, it may not operate properly.
- Depending on the peripherals (wireless router, microwave oven, etc.), communication failures may occur.
- Impacts can cause the Magic Remote to malfunction.
- Take care not to bump into nearby furniture, electronic equipment, or other people when using the Magic Remote.
- For instructions on how to set up the pointer for the Magic Remote, please refer to the following User Guide.
Path: Settings System Pointer Options
1.3. Using the More Actions
[Go to table of contents]- Press the
 button on the remote control.
- Using the remote control, select your desired button on More Actions displayed on the screen.
If your remote control doesn't have number buttons or color buttons, you can use those functions in More Actions.
- The types of buttons appearing on the More Actions vary, depending on the region and the type of connected device.
- Some functions may not support More Actions.
- Depending on the model or region, the labeling and operation of the remote control buttons may vary.
- More Actions button: ,
If your remote control doesn't have a More Actions button, press and hold the Yellow button to execute More Actions.
- More Actions button:
1.4. Setting Universal Control
[Go to table of contents]- Some models may not be supported.
- This feature can only be used with the Magic Remote.
You can purchase the Magic Remote separately if it is not provided.
Some models allow you to connect the provided IR blaster, enabling the use of a regular remote control by setting the integrated remote control. - When changing settings on a device, make sure it is powered on first.
- To set up a universal remote control with the latest information, connect to the network and accept the User Agreements.
- The manual setting feature for universal remote control is not supported for a game console.
- Some buttons may not work depending upon the model of the external device.
- Point the Magic Remote at the device you want to control.Make sure that there are no objects in front of the device to ensure that the remote control signal is well received.
Automatically Setting the Universal Remote Control
Connect the devices to be set to this device's HDMI port, and turn the power of the device on.This device will recognize the connected device to automatically set the universal remote control without manual setting.
- After setting the universal remote control, you may need to do some additional user settings.
- It may take several seconds to complete the settings for the universal remote control.
- In some models, you can set the universal remote control only after converting to an input of a connected device.
- Depending on the connected device, the automatic setting feature for universal remote control (automatic device connection) may not be supported.
Manually Setting the Universal Remote Control
If the universal remote control has not been set automatically, you can set it up manually.- Press the button on the remote control.
- Enter the following path on the screen. General External Devices Universal Control Settings
- Select the HDMI port connected to the device you wish to set, and select Manage Settings.
- Press the Start Setting button to set the new integrated remote control by following the on-screen instructions.
You can retrieve a previously set integrated remote control from View Settings History.
- To delete the integrated remote control settings, select Delete Settings from the Manage Settings of the desired HDMI port.
1.5. Using the Quick Access
[Go to table of contents]- This can only be used with a remote control that has numeric buttons.
Setting the Quick Access
- Launch the app or select the channel or input you wish to assign.
- The items that can be registered to the shortcut button vary depending on the model.
- Press and hold the number button (1~8) you want to register.
No. 9 is fixed to Quick Help. - When the registration pop-up window appears, select Yes.
- If you press and hold a number button that has already been registered, the registered function will be performed.
- To see the items that can be registered, select a number that has not been registered in the Quick Access edit mode.
- If you are in a mode where Quick Access cannot run, no action will be performed.
- If you delete a registered app, Quick Access will be deregistered as well.
Checking and Editing Quick Access
- Press and hold the number 0 button on the remote control.
The Quick Access edit screen appears. - Selecting a number that has already been registered allows deregistering it.
When you select a number that has not been registered, items that can be registered will be shown.
An item that has been registered to a different number is indicated with a check mark.
Select Help on the screen.You can view a brief instruction for this function.
1.6. Connecting to SIMPLINK (HDMI-CEC)
[Go to table of contents]- Up to three devices can be connected and used simultaneously.
- Connect the SIMPLINK HDMI Output port to HDMI port with an HDMI cable.
- Press the button on the remote control.
- Enter the following path on the screen. General External Devices HDMI Settings
- Set SIMPLINK (HDMI-CEC) to On.
- Turn on the power of the connected device.When it is automatically connected to the device, the external input is changed.
If the device is not automatically connected, click the button on the remote control and select the device you wish to connect to.
- This feature works only with devices with the
 logo. Check for the SIMPLINK logo on the external device.
Use of any product other than those specified may cause problems during operation. - To use SIMPLINK, you need to use a high-speed HDMI® cable with CEC (Consumer Electronics Control) function.The High-Speed HDMI® cable has the pin 13 for enabling information exchange between devices.
- To output sound from an external audio device, connect the audio device to the device's HDMI port with an HDMI cable.Set Sound Out to HDMI(ARC) Device and set SIMPLINK (HDMI-CEC) to On.
- Depending on the model or region, the labeling and operation of the remote control buttons may vary.
- If your remote control doesn't have a button, press and hold the
 button to execute Home Hub.
- If your remote control doesn't have a
Supported SIMPLINK Functions
Instant Play
When you start a multimedia device, you can immediately watch content from the device on the screen without having to control anything.Controlling devices with the remote control
Enables the user to control multimedia devices with the provided remote control to watch content.- The menu of the multimedia device can be operated with the arrow keys on the remote control.
Main Power Off
Turning off this device will also turn off the devices connected through SIMPLINK.- This feature is only available in certain devices.
Main Power On
Turning on a SIMPLINK device will also turn on this device.- Some models may not be supported.
2. Live Channel Watching and Scheduling
[Go to table of contents]2.1. Watching Broadcasts
[Go to table of contents]- Connect the broadcast antenna/cable to the device.
- Press the button on the remote control.
- Enter the following path on the screen. General Channels Channel Tuning Auto Tuning
You can search for the current broadcasting channel and save it to the device.
- You may also connect a piece of equipment that can receive broadcasting such as a set-top box instead of the antenna/cable.
Press the button on the remote control, then navigate to General External Devices Universal Control Settings on the screen.
2.2. Using the Live Menu
[Go to table of contents]Press and hold the GUIDE button on the Magic Remote.
Or press the LIST button on the standard remote control.
- Guide: You can view programs and the schedule of each program.
For more details, please refer to the following User Guide.
Path: Live Channel Watching and Scheduling Viewing Guide - Channels: View a list of broadcast content that is currently being broadcast.
- TV Scheduler: You can set the date and time of the desired broadcasting program, and watch the program.
For more details, please refer to the following User Guide.
Path: Live Channel Watching and Scheduling Using TV Scheduler
- The channels displayed in the channel list are provided by the broadcaster; therefore, if the broadcaster changes channel configurations without prior notice, some of the channels in the list may differ from those of the actual device.
- Because channel information displayed in Channel List includes information provided by external Electronic Program Guide (EPG) providers, it may differ from the actual TV channels.
- You must complete the settings of the network, region, and auto-channel to receive normal live broadcast service.
- The configurable items differ depending upon model.
2.3. Viewing Guide
[Go to table of contents]- Press the button on the remote control.
- Launch Live TV on the screen
- Press the GUIDE button on the remote control.
Guide screen will appear. - Information about the program currently being watched or being focused is displayed at the top of the screen.
Select or the program name of the desired program from the broadcast schedule for each channel.You can view more information on the program and perform Watch/Record (only available on certain models) or Reminder/Scheduled Recording (only available on certain models), etc.
You can turn pages using the channel buttons on the remote control.
 : Number buttons appear on the screen.
- Move to Top: Move to the top of the list of programs.
- Go to Current Time: You will be taken to the program list for the current date and time.
- Filter: The type of channel displayed on the screen can be set.
- All Genre: Displays the genres selected in Guide with color.
- Select
 on the screen.
Channel Manager: Launch Channel Manager.
Channel Row: You can change the size of the program list to adjust the number of channels displayed on the screen.
Filters: The type of channel displayed on the screen can be set.
Mini TV: The screen can be turned on or off to preview the selected channel.
User Guide: Move to the User Guide app.  : Closes the app.
- Program information is not displayed for channels with no provided broadcast information.
- The configurable items differ depending upon model or country.
- Depending on the model or region, the labeling and operation of the remote control buttons may vary.
- If your remote control doesn't have a button, press and hold the button to execute Home Hub.
- If your remote control doesn't have a
Viewing Set-Top Box Guide
After connecting the Set-Top Box, you can view programs and the schedule of the Set-Top Box and use the Magic Remote.- Some models may not be supported.
2.4. Checking Program Info
[Go to table of contents]- Select on the screen.You can also press the button on the remote control.
You can move the position of the banner by selecting Change Banner Location in More Actions. - Select a channel banner to enter the detailed information pop-up to see the detailed program information or run additional features related to the banner.
You can view broadcast information about other channels using the/ buttons on the remote control.
You can view broadcast information about the channel you are currently watching using the/ buttons on the remote control. - Select Guide on the screen.
Launch Guide.For more details, please refer to the following User Guide.
Path: Live Channel Watching and Scheduling Viewing Guide
- Available features may vary depending on the broadcast signal.
- Depending on the model, some features may not be available.
- Depending on the model or region, the labeling and operation of the remote control buttons may vary.
- More Actions button: ,
If your remote control doesn't have a More Actions button, press and hold the Yellow button to execute More Actions.
- More Actions button:
2.5. Using TV Scheduler
[Go to table of contents]- Press the button on the remote control.
- Launch Live TV on the screen
- Press the button on the remote control and select TV Scheduler on the screen.
The TV Scheduler screen will be displayed.
- Select
 on the screen.
You can set the New Reminder. - By selecting on the screen, you can adjust the settings related to TV Scheduler.
Sort: You can sort the list.
Delete: You can set the Delete Mode.
Guide: Launch Guide.
User Guide: Launch User Guide.
Quit App: Closes the app. - : Closes the app.
- Depending on the model or region, the labeling and operation of the remote control buttons may vary.
- More Actions button: ,
If your remote control doesn't have a More Actions button, press and hold the Yellow button to execute More Actions. - If your remote control doesn't have a button, press and hold the button to execute Home Hub.
- More Actions button:
Scheduling a selected broadcast from Guide
You can select a show to schedule it for watching.- Press the button on the remote control.
- Launch Live TV on the screen
- Press the button on the remote control and select Guide on the screen.
- Select the program you want.
If you want to watch a live broadcast, click Watch.
In case of an upcoming program, click Reminder.
- Applies to digital broadcasting.
Manual Scheduling
You can select the date, time, and channel to watch the channels.- Press the button on the remote control.
- Launch Live TV on the screen
- Press the button on the remote control and select TV Scheduler on the screen.
- Select the .
- Select Create Manually.
- Set the date, time, and channel to watch.
- Some models may not be supported.
2.6. Watching LG Channels
[Go to table of contents]Press the
button on the remote control and select LG Channels on the screen.You can use the 'Interactive Channel' service that enables users to conveniently enjoy content related to the current channel without having to switch apps.You can use the 'Interactive Channel' by pushing the buttons on your remote control or clicking your screen according to the instructions that appear on the Internet channel screen.
While watching LG Channels, press the
button on the remote control.You can perform functions related to the broadcast you are watching or move to apps such as LG Channels.You can see information on new Internet Channels or manage the channels you like in LG Channels.- Some models may not be supported.
- You must connect to the network and agree to User Agreements before you use it.
- When LG Services Country is changed, you will no longer be able to use LG Channels.You can access this setting by pressing the button on the remote control, then navigating to General System Location on the screen.
- Selecting LG Channels will change the input mode to LG Channels.Some content may be replaced with other apps.
- Some LG Channels may not support this service.
- Live Playback and recording are not available for LG Channels.
- LG Channels services may be stopped or changed without prior notice by the broadcasting company.
2.7. Using the Live Plus
[Go to table of contents]- Press the button on the remote control.
- Enter the following path on the screen. General System Additional Settings
- Set Live Plus on the screen to On.
Setting Live Promotion to Off will remove advertisements from Live Plus.
- The configurable items differ depending upon model.
- Some models may not be supported.
- You can still access some of the Live Plus features when using external devices such as a set-top box.
- If you set up a universal remote control, you can use Live Plus even when using external devices.
- This service is only provided for selected content with contracted partners.
3. Smart Function
[Go to table of contents]3.1. Home Tutorial
[Go to table of contents] button on your remote control.Roll the Wheel (OK) button on the Magic Remote to scroll through the menu.You can open apps and content or use various features of the smart function.
Press the
button on the remote control.You can use or close recently used apps saved for each LG Account account.- Standard remote control allows you to scroll through the menu with the / buttons.
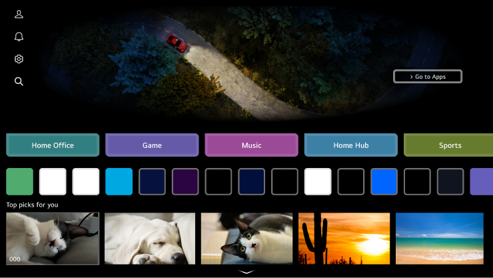
 : Launch LG Account.
For more details, please refer to the following User Guide.
Path: Smart Function Managing Your LG Account : Launch Notifications.
For more details, please refer to the following User Guide.
Path: Smart Function Notifications- : Launch Quick Settings.
For more details, please refer to the following User Guide.
Path: Settings Quick Settings To Use Setting Function Quickly  : Launch Search.
For more details, please refer to the following User Guide.
Path: Apps and Content Content Search
You can use various functions or services.
You can run, move, and delete the apps installed on your device.- Recent Input: Returns to the most recently used external input.
- The Home screen is automatically displayed whenever you turn on the power.You can change settings to prevent the home screen from being displayed every time you turn on the device.
Press the button on the remote control, then navigate to General System Additional Settings Home Settings on the screen.Set Power On Screen to Recent Input. - The home screen shows advertisements.You can change settings to turn the advertisements on or off.
Press the button on the remote control, then navigate to General System Additional Settings Home Settings Home Promotion on the screen. - The availability of and access to Contents and Services in the device are subject to change at any time without prior notice.
- Available features vary depending on the region or service.
3.2. Manage Home
[Go to table of contents] button on the remote control.Edited lists are saved for each LG Account and are stored only on the device where the edits were made.- Depending on the model or region, the labeling and operation of the remote control buttons may vary.
- More Actions button: ,
If your remote control doesn't have a More Actions button, press and hold the Yellow button to execute More Actions.
- More Actions button:
Edit Card List
- Select the card you wish to edit, and press and hold the Wheel (OK) button on the remote control.
Alternatively, you can press Edit located at the end of the Card List. - Move to the desired position and press the Wheel (OK) button on the remote control to change the position of the app.
You can also move cards with the/ buttons on your remote control. - To delete an card, select the
 icon above the card.To add a card that was deleted, simply select the desired card and add it to the list.
- Press the button on the remote control.
Home Settings: When turning the power on, go to the screen that sets the Home behavior or advertising display.
User Guide: Move to the User Guide app.
- Press the
- After editing is complete, Press the button on the remote control to exit the Edit Card mode.
Edit App List
- Select the app you want to edit, and then press and hold the Wheel (OK) button on the remote control to enter the Edit App List mode.
Alternatively, you can press Edit App List located at the end of the App List. - Move to the desired position and press the Wheel (OK) button on the remote control to change the position of the app.
To delete an app, select the icon above the app.
Select the icon on the app to hide it from the list.
You can reset the order of the app list by pressing Reset Editing Apps.- You can also move apps with the / buttons on your remote control.
- Press the button on the remote control.
Home Settings: When turning the power on, go to the screen that sets the Home behavior or advertising display.
User Guide: Move to the User Guide app.
- You can also move apps with the
- After editing is complete, click Close at the bottom of the screen to exit the Edit App mode.
- Default apps cannot be deleted.
Edit Contents List
- Scroll down to the bottom of the Home screen by rolling the Wheel (OK) button on the remote control, and select
 on the screen to enter Edit Contents List mode.
- Select the list you want to move with the Wheel (OK) button on the remote control, move it to the desired location, then press the Wheel (OK) to confirm.You can also move the list with the /// buttons on the remote control.
- Press the button on the remote control.
Home Settings: When turning the power on, go to the screen that sets the Home behavior or advertising display.
User Guide: Move to the User Guide app.
- Press the
- After editing is complete, click Close at the bottom of the screen to exit the Edit Content List mode.
- Some lists cannot be moved.
3.3. Managing Your LG Account
[Go to table of contents]- Connects the device to the network.
- Press the button on the remote control.
- Select on the screen.
- Start signing up for LG Membership by selecting one of the suggested login methods.
You can sign up an LG membership using the ID and password of your email address or external service account. - Agree to the User Agreements and enter the information required to sign up.Required information may vary depending upon the country.
- A verification link will be sent to the email address you entered when you signed up.Please complete email verification within the validity period.
- Once your email address is verified, you can log in with your credentials.
- This feature may not be available in some countries.
- Age restrictions may apply for signing up.
- Some apps or services require individual agreement to terms of use.
- To troubleshoot issues related to this feature, please refer to the following User Guide.
Path: Troubleshooting Troubleshooting LG Account Issues
Switching Login Accounts
You can conveniently switch between previously logged-in accounts.- Press the button on the remote control.
- Select LG Account on the screen.
- A list of previously logged-in accounts is displayed.Select the account you wish to change.
To log in with a new account, select Add Account.
- You can save up to 10 accounts.If the number of accounts exceeds 10, the earliest logged-in account is deleted.
Editing account list
You can edit the list of logged-in accounts.- Press the button on the remote control.
- Select LG Account on the screen.
- Press on the screen and select More account information.
- Basic information about the account can be viewed by selecting Account Management under the logged-in account.Also, you can change your password or edit your account information.
Pressing Edit Account List enables you to delete the saved account.
Using a Simple Password
You can set a simple password to be entered when switching accounts.- Press the button on the remote control.
- Select LG Account on the screen.
- Press on the screen and select More account information.
- Select Account Management on the screen.You can only select the account you are logged in to for Account Management.
- Select Security Settings Edit Security Settings on the screen, and enter the password for that account.
- Select Enter Simple Password(Medium password strength) on the screen for Account Switching Methods.
- Enter the desired four-digit number, and press OK on the screen.
- You can use Enter Simple Password(Medium password strength) only when switching accounts within this device.
3.4. Notifications
[Go to table of contents]- Press the button on the remote control.
- Select on the screen.
- You can check the details by selecting the desired item.If it supports shortcuts, you can launch the app.
- Press the button on the remote control.
Mark all as read: Changes all notifications to 'Read'.
Delete: You can delete notifications.
Notification Settings: You can set whether to receive notifications for each app.If it is set to Off, any notifications previously received from the app will also be deleted.For external service apps, you can check notifications in Notification Settings after agreeing to receive notifications from the app.
User Guide: Move to the User Guide app.
- Depending on the model or region, the labeling and operation of the remote control buttons may vary.
- More Actions button: ,
If your remote control doesn't have a More Actions button, press and hold the Yellow button to execute More Actions.
- More Actions button:
3.5. About Accessibility
[Go to table of contents]Press the
button on the remote control and select Accessibility on the screen.Press and hold the
button on the Remote Control.You can display and configure Accessibility Shortcuts from any screen.For more details, please refer to the following User Guide.Path: Settings
Quick Settings Accessibility Shortcuts- Depending on the model or region, the labeling and operation of the remote control buttons may vary.
- If your remote control doesn't have a button, press and hold the
 button to execute Accessibility Shortcuts.
- If your remote control doesn't have a
Vision Features
There are settings available for enhancing screen viewing.Hearing Features
There are settings available for enhancing audio quality.Control Features
You can adjust the settings to assist with device operation.Edit Shortcuts
You can edit frequently used Accessibility settings.Learn Remote Control
Press a button on the remote control following the on-screen instructions to get information about the button.Tips
You can find tips on various features.Quick Help
You can receive assistance for diagnosing and resolving issues with the device.
You can also long-press the number 9 button of the remote control to run the Quick Help.Chatbot
You can resolve issues with the device by chatting with the Chatbot.
3.6. Using Always Ready
[Go to table of contents]Use the
 button on the remote control to turn off the device.The device will switch to Always Ready.
- To use Always Ready, you need to set Enable the function of Always Ready to On.Press the button on the remote control, then navigate to General Always Ready on the screen.Turning this option On may increase energy consumption.
Exit Always Ready and Watch The device
To watch the device when it is on Always Ready with the screen on, press the button or the button on the remote control.The Hands-free Voice Control feature can be used to command the desired function to be executed.
When the screen is off in Always Ready, you can turn on the device by pressing the
button on the Magic Remote or with Hands-free Voice Control.Press the Wheel (OK) button on the remote control to display the wallpaper when the device is Always Ready with the screen off.
- Some models do not support Hands-free Voice Control.
Using Always Ready Without Screen Wallpaper
Even when the screen is off, you can play music using voice recognition or by connecting to a mobile device via Bluetooth.Users can turn off only the screen in Always Ready using the below method.- Method 1.When the device is Always Ready with the screen on, press the button on the Magic Remote once more.
- Method 2.You can always use Always Ready with the screen off without going through the wallpaper.Press the button on the remote control, then navigate to General Always Ready on the screen.Select Use Always Ready without wallpaper(LG Gallery+) on the screen.
- The screen may take a few seconds to respond to your voice, depending on the model.
- When the power is turned off for the first time after a software update, Always Ready does not work to reflect the update contents.To use Always Ready again, turn the power off and on again.
- Some models may not be supported.
Precautions on Motion Sensor
The motion sensor is located at the bottom center of the device.- The motion sensor is only supported by certain models.
- If the motion sensor is stained with a foreign body, it may not operate properly.
- If the surrounding environment of the device is too bright or too dark, the motion sensor may not work properly.
- The presence of any obstacles in front of the device may affect the sensing capability of the motion sensor.
- The motion sensor operates by detecting changes in lighting around the device or motion of objects (pets, robot vacuums, etc.).
Press the button on the remote control, then navigate to LG Gallery+  My Content Always Ready on the screen.Adjust the sensitivity of the sensor in Motion Sensor Sensitivity.
3.7. Using the LG Gallery+
[Go to table of contents]- Press the button on the remote control.
- Select LG Gallery+ on the screen.
- Select or search for desired content on the screen.
- Try subscribing to a paid subscription service in LG Gallery+.
You can apply LG Gallery+ content to the screen saver.
- Try subscribing to a paid subscription service in LG Gallery+.
- Available settings vary depending on the model or region.
- You must sign in to your LG Account before using it.
- :You can view and change items set in LG Gallery+.
My Content
You can manage favorite or stored content.Payment Information
You can view and manage paid subscription information.Others
You can view the latest news or version of the LG Gallery+ app.
 :You can search for content in LG Gallery+.
- :Closes the app.
- Explore More Themes:You can select desired content in various ways.
Generative AI
AI images are supported within the provided credit limits.The languages available for Generative AI may change according to service policies.Music
You can play mood sound from the internal memory or music from a device connected via Bluetooth or USB.Photo
You can set a picture from a connected external device, a mobile device connected with LG ThinQ, or Google Photos as your screen wallpaper.You can use Google Photos after you link your Google account.Briefing
You can additionally display weather, game information set in Sports, connected IoT device information, TV Scheduler list, and more.
You can change the region for the displayed weather in Weather Location Setting in Location.Press the button on the remote control, then navigate to General System Location on the screen.
You can check today's schedule by linking your Google account.
3.8. Using Multi View
[Go to table of contents]- Press the button on the remote control.
- Select Multi View on the screen.
- Press
 on the screen to select the item you want to use.
Side by Side/Picture in Picture: You can select multiple apps and watch them on one screen.
Dual PC Monitor: You can view the screen input via HDMI simultaneously. - Select the desired app or input, then press Selected.
From the Recommended combinations on the screen, you can also select the most recently used app combinations or recommended combinations for Multi View.
- Depending on the model, some features may not be available.
- The HDMI input may not be displayed when the power of the device connected to HDMI is turned off.
- There may be restrictions on running Multi View in some contents.
- If the running app does not support Multi View, it recommends a combination of apps that can be run.
Using Multi View Mode
Select /
 on the screen.Switches to hear the sound on the screen that is not currently outputting sound.
Select
 on the screen.Sounds from both screens are played simultaneously, and you can adjust the sound balance.
Select
 on the screen.You can set additional options.
Change View Type
Change the Multi View mode.Add App
You can add/delete the app to use in Multi View.Change App
You can change the app to use in Multi View.Control at Full Screen
You can operate the app by switching to Full Screen.Move
You can move the position of the sub-screen.Size
You can change the size of the sub-screen.Quit App
Closes the app.Change Input
You can change the input to use for Dual PC Monitor.Quit Dual PC Monitor
Closes Dual PC Monitor.
- Depending on the model, some features may not be available.
- Available options may differ depending upon Multi View mode you are running.
Supported Resolution: Dual PC Monitor
| Resolution | Vertical Frequency (Hz) |
|---|---|
| 1024 × 768 | 60 |
| 1360 × 768 | 60 |
| 1280 × 720 | 60 50 |
| 1280 × 1024 | 60 |
| 1920 × 1080 | 60 50 |
3.9. Using Hands-free Voice Control
[Go to table of contents]When the device is on
- Say “Hi LG” within the watching distance from your device.
- The speech recognition screen appears.
- Say the feature you want.
Example) Find something to watch/Channel number OO/Turn up the volume/How is the weather today?/Voice Recognition Help, etc.
When the device is off
The device functions can be used with Hands-free Voice Control even when the device is off.Press the
button on the remote control, then navigate to General Always Ready on the screen.Set Always Ready to On.- Saying “Hi LG” to the device makes the Standby Light on the front of the device blink and produces a notification sound.
- Say the feature you want.
Example) "Turn on the device", "How's the weather today?" etc.
Precautions When Using Hands-free Voice Control
- Some models do not support this function.
- In some exceptions, the Hands-free Voice Control may not work, even if Always Ready is on.
- If a software update is in progress
- When set to the store mode
- When the device has not been turned on for over 96 hours
- When pixel cleaning is running
- To use this feature:
- You must be connected to a network.
- You must agree to the terms of use for voice recognition.
- If Hands-free Voice Control does not work, please examine the following settings.
Press the button on the remote control, then navigate to General AI Service Voice Recognition Settings on the screen.Set Use Hands-free Voice Control to On. - The microphone switch on the device must be On to use Hands-free Voice Control.
Some models may not be supported. - To operate a connected device with Hands-free Voice Control, connect the IR blaster and set the universal remote control.
- The operation may be limited depending on the country and language settings.
- When updating the device, the existing functions or operations you have used may change.
- The Hands-free Voice Control function enables the device body to recognize the user's voice.For smooth operation, use this function within 3 m (9.84 feet) of the device.
Hands-free Voice Control of Zero Connect Box model recognizes the user's voice in the Zero Connect Box.Install your Zero Connect Box in an open space for best performance. - Hands-free Voice Control will work even if you say “Hi LG” and the desired feature continuously.
Some models may not be supported. - Depending on the situation, symbols, numbers and special characters may not be recognized.
- It may be affected by the environment, such as voice tone or volume, unclear pronunciation, and ambient noise.
- When you use an external speaker connected to the device, the sound output from such an external speaker can be recognized as noise.It is recommended to use the voice recognition function with Magic Remote.
- You can change the call word for Hands-free Voice Control.
Press the button on the remote control, then navigate to General AI Service Voice Recognition Settings Set Wake-up word for Hands-free Voice Control on the screen.(The operation may be limited depending on the country and language settings.) - If the Hands-free Voice Control function activates unexpectedly, try lowering its sensitivity.
Press the button on the remote control, then navigate to General AI Service Voice Recognition Settings Set Sensitivity on the screen. - For detailed information on how to use the voice recognition feature with the remote control, please refer to the following User Guide.
Path: Smart Function Using Device Functions through Speech
3.10. Using Device Functions through Speech
[Go to table of contents]- Press and hold the button on the remote control and speak out the function you want to launch or the keyword you want to use for your search.
- Once you release the button after your speech input, the corresponding function is launched.
- Some models may not be supported.
- Menu Language must be set as the official language of the country in Location to see correct search results.If Menu Language is not set as the official language, some functions may be limited.
- You can change the voice recognition language.
Press the button on the remote control, then navigate to General System Language Menu Language on the screen. - The languages available for voice recognition features may be changed in accordance with Service Operation Policy.
- Details of service may vary by model.
- Please note that the services enabling voice commands, voice recognition and other smart features may be changed, removed or terminated, without notice, by the manufacturer or its third party providers.
- You can change voice-related settings or confirm which features can be controlled by voice commands.
Press the button on the remote control, then navigate to General AI Service Voice Recognition Settings/Voice Recognition Help on the screen.
Using your voice as your Voice ID
Register your voice to your LG Account.We can recognize you with your registered voice to provide personalized content and services.- Log in to your LG Account to register your voice.
- Press the button on the remote control.
- Enter the following path on the screen. General AI Service Voice Recognition Settings
- Select Voice ID Manage Voice ID on the screen.
- Press Register Voice ID on the screen and follow the instructions to register your voice.
- This function may not be available in some countries or models.
- The languages available for Voice ID features may be subject to change in accordance with the Service Operation Policy.
- After registering your voice with your LG Account, you must set Use Voice ID on this TV to On to use it.
- You can register a new voice, re-register, or delete one.
Press the button on the remote control, then navigate to General AI Service Voice Recognition Settings Voice ID on the screen. - With Voice ID, you don't have to enter your password when you switch accounts.
- A person with a similar voice may unlock the device, and if your voice is different due to health-related reasons, it may not be recognized.
Using the speech recognition function with the LG ThinQ app
You can use the speech recognition function by pressing on the LG ThinQ app installed on your mobile device.
To connect your mobile device to this device using the LG ThinQ app, please refer to the following User Guide.
Path: Allow New Connections
Connecting a Mobile Devices by the LG ThinQ- When using the speech recognition function through the LG ThinQ app, some functions or devices may not work.
Cautions for Speech Recognition
- To use this feature:
- You must use the Magic Remote.
- You must be connected to a network.
- You must agree to the terms of use for voice recognition.
- You must set the channels, region, etc.The configurable items differ depending upon model.
- To control a set-top box connected to the device using voice recognition, you need to set up the universal remote.Press the button on the remote control, then navigate to General External Devices Universal Control Settings on the screen.
It is recommended to point the Magic Remote toward the set top box after the voice input. - The rate of speech recognition may vary depending on the characteristics of the user (voice volume, pronunciation, accent, and talking speed) and the surroundings (noise and device volume).
To achieve accurate recognition of your speech, you must pronounce words in a slow and accurate manner at an appropriate voice volume at a distance of about 10 cm (4 inches) away from the Magic Remote's microphone. - If your speech is not recognized properly, speech recognition may operate differently than you originally intended.
- Depending on the model or region, the labeling and operation of the remote control buttons may vary.
- Voice recognition button:
 ,
- Voice recognition button:
3.11. Speech to Text
[Go to table of contents]- Tap the text input field on the screen with the Magic Remote pointer.The keyboard will be displayed.
- Select the key on the screen keyboard.The voice recognition function activation guide will be displayed.
- Speak slowly and clearly into the remote control microphone.If there are words similar to that which you spoke out loud, you may see a list of multiple results on the screen.Select a result and it will be displayed on the text box.If you do not get the results you want, press RETRY.
- Some models may not be supported.
- To use this feature:
- You must be connected to a network.
- You must agree to the terms of use for voice recognition.
- You can change the voice recognition language.
Press the button on the remote control, then navigate to General System Language Menu Language on the screen.
To temporarily switch to another speech recognition language, press the button in the voice recognition information display window. - The rate of speech recognition may vary depending on the characteristics of the user (voice volume, pronunciation, accent, and talking speed) and the surroundings (noise and device volume).
- To improve the accuracy of Speech to Text, you must speak clearly and loudly about 10 cm (4 inches) from the Magic Remote microphone.
- Voice recognition is unavailable in any password input field and the address bar of your Web Browser (excludes general search).
3.12. How to use Alexa on the device
[Go to table of contents] (Alexa) button on your Magic Remote.During setup you will log into your Alexa account, do a quick test command to make sure Alexa works and you'll be ready to go.
To use Alexa, press and hold the
(Alexa) button on your Magic Remote.Once the blue animation appears at the bottom of your screen, say a command such as “Alexa, open Prime Video.”Press the
(Alexa) button on your Magic Remote once (without holding) to access the Alexa App on your device.here you'll find more ways to use Alexa as well as setting features such as turning on the Hands-Free option (if available).- Alexa is not available in all languages and countries.
- Alexa features and functionality may vary by location.
4. Apps and Content
[Go to table of contents]4.1. Using Home Office
[Go to table of contents] button on the remote control and launch Home Office on the screen.The PC can be remotely operated from the device.
- Turn on the power of the PC to which you wish to connect.
- Press the button on the remote control and launch Home Office on the screen.
- Select Add Remote PC.A new PC can be connected.
- The PC to be connected must be powered on, and 'Enable Remote Desktop' must be turned on in the PC settings.
- Up to four devices can be connected to Add Remote PC.To add another PC, delete the previously registered PC.
- You can connect only Windows 10 Professional or later or Mac operating systems.
A Windows user name and password must be set.Login via PIN input is not supported. - Before connecting a Mac, ensure the Mac is turned on and Screen Sharing is activated in Mac Settings Sharing.
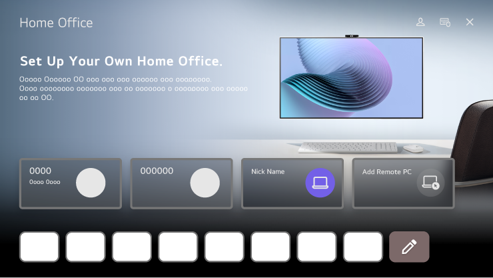

You can either use the cloud PC services or switch to a connected PC.: You can edit the connection information.: You can delete the connected PC.
Add Remote PC: A new PC can be connected.
You can use the Internet service provided by the PC on the device.
Available features may vary depending on the country.
Selecting on the screen enables you to edit the list.- : Launch LG Account.
For each logged-in account, you can configure a list of remote PCs and Internet services to connect.  : You can connect a Bluetooth keyboard or mouse and set whether to use the connected device.
For more details, please refer to the following User Guide.
Path: Settings External Devices Connect Bluetooth Controller- : Closes the app.
- Connecting a keyboard and mouse to the device enables smooth operation.
If the keyboard layout of the keyboard connected to the PC and the keyboard connected to the device are different, certain keys may not work. - Both the device and PC can be connected only after network connection and settings are set.
- If the device and PC are not connected to the same network, public IP information is required, and port forwarding settings of the router may be required.
- If the connection is restricted by the PC security policy, contact the network security manager.
- Some features or programs of the PC cannot be used.
- When the power-saving function of the PC is activated, the connection is lost and cannot be reconnected.We recommend disabling the PC power-saving function before use.
4.2. Enjoying Games
[Go to table of contents]- Press the button on the remote control.
- Select Games on the screen.
- This function may not be available in some countries or models.
- It is recommended that you use a gamepad that has been tested for compatibility with this devices.
To view the list of compatible Bluetooth game controllers, please refer to the following User Guide.
Path: Settings External Devices Connect Bluetooth Controller
To view the list of compatible USB game controllers, please refer to the following User Guide.
Path: Allow New Connections Connecting a Keyboard, a Mouse and a Gamepad
4.3. Enjoying Music
[Go to table of contents]- Press the button on the remote control.
- Select Music on the screen.
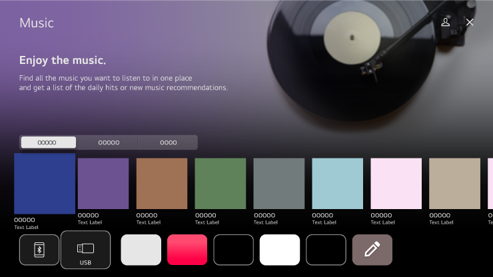

Select the desired service.The content provided by the service is shown below.
Select Recently played on the screen.Previously selected music is displayed in a list.If the number of items exceeds 16, the oldest are automatically deleted in order.
You can listen to music from a connected USB or mobile device.Selecting the desired item will navigate to the corresponding app.
Displays music apps available on the device.Selecting the desired item will navigate to the corresponding app.
Selecting on the screen enables you to edit the list.- : Launch LG Account.
- : Closes the app.
- This feature may not be available in some countries.
- You must connect to the network to use the Music feature.
- Available features vary depending on the region or service.
- Recommendations or search results may differ from those on a PC or mobile device.
4.4. Using the Sports Service
[Go to table of contents]- Press the button on the remote control.
- Select a Sports card.
- You can view the list of teams by league and detailed information.
Selecting the desired sports league enables you to check information about that league. - Press My Team to register your preferred team or player.
Registering a team or player enables you to check live match updates and upcoming match schedules in My Team.
- : Launch LG Account.
For more details, please refer to the following User Guide.
Path: Smart Function Managing Your LG Account - Select on the screen.
Update Games
You can receive real-time sports updates.Notification Function
You can enable or disable sports notifications.User Guide
Launch User Guide.Quick Guide
Move to the sports main screen and display the Quick Guide.Quit App
Closes the app.
- : Closes the app.
- Some models may not be supported.
- The configurable items differ depending upon model.
- To use the Sports feature, you need to connect to the network and log in to your LG Account.
- The match schedule or status may differ from actual ones depending on the circumstances of the data provider.
- Real-time alarm may not be available when using certain apps.
Changing Notifications Settings for Individual Teams or Players
You can receive notifications about the matches of the teams or players you have registered in My Team even while watching a match.- In My Team, select the team or player you wish to change.
- In the detailed page, select Notification Settings.
Game Start Notification
Notifies the start of matches for the registered team or player.Real-time Score Notification
Notifies the score changes in matches in which the registered team or player participated.- The frequency of notifications may vary depending on the sport.
Game Result Notification
Notifies the match results of the registered team or player.
- To turn off notifications for all Sports, press the button on the remote control from the Sports homepage, and set Notification Function to Off.
- Depending on the model or region, the labeling and operation of the remote control buttons may vary.
- More Actions button: ,
If your remote control doesn't have a More Actions button, press and hold the Yellow button to execute More Actions.
- More Actions button:
4.5. Using the Learning Service
[Go to table of contents]- Press the button on the remote control.
- Select Learning on the screen.
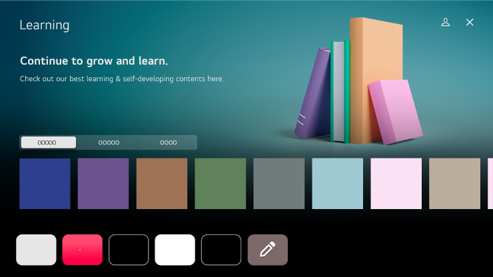
Select the desired service.The content provided by the service is shown below.
Select Recently watched on the screen.The previously selected items are listed.If the number of items exceeds 16, the oldest are automatically deleted in order.
You can run an app related to education.Selecting on the screen enables you to edit the list.- : Launch LG Account.
- : Closes the app.
- You must connect to the network to use the Learning service.
- This function may not be available in some countries or models.
- Available features vary depending on the region or service.
- Recommendations or search results may differ from those on a PC or mobile device.
4.6. Using the New and Hot
[Go to table of contents]- Press the button on the remote control.
- Select New and Hot on the screen.
- You can check trailers and related information for upcoming releases on various OTT (Over-the-top) platforms.After selecting the content you're interested in, select Reminder to receive a notification when it's released.
- Select on the screen.
Reminder List
Show the list of content with notifications enabled.Selecting a released title will launch the corresponding OTT app for immediate streaming.Select Delete Mode on the screen to cancel notification settings.User Guide
Launch User Guide.Quit App
Closes the app.
- This function may not be available in some countries or models.
- A separate subscription is required to watch the content on specific OTT services.
4.7. Using the Web Browser
[Go to table of contents]If you input the search word, it will find the information about search word based on the search engine.
- Press the button on the remote control.
- Run the Web Browser application.
- Enter the website address in the address bar at the top of the screen to navigate, or directly enter a search term.View any previously opened tabs by pressing the number next to the address bar.
 : You can refresh the web page you are viewing.
 : You can manage your download history.Display when downloads are in progress or when downloaded files exist.
- Select on the screen.You can zoom in or out on the screen while browsing the website.
- The configurable items differ depending upon model.
Block Ads
You can block ads within the web page you are viewing.
It is only displayed when Settings Use Block Ads is set to On on the screen.Multi View/TV View
Splits the device screen to display. You can browse web pages while watching this device.Open New Secret Tab
You can browse websites privately as it does not save the web browser history.History
You can view and delete the website visit history.Add to bookmarks
You can add the website you are currently viewing to your Favorites.Add shortcut to the Home screen
You can add the website you are currently viewing as a shortcut to your Home.Add to Home Office Shortcut
You can add the website you are currently viewing as a shortcut to Home Office.Bookmarks
You can view and delete the list of websites you have added to your Favorites.Settings
You can change the web browser settings.Send Feedback
Please send feedback about any difficulties/inconveniences you have experienced while using the web browser, which will help us improve our service.User Guide
Launch User Guide.Quit App
Turns off the app from running in the background.
- : Closes the app.
- The Web Browser app is a browser for this device, so it may work differently than the browser for your PC.
- Some contents may not be played properly.
- Flash Plug-in is not supported, and only HTML5 media is supported.
- Plug-in installation is not supported.
- Media in formats other than JPEG/PNG/GIF may not be played.
- Apps may be forced to shut down if the device runs out of memory.
- The fonts provided on the device are used. Depending on the content, characters may look different from PC or mobile browsers.
- Only files that can be played by Media Player can be saved.
- Caution is required because malicious or phishing sites are not automatically blocked.
- Some functions of Web Browser may not be supported temporarily due to external factors.
- The USB storage device must be connected to download files.
- The website can be accessed through the Web Browser app, so care needs to be taken about children's access to harmful online contents.
You can lock the Web Browser app to prevent access to harmful online contents.
Press the button on the remote control, then navigate to General System Safety Application Locks on the screen. - If you encounter issues while using Web Browser, please refer to the following User Guide.
Path: Troubleshooting Troubleshooting Internet Browser Issues
Changing Web Browser Settings
Select Settings at the top of the Web Browser app.- The configurable items differ depending upon model.
On Startup
You can choose the page that appears when you start the Web Browser app.Search Engines
You can select a search engine to search for when entering a keyword in the address bar.- Search engine settings may be subject to change without notice based on the supplier's circumstances.
Show Recommended Sites
You can set whether or not to display a list of Recommended Sites on the new tab screen.Always Show Address Bar
When set to On, the address bar and menu bar area at the top will always be displayed.Automatic Web Browser Issue Report
When it is set to On, if a failure (malfunction, media playback failure, page loading failure, abnormal shutdown, delay in response due to insufficient memory, etc.) occurs while using the web browser, the information is automatically sent to the web browser development team at the manufacturer's headquarters (Korea).The submitted information will only be used to improve the Web Browser performance.Use Block Ads
When it is set to On, if you press the at the top of Web Browser, a button to turn on or off Use Block Ads will appear on the screen.Turning on the Use Block Ads feature speeds up page loading by blocking ads included in the website.Site Filtering
You can register websites to block or allow.- Approved Sites: You can configure the settings to open the previously registered web pages only.
- Blocked Sites: You can configure the settings to block specific websites.
- To use the Site Filtering function, you should enter the device password.
Pop-up Blocker
Blocks pop-ups that are automatically displayed by web pages.Do Not Track
You can request to not leave a history of your visit on the website. The operation may vary depending on the policy of the website.Adaptive Streaming using JavaScript
The media streaming technology using JavaScript allows you to view video with optimized resolution.
If this is set to Off, the resolution of the videos played in Web Browser is limited to 720p.Cookies Settings
Enables the website to store and use cookie data.Clear Browsing Data
- Clear Cookies: Deletes cookie data. When deleted, you are logged out of most sites.
- Clear All Browsing Data: Deletes all browsing history, including cookies.
4.8. Using the Media Player
[Go to table of contents]- Press the button on the remote control.
- Launch the Media Player app on the screen.
- Select a device to use from the device list.
- Select the content to play.
 : Move to the music playback screen.
Displayed only when music is playing.- : Launch Search.
- Select on the screen.
View Type: Selects a content display mode.
Sort: Select the option to sort content.
Group: If you filter by Music, you can group content into categories such as Artist and Album.
Selection Play: You can select and play multiple pieces of content.
Delete: You can select and delete multiple pieces of content.
User Guide: Move to the User Guide app.
Quit App: Closes the app. - : Closes the app.
- You cannot delete files that are shared from other devices.
- Different settings items are available depending on the filtering or model you selected.
- Certain content may not be displayed on the list if the number of all content exceeds 40,000.
Viewing Photos
You can select a photo from the Media Player app and view the photo.To use more features, press the Wheel (OK) button on the remote control and select
 on the screen.
 : Shows the previous content.
 : Starts the slide show.
 : Shows the next content.
 : Rotates photos.
 : Enlarges or reduces the photo.
 : 360-degree photos can be viewed in 360 degrees.
- Using the 360° VR Play on a normal photo may distort the image.
- Some models may not be supported.
 : Plays a music file selected from the storage device as background music.
- : Sets the photo size or changes the speed or effects for the slideshow.
- Some models may not be supported.
Playing Videos
You can select a video from the Media Player app and play the video.Pressing the
/ buttons on the remote control allows you to skip backward/forward 10 seconds.To use more features, press the Wheel (OK) button on the remote control and select
on the screen.- : Shows the previous video.
- : Plays or pauses the video.
- : Shows the next video.
 : You can change subtitle settings.
- : Rotates videos.
 : Fast-rewinds the video at higher speeds.
 : You can do the settings related to play on repeat of the video.
 : Fast-forwards the video at higher speeds.
- : 360-degree videos can be viewed in 360 degrees.
- Using the 360° VR Play on a normal video may distort the image.
- Some models may not be supported.
- Select on the screen.
Resume Play: You can set continue watching to resume playing from the last viewed scene.
Play Speed: Sets the playback speed.
Audio Track: You can set audio tracks.
Show the progress bar when the video starts: You can set to hide the playback bar when you start playing the video.
Listening to Music
You can select a song from the Media Player app and play the song.To use more features, press the Wheel (OK) button on the remote control and select
on the screen. : You can set the random play mode.
- : You can set the repeat play mode.
 : Lyrics are available for music files that provide them.
In some music files, you can choose a lyric section and move the playback position.- The lyrics feature is only supported on some devices.
- The lyrics may not be displayed in sync depending on the lyrics data in the music file.
 : You can listen to music with the screen turned off.
- Select on the screen.
Lyrics Sync: You can set the lyric speed.- This feature may not be supported depending on the music.
4.9. Installing Apps
[Go to table of contents]- Press the button on the remote control.
- Select Apps on the screen.
- Select a category or press the on the screen to search for an app.
- Select an app to install.
- Read the details of the app and then press Install.
- When the installation is complete, you can run the app immediately.
- : Searches for content.
For more details, please refer to the following User Guide.
Path: Apps and Content Content Search - : You can log in to your LG account.
For more details, please refer to the following User Guide.
Path: Smart Function Managing Your LG Account - : You can manage apps, such as updating or deleting installed apps.
- : Closes the app.
- In order to install apps, you must be logged in.
- Available categories may vary depending on the country or service status.
- If the storage on your device is insufficient, you can install the apps by connecting an external memory device.
- Some USB storage devices may not be supported or may not work properly.
- USB stick containing apps from other devices may not be used.
- Exercise caution when in used by children. Children may have access to inappropriate online content through this product.You can block inappropriate online content by restricting access to some apps.
Press the button on the remote control, then navigate to General System Safety Application Locks on the screen. - Depending on the model or region, the labeling and operation of the remote control buttons may vary.
- More Actions button: ,
If your remote control doesn't have a More Actions button, press and hold the Yellow button to execute More Actions.
- More Actions button:
4.10. Content Search
[Go to table of contents]- Press the button on the remote control.
- Select on the screen.
- Search for a variety of content and information using the desired search terms.
You can also search by selecting recommended search terms or genres on the screen.
When any search history is available, recent searches appear below the search box.
- You must connect to the network to use the search feature.
- Search results may vary depending on the channel, region, network settings, and whether you have agreed to the terms and conditions.
The configurable items differ depending upon model.
5. Allow New Connections
[Go to table of contents]5.1. Using Home Hub
[Go to table of contents]Press the
button on the remote control.Entering into the Home Hub.If your remote control doesn't have a
button, press and hold the button to execute Home Hub.- TV / Inputs: You can select broadcasts or external devices connected to the external input port.
- Mobile: You can share the screen of your mobile device or enjoy its content by connecting the mobile device.
Select AirPlay on the screen.Use Apple Home, AirPlay to control your device and watch content from your iPad or Mac on the screen.
Select Google Cast on the screen.You can receive and watch content like movies, broadcast programs, photos, and websites on any device that supports Google Cast transfer, such as a smartphone or tablet PC.- This feature may not be available in some countries.
- The content and services available by connecting Apple Home and AirPlay are subject to change without notice.
- If the Wi-Fi router connected to the device is set to DFS channels (channels 52-144), it may not connect.
- All devices to be connected via Google Cast must be connected to the same network.
- Sound Out & Peripheral devices: The currently selected output speaker is displayed, and you can navigate to the output speaker settings screen.
You can select connected Bluetooth devices, USB storage devices, network server devices, and cameras. - Smart Ways to Use Home Hub: You can check the connection guide for each type of Home IoT Devices.You can connect and see devices registered with your LG ThinQ account or IoT devices.
You can learn how to set up LG Hub for Matter device control.- Matter is a global communication standard that allows smart home devices from different manufacturers to work together in one app.
- : Launch LG Account.
- Select on the screen.
Edit Inputs: You can edit the name of the connected device or apply the related settings.
Universal Control Settings: Move to the Universal Control Settings app.
Edit LG ThinQ Home: Select which home to display from the ones configured in the LG ThinQ app on your mobile device.
Google Home Settings: Navigate to Google Home Settings provided by Google.
Edit List: You can hide or show the connected Home IoT Devices and rearrange the list.
Delete devices: You can delete the connected device.You can only delete certain devices from this device.
Notification: You can turn on or off the notifications on the connected device.
Show Connectable IoT Devices: Shows devices that are available for connection on the screen.
User Guide: Move to the User Guide app.
Quit App: Closes the app. - : Closes the app.
- Available settings vary depending on the model or region.
Connecting Home IoT Devices
You can check and control the status of the connected Home IoT Devices.- Install the LG ThinQ app on your mobile device.
- Log in to your LG ThinQ account, and register your own LG ThinQ device.
- Press the button on the remote control.Entering into the Home Hub.
If your remote control doesn't have a button, press and hold the button to execute Home Hub. - Select on the screen.
- Log in to your LG ThinQ account. A list of the registered LG ThinQ devices will appear.
The tabs are categorized by the connected IoT device services.By selecting each tab, you can view the status information of connected IoT devices and perform relevant operations.
- Available settings vary depending on the model or region.
- If you are in an area where the LG ThinQ app is not in service, LG ThinQ device connection will not be supported.
- Select the IoT tab to register your IoT devices.Select the IoT connection guide displayed on the screen and follow the instructions for connecting IoT devices.
- If you are controlling the external device from your mobile app, you might not be able to control the device from this device. Quit the mobile app to control it from this device.
- IoT devices that can be connected to this device are subject to change without notice.
- Connectable LG ThinQ devices and supported functions may differ from those of mobile devices.
5.2. Connecting a Keyboard, a Mouse and a Gamepad
[Go to table of contents]You can play gamepad-only games by connecting a gamepad.
Connecting to a USB port with a cable or wirelessly
Connect your mouse, keyboard, or gamepad to a USB port.- It is recommended that you use a gamepad that has been tested for compatibility with this devices.
Sony DualShock 4, Sony DualShock 3, Sony DualSense Controller, Sony DualSense Edge Controller, Microsoft Xbox 360 Controller, Microsoft Xbox Adaptive Controller, NVIDIA SHIELD Controller, Logitech F310, Logitech F710, Amazon Luna Controller, Shaks S3b, Shaks S2b, Nintendo Switch Pro Controller, MOGA XP5-X Plus Controller, Joytron CYVOX DX Controller, SteelSeries Stratus+ Controller - The connection may be lost or slowed depending on the distance and wireless environment.
- Keyboard input may be limited on some screens.
- You can change the input language by pressing the language switch key or the right Alt key, And also can change by pressing the Ctrl key and the Space key at same time.
- To enter text in the text field, use the on-screen keyboard or a USB keyboard.
- Right-click with the mouse.Buttons for navigating to Home or Previous Screen are displayed on the screen.
The functions accessible via right-click may be subject to change.
This feature may not work with certain apps. - You can use the connected gamepad buttons as the remote control buttons.The button's name or operation may differ based on the gamepad model.
Logo Button: Launch Games.
Left Stick: You can move in all four directions.
Right Stick: You can change the volume or channel.
A Button: Selects the corresponding item.
B Button: Returns to the previous screen.
Connecting via Bluetooth
You can connect and use input devices such as a Bluetooth-enabled keyboard, mouse, or gamepad.For more details, please refer to the following User Guide.Path: Settings
External Devices Connect Bluetooth Controller5.3. Using a USB Input Microphone
[Go to table of contents]5.4. Connecting a Mobile Devices by the LG ThinQ
[Go to table of contents]Connecting Your Mobile Device to a product Using the LG ThinQ App
- Download the LG ThinQ app from the app store of your mobile device.
- Connect the device and mobile device to the same network.
- Run the LG ThinQ app installed on your mobile device.
- Follow the instructions on the LG ThinQ app to connect your mobile device.
- When your account information of LG ThinQ is linked to the device, you can manage the IoT devices linked to your account using Home Hub.
- Voice commands can also be made through Smart Speaker linked to the account in the settings of the LG ThinQ app.
- The service may not offer depending on country.
Controlling Your device with the LG ThinQ App
You can tap the buttons on your mobile device's screen to control this device.- Some controls may be limited in external input mode.
- The app's screen and functionality are subject to change without prior notice.
- Available features may differ depending on your country and OS.
Using the Camera of a Connected Mobile Device on the Device
You can use the camera of a mobile device connected with LG ThinQ on the device.- For a reliable connection always keep the connected device to this device updated to the latest OS version.
- Depending on the model or manufacturer of the mobile device, the camera may not be connected.
- Connect the device to a 5 GHz router because the performance may be affected by your wireless environment.
- The response rate may vary depending upon the user's environment.
- If the connection fails repeatedly, turn off the product and the device you are trying to connect. Then turn them back on and try again.
5.5. Connecting a Mobile Devices by Tagging NFC
[Go to table of contents]By bringing a mobile device near the NFC embedded in the remote control, you can install the LG ThinQ app and connect the device.
- Turn on NFC in the settings of the mobile device.
To use NFC with Android devices, set the NFC option to enable read/write tags in the settings of the mobile device.
The NFC settings may vary depending on the device. - Turn on the mobile device screen and place it near the
 on the remote control.
The maximum distance for NFC tagging is about 1 cm (0.39 inches). - Follow the instructions to install the LG ThinQ app on your mobile device.
- Tag your mobile device to the remote control again.You can enjoy the contents of the mobile device or connect it to the screen through the LG ThinQ app.
- Some countries do not support LG ThinQ app installation with NFC tags.In this case, download the LG ThinQ app from each app store.
- This feature is available for NFC-enabled mobile devices only.
- Depending on the mobile device, the NFC location may be different.For more information, refer to the user manual of the device.
- Features connected via NFC may differ depending on the mobile device.
- This feature is only available if the remote control has an NFC logo.
- Some remote controls have on the back of the remote.
5.6. Mirroring the Screen of a Mobile Device
[Go to table of contents]- Enable Screen Share mode on the mobile device.
- Your device will be displayed in the list of available devices.
- Select your device and request connection.
- Select Accept in the connection request popup window.
- When the connection is complete, the screen of the connected device appears.
- When you connect Screen Share for the first time, a popup will appear which allows you to select Accept, Decline or Block.
- Accept: You can connect the device.No connection popup will appear from the second time.
- Decline: Do not connect the device.If you try to connect again, the popup will appear.
- Block: Do not connect the device.Even if you try to connect again, the popup will not appear and the connection will not work.
You can unblock it by pressing Delete Connection History.Press the button on the remote control, then navigate to General External Devices on the screen.
- For a reliable connection always keep the connected device to this device updated to the latest OS version.
- Depending on the model or manufacturer of the mobile device, the Screen Share feature may not be supported.
- iPad, iPhone, Mac, etc. can be connected through AirPlay.For more details, please refer to the following User Guide.
Path: Allow New Connections Using Home Hub - Connect the device to a 5 GHz router because the performance may be affected by your wireless environment.
- The response rate may vary depending upon the user's environment.
- It differs among devices. When trying to connect to a device, refer to the device's User's Guide for more information.
- If the connection fails repeatedly, turn off the product and the device you are trying to connect. Then turn them back on and try again.
5.7. Playing Sound from a Mobile Device through the Internal Speakers
[Go to table of contents]- Turn the mobile device's Bluetooth on, then select this device from the list of devices.
- This device will be connected to the mobile device.
- The device may not be found in the list of mobile devices while performing operations such as searching for a broadcast channel or setting up a Bluetooth speaker.
The configurable items differ depending upon model. - If you connect a mobile device to the device via Bluetooth and listen to the sound of the mobile device through the internal speaker, the device may not be connected to any other mobile device.
5.8. Connecting a Camera
[Go to table of contents]- Press the button on the remote control.
- Select Camera on the screen.
- Select the camera you want to use from the connected cameras.
- You can connect USB cameras to the USB input port and use them immediately by selecting Open Camera.
- You can use a mobile device's the camera connected via LG ThinQ on the device.For more details, please refer to the following User Guide.
Path: Allow New Connections Connecting a Mobile Devices by the LG ThinQ
- Select the app to use as a camera.
Available apps and services may vary by country.
- Select on the screen.
User Guide: Move to the User Guide app.
Quit App: Closes the app. - : Closes the app.
- Depending on the model, some features may not be available.
- For a detailed description of the camera's functions, refer to the device's manual.
- The camera must be purchased separately.
It is recommended that you use a product that has been tested for compatibility with this devices.Compatible cameras may change without prior notice.
Amcrest : AWC496, AWC195-B
Logitech : BRIO, C920, C920c, C920e, C920s, C920x, C922 Pro, C922x, C925e, C930c, C930e
LG Smart Cam - Depending on the installation status of the device, the camera may not be mounted on the device.
- USB storage device may not work or function properly when a USB hub or extension cable is used.
Set Screen Position Automatically
- Press the Wheel (OK) button on the remote control while using the camera.
- Set Set Screen Position Automatically to On.Adjust the camera to automatically center a person or object that is recognized as a face on the screen.
When set to Off, you can manually set the composition of the camera screen.In this case, the connected camera must support PTZ (Pan-Tilt-Zoom) functionality.
- Recognizes up to six people.
- It may be recognized as a face, even if it is not a person.
- If the distance between the camera and the subject is too far, face recognition may not work.
Video Conferencing
You can have a video conference using an Internet website or an app that enables video conferences.- This function may not be available in some countries or models.
- Internet connection is required to use this feature.
- Depending on camera performance or the network environment, the image quality may not be clear.
- You can check video conference sites or apps in the Internet service list of Home Office.Depending on the circumstances of the service provider, the use of the video conferencing site or app may be subject to suspension or change.
Making the Most of Multi View
By pressing Multi View, you can run the video screen or broadcast screen, and camera simultaneously.Press the button on the remote control, then select Multi View on the screen.For more details, please refer to the following User Guide.
Path: Smart Function
Using Multi View- This feature is available only on models that support the Multi View feature.
- Depending on the model, some features may not be available.
5.9. Connecting Exercise Equipment
[Go to table of contents]- Turn on and use FTMS (Fitness Machine Service)-compatible exercise equipment near the device.
- When exercise equipment is detected via Bluetooth, a connection popup will appear on the device screen.
- Connect: Connect the exercise equipment to the device.
- Cancel: Do not connect the exercise equipment.To connect later, turn the device off and on again, or switch your LG Account.
- Don't Show: Do not show the exercise equipment connection popup again.To connect later, you must delete the connection history.
Press the button on the remote control, then select General External Devices Delete Connection History on the screen.
- When you connect the exercise equipment, a workout information window appears on the screen.
- Some exercise equipment may not support the connection or may provide inaccurate workout information.
- Workout information may not be displayed in some apps.Switch to another app to view workout information.
 : You can move the workout information window up, down, left, and right.
- : You can change the workout information displayed.
 : You can watch related workout videos.
- It may not be supported depending on the app you are using.
 : You can operate the screen below the workout information window.
- : Ends the workout.
5.10. Connecting USB Storage Devices
[Go to table of contents]Tips for Using a USB Storage Device
- A USB storage device that has a built-in automatic recognition program or uses its own driver might not be recognizable.
- Some USB storage devices may not be supported or may not work properly.
- If you use a USB extension cable, the USB storage device may not be recognized or may not work properly.
- Please use only USB storage devices formatted with the FAT32, exFAT or NTFS file system provided by Windows OS.
- It is recommended that you use an external USB HDD with a rated voltage of 5V or less and a rated current of 500 mA or less.If you use a device requiring a higher voltage/current than the rated voltage/current, it may not operate properly due to lack of current.
- It is recommended that you use a USB hub or USB storage device with a power supply.
- If a USB HDD with power-saving function does not work turn the hard drive off and on again to make it work properly. For more information about the USB HDD, see the Owner's manual.
- Data on a USB storage device may be damaged. It is recommended that you back up any important files. Users are responsible for data management. The manufacturer bears no responsibility.
- Press the button on the remote control.Entering into the Home Hub.Select the USB storage device you want to remove from Home Hub.Press Eject to remove the USB storage device. If you disconnect the USB storage device without selecting Eject, an error may occur in this device or storage device.
- When you connect a USB storage device of a file system not supported by this device to the USB port, the format message appears.To use the connected USB storage device, you should format the device first.
Formatting deletes all data stored on the USB storage device, and the device is formatted with the FAT32, exFAT or NTFS file system. - Press the button on the remote control.Entering into the Home Hub.Select the connected USB from Home Hub and select Format to format the USB storage device.
- When connecting a USB storage device, a random file/folder can be created to provide services such as the saving and retrieving of thumbnail images.
- Depending on the model or region, the labeling and operation of the remote control buttons may vary.
- If your remote control doesn't have a button, press and hold the button to execute Home Hub.
- If your remote control doesn't have a
5.11. Sharing PC Content
[Go to table of contents]Browse the content on your PC to watch on the screen (Windows 10/Windows 11)
- Connect your device and PC to the same network.
- Right-click the file you want to play and select “Cast to Device”.
- Select the name of the device you want to watch from the displayed list, and playback will start on that device.
- Even when multiple devices are connected, the selected file is played through only one device. The playback rate may vary depending on the network connection.
- To play on other operating systems or devices, refer to the manual of the operating system/device.
Browse and watch the content stored on the PC using the device (Windows 10/Windows 11)
- Connect your device and PC to the same network.
- Open the “Start” menu on your PC screen, search for “media streaming options” and then select the result that appears.
- Select the “Turn on media streaming” button in the window that opens.
- Allow all of the “media streaming options”.
- Select “OK” to save the settings.
- Select the connected PC in the Home Hub app on the device, and then select and play the file you want.
- To play on other operating systems or devices, refer to the manual of the operating system/device.
Matters That Require Special Attention during Content Share
- Check your network settings if the Content Share option does not work properly.
- Connect the device to a 5 GHz router because the performance may be affected by your wireless environment.
- May not work properly depending on the network environment.
- If multiple devices are connected to one device, the content may not be played properly depending upon server performance.
- To watch a 1080p video through the content sharing function, a router using the 5 GHz frequency is required.If you use the existing 2.4 GHz router, the video may be laggy or not play properly.
- The Content Share function may not be supported for a router that does not support multi-cast. For more information, refer to the user guide that came with your router or contact the manufacturer.
- Captions are only supported on some connected devices.
- If you have added a caption file afterward, disable the shared folder on the PC and then enable it again.
- The DRM files in the connected device will not play.
- Even for the file format supported by this device, the supported file format may differ depending on the connected device environment.
- If there are too many folders or files in a folder, it may not work properly.
- The information on the file imported from the connected device may not be displayed correctly.
- Depending upon the encoding, some streams may not play in Content Sharing mode.
5.12. Mirroring PC Screen
[Go to table of contents]Connect Wireless (Windows 10/Windows 11)
- Click the Notification Center icon on the taskbar on the PC screen and select Connect.
- Select the device you want to connect to and request the connection.
- After the connection is established, the device will display the screen of the connected PC.
- For a reliable connection always keep the connected device to this device updated to the latest OS version.
- It is recommended that you use this function at close range.
- Start Screen Share faster by having your mobile device or PC connected to the same network as this device.
- Though it can be connected without a wireless router, connecting your device to a 5 GHz router is recommended because the performance can be affected by the surrounding wireless environment.
- The response rate may vary depending upon the user's environment.
- It's different from Windows version. For more information on the device you want to connect to, refer to its user guide.
- If the connection fails repeatedly, turn off the product and the device you are trying to connect. Then turn them back on and try again.
- You can also connect to your PC wirelessly from the Chrome browser or AirPlay.For more information, refer to the user manual of the device.
Connect Wired
- Connect your PC to the device using an HDMI cable.
- Press the button on the remote control.
- Select Home Hub on the screen.
- Switch the current input source to the port where the HDMI cable is connected.
- After the connection is established, the device will display the screen of the connected PC.
- If you encounter connection issues, please refer to the following User Guide.
Path: Troubleshooting Troubleshooting Device Connection Issues
6. Settings
[Go to table of contents]6.1. Quick Settings
[Go to table of contents]6.1.1. Accessibility Shortcuts
[Go to table of contents]Press and hold the
button on the Remote Control.You can also run Accessibility Shortcuts by pressing the
button on the remote control and selecting  on the screen.
- Depending on the model or region, the labeling and operation of the remote control buttons may vary.
- If your remote control doesn't have a button, press and hold the button to execute Accessibility Shortcuts.
- If your remote control doesn't have a
Edit Shortcuts
You can customize Accessibility Shortcuts to group together your most frequently used Accessibility features.Go to the Accessibility app
Move to the Accessibility app.
6.1.2. To Use Setting Function Quickly
[Go to table of contents] button on the remote control.You can quickly and easily use frequently used settings or functions.
Select
on the screen.You can add/delete items in Quick Settings and change the order.- : You can set more options.
You can also long-press button of the remote control to run the All settings directly.  : You can resolve issues with the device by chatting with the Chatbot.
- : Displays the Accessibility Shortcuts.
 : Directs to the Network settings.
- Recent History: The most recently selected item in Quick Settings is displayed.
- The configurable items differ depending upon model.
6.1.3. Game Dashboard
[Go to table of contents]Press the
button on the remote control.- Dark Room Mode: You can adjust the brightness of the entire screen to reduce eye strain in a dark environment or when watching for a long time to make the screen easier to watch.
- Multi View: You can split the screen and use two apps simultaneously.
There may be restrictions on running Multi View in some contents. - Menu Color: You can change the color of the menu.
- Game Optimizer: Directs to the Game Optimizer settings.
For more details, please refer to the following User Guide.
Path: Settings Game Optimizer - All Settings: You can set more options.You can also long-press button of the remote control to run the All settings directly.
 : Launch User Guide.
- : The order of the items displayed on the Game Dashboard can be changed or replaced with other items.
- The configurable items differ depending upon model.
- When you connect a game console and run a game, General Game Optimizer is changed to On, and Picture / Sound Select Mode is changed to Game Optimizer.If Game Dashboard does not display, please check each setting.
6.2. Picture
[Go to table of contents]6.2.1. Select Mode
[Go to table of contents]- Press the button on the remote control.
- Enter the following path on the screen. Picture Select Mode
Personalized Picture
Using artificial intelligence deep learning technology, it analyzes and sets the optimal picture quality based on user preferences.Vivid
Sharpens the image by increasing the contrast, brightness and sharpness.Standard
Displays the picture with natural contrast, brightness and sharpness levels.
If you select this during an HDR signal, a screen that can adequately show the expressiveness and brightness of HDR images is displayed in a normal viewing environment.Auto Power Save
Auto Power Save mode reduces power consumption by using dimming control.Cinema Home
The screen appears brighter and clearer than that of the Cinema screen.Cinema
Suitable picture for movies.
If you select this during an HDR signal, a screen optimized for HDR video signals is displayed.Sports/Soccer/Cricket
Suitable picture for sports games. Sharpens the image of rapid movements such as kicking or throwing a ball.- The name of the sport may differ depending on region.
Game Optimizer
Suitable picture for gameplay.FILMMAKER MODE
Provides optimized Cinema Picture quality certified by UHD Alliance, the standard setting body for UHD-related technologies.- To auto-switch to FILMMAKER MODE when a signal that can be operated with this mode is entered, set FILMMAKER MODE Auto Start to On.
This mode is suitable for movies, etc. viewed in a dark environment. Expert (Bright space, daytime)/Expert (Dark space, night)
Expert (Dark space, night) has lower color temperature than Expert (Bright space, daytime).
Select a mode that is suitable for the movie you are watching.- ISFccc: Imaging Science Foundation Certified Calibration Control Expert is an option that allows a picture quality expert to fine-tune the quality of the standard picture. Thus, it may not be effective for a normal picture.
- ISFccc: Imaging Science Foundation Certified Calibration Control
- The configurable items differ depending upon model.
- Depending upon the input signal, the available picture modes may be different.
- When watching online service content, the Picture Mode may be changed to match the content being shown.
- Select Mode changes may modify Energy Saving and Motion Eye Care settings and it can affect energy consumption. You can change the settings in General Energy Saving and Picture Advanced Settings Brightness Motion Eye Care.
6.2.2. Personalized Picture Wizard
[Go to table of contents]- Press the button on the remote control.
- Enter the following path on the screen. Picture Personalized Picture Wizard
- Press the Start on the screen and select your favorite image for each step.
- After logging in with your LG Account and running Personalized Picture Wizard, settings are saved for each account.
- When you complete the setup of Personalized Picture Wizard settings, Picture Mode for all inputs changes to Personalized Picture.
You can set different Picture Mode for each input mode as follows.Press the button on the remote control to select the input you want to change, and press the button on the remote control, then enter to Picture Select Mode on the screen to change to the desired Picture Mode. - Depending on the image quality set, Energy Saving Step may change and affect energy consumption.
- Depending on the model or region, the labeling and operation of the remote control buttons may vary.
- If your remote control doesn't have a button, press and hold the button to execute Home Hub.
- If your remote control doesn't have a
6.2.3. Aspect Ratio
[Go to table of contents]- Press the button on the remote control.
- Enter the following path on the screen. Picture Aspect Ratio User Selection
16:9
Displays an aspect ratio of 16:9.Original
The optimal screen ratio changes depending on the input image signal.4:3
Displays an aspect ratio of 4:3.Vertical Zoom
You can adjust the vertical dimension of the screen and align the screen vertically by using Adjust Zoom Ratio and Adjust Screen Position.4-Way Zoom
You can adjust the horizontal/vertical/diagonal dimensions of the screen and align the screen horizontally/vertically by using Adjust Zoom Ratio and Adjust Screen Position.
- The configurable items differ depending upon model.
- The picture may get distorted while zooming in or out.
- Selecting a different screen size from the original size may cause the image to look different.
- Depending on the combination of picture format and screen size, the edges may be hidden or shown in black, or both sides of the picture may flicker. Also, when selecting an item shown on the broadcast screen, the outline may not be aligned correctly.
- Depending upon the input signal, the available screen sizes may be different.
Just Scan
- Press the button on the remote control.
- Enter the following path on the screen. Picture Aspect Ratio Just Scan
If set to Auto, the feature switches between On or Off status depending on the information contained in the video signal.
- The items that can be selected may vary depending on the current input.
6.2.4. Brightness
[Go to table of contents]- Press the button on the remote control.
- Enter the following path on the screen. Picture Advanced Settings Brightness
Panel Brightness
Controls the level of screen brightness by adjusting the backlight. The closer to 100 the brighter.- Decrease the Panel Brightness to reduce energy consumption.
- Depending on the Energy Saving (Auto/Maximum), you may not be able to adjust the Panel Brightness.
Press the button on the remote control, then navigate to General Energy Saving Energy Saving Step on the screen.Switch Energy Saving Step to either Off or Minimum. - Depending on the model, there may not be a Panel Brightness setting option.
OLED Pixel Brightness
Adjusts the display brightness by varying the brightness of the OLED panel.- Depending on the Energy Saving (Auto/Maximum), you may not be able to adjust the OLED Pixel Brightness.
Press the button on the remote control, then navigate to General Energy Saving Energy Saving Step on the screen.Switch Energy Saving Step to either Off or Minimum. - Depending on the model, there may not be a OLED Pixel Brightness setting option.
- Depending on the Energy Saving (Auto/Maximum), you may not be able to adjust the OLED Pixel Brightness.
Adjust Contrast
Adjusts the contrast of the bright and dark areas of the picture. The closer to 100, the higher the contrast will be.Black Level
Adjusts the brightness of dark areas of the screen.The closer it is to 100, the lighter the screen becomes.Auto Dynamic Contrast
Corrects the difference between the bright and dark areas of the screen for optimal results depending on the brightness of the picture.Dynamic Tone Mapping
Set to On.Suitable contrast settings based on image brightness of the HDR content.
Set to Off.Setting Professional to On enables you to fine-tune the expressiveness of HDR content.Expression Enhancer
It is a technology to improve the contrast and expression of foreground, background and object by analyzing the information of the HDR image.Peak Brightness
Adjusts the maximum brightness of the screen.Gamma(Adjust Brightness)
Adjusts the medium brightness of the picture.- BT.1886 expresses the gradation in ITU-R BT.1886, which is an international standard.
FILMMAKER MODE Ambient Light
Set to On.Optimize image quality based on the amount of light detected by the ambient light sensor.- Supported when Picture Mode is set to FILMMAKER MODE.
Near Black Detail
Adjusts the expressiveness of dark areas in the video.Video Range
Adjusts the darkness of the screen in order to display a perfect black.Select Video Range to match the color range of the external input device.- This feature can be used while watching content through an external input.
LED Local Dimming
Maximizes the contrast ratio by making the bright areas of the screen brighter and the dark areas of the screen darker.- Off: Disables the LED Local Dimming function.
- Low/Medium/High: Changes the contrast ratio.
- Turning this option Off may increase energy consumption.
Motion Eye Care
Automatically adjusts brightness and reduces image blur based on image data which reduces eyestrain.- Turning this option Off may increase energy consumption.
- Depending upon the input signal or the selected picture mode, the available options may differ.
- The configurable items differ depending upon model.
6.2.5. Color
[Go to table of contents]- Press the button on the remote control.
- Enter the following path on the screen. Picture Advanced Settings Color
Color Depth
Tones down or up the colors displayed on the screen. The closer to 100 the deeper the color.Tint
Adjusts the color balance between red and green displayed on the screen. The closer to Red 50, the redder the color will be. The closer to Green 50, the greener the color will be.Color Gamut
Selects the range of Colors to display.Native
Displays more vivid and richer color.Auto Detect
It automatically sets the Color Gamut to match the signal.Dynamic
It expands the Color Gamut to match the scene.Adobe RGB
Sets the Color Gamut to Adobe RGB standards.Cinema
Sets the Color Gamut to DCI-P3 standards.
Fine Tune
This is used when experts control it by using a test pattern. You can control it by selecting areas of six colors (Red/Green/Blue/Cyan/Magenta/Yellow).
For normal images, adjustments may not result in noticeable Color changes.Color Adjustment
To make the image more colorful and lively adjust the Color and saturation of the picture.Select Color
From Red/Green/Blue/Cyan/Magenta/Yellow, select a tone to adjust.Adjust Saturation/Adjust Tint/Adjust Luminance
Adjust the chroma/tint/luminance of the tone in the range of -30 to +30.
White Balance
The function to adjust each color to be reproduced more accurately based on white allows you to adjust the overall color tone of the screen to your preference.Color Temperature
You can set the color to make the display look cooler or warmer.Method
This method is used for fine-tuning the color temperature setting. You can control the color temperature at two points of the bright part and dark part of the video if you select 2 Points, at each point of 10 levels if you select 10 Points Signal Level(%), and at each point of 22 levels of the video if you select 22 Points Signal Level(%).Point
Select screen brightness for color temperature adjustment.
If Method is set to 2 Points; use Low to select shadows and High to select highlights.
If Method is set to 10 Points Signal Level(%); you can select brightness using numbers indicating 10 levels.
When the Method is set to 22 Points Signal Level(%), you can select the brightness with the 22 levels of brightness.Signal Level(%)
Select screen brightness for color temperature adjustment.
If Method is set to 10 Points Signal Level(%); you can select brightness using numbers indicating 10 levels.
When the Method is set to 22 Points Signal Level(%), you can select the brightness with the 22 levels of brightness.- The name of the Signal Level(%) may vary depending on the signal.
Show brightness level at the maximum signal level(%)
Adjusts the luminance of the highest 100% signal level.Adjust brightness level at the selected signal level(%)
The brightness of the selected signal level can be adjusted.- You can do these settings only when the Picture Select Mode is the Cinema, Expert (Bright space, daytime) or the Expert (Dark space, night) and when the Method is set to 10 Points Signal Level(%) or 22 Points Signal Level(%).
- You can do these settings only when the Picture
Red/Green/Blue
Adjust the color temperature of the selected point.
Adjust the intensity of Red/Green/Blue in the range of -50 to 50.
You can adjust respective values for the brightness selected in Point.
- Depending upon the input signal or the selected picture mode, the available options may differ.
- The configurable items differ depending upon model.
6.2.6. Clarity
[Go to table of contents]- Press the button on the remote control.
- Enter the following path on the screen. Picture Advanced Settings Clarity
Adjust Sharpness
Adjusts the sharpness of the image. The closer to 50, the sharper and clearer the image will be.Super Resolution
Adjusts the resolution to make dim and blurred images clearer.Noise Reduction
Removes small dots that stand out so as to make the image clean.MPEG Noise Reduction
Reduces the noise produced during the creation of digital video signals.Smooth Gradation
It reduces the phenomenon that the outline of the image is rugged and in a staircase pattern and displays a smoother screen.Real Cinema
Optimize display for movies.TruMotion
Suitable the image quality of fast-moving pictures.- Off: Turns off the TruMotion.
- Cinematic Movement: Adjusts the shaking of the motion on the screen to make it feel like you are in a movie theater.
- Natural: Sets images with a lot of motions to look natural and clear.
- Smooth Movement: Softens fast-moving pictures.
- User Selection: Sets TruMotion manually.
- De-Judder: Adjusts juddering on the screen.
- De-Blur: Reduces the blurring effects of motion.
- OLED Motion/Motion Pro: You can make your video clearer by eliminating afterimages.
- The configurable items differ depending upon model.
- Depending upon the input signal or the selected picture mode, the available options may differ.
- The advanced settings can be changed only in User Selection mode.
6.2.7. Apply to All Inputs
[Go to table of contents]- Press the button on the remote control.
- Enter the following path on the screen. Picture Advanced Settings Apply to All Inputs
- Applying current video settings to all inputs.
6.2.8. Reset
[Go to table of contents]- Press the button on the remote control.
- Enter the following path on the screen. Picture Advanced Settings Reset
- Select reset in each screen mode.
6.2.9. FILMMAKER MODE Auto Start
[Go to table of contents]- Press the button on the remote control.
- Enter the following path on the screen. Picture Advanced Settings FILMMAKER MODE Auto Start
- Select On on the screen.
When a signal that can be operated with FILMMAKER MODE is detected, the Picture Mode automatically changes to FILMMAKER MODE.
- While this mode effectively conveys the creator's intention, it may appear darker than other Picture Mode.
6.2.10. Reduce Blue Light
[Go to table of contents]- Press the button on the remote control.
- Enter the following path on the screen. Picture Advanced Settings Reduce Blue Light
On
The color temperature of your screen is adjusted.Off
Turns off the Reduce Blue Light.
- Some models may not be supported.
6.3. Sound
[Go to table of contents]6.3.1. Select Mode
[Go to table of contents]- Press the button on the remote control.
- Enter the following path on the screen. Sound Select Mode
Personalized Sound
Using artificial intelligence deep learning technology, it analyzes and sets the optimal sound quality based on user preferences.AI Sound /AI Sound Pro
Depending on the content you watch, you can enjoy the optimized sound and virtual surround in real time.Standard
Optimizes the sound for all types of content.Cinema
Optimizes the sound for cinemas.Clear Voice /Clear Voice Pro
Boosts voice clarity.Sports / Soccer / Cricket
Optimizes the sound for sports games.- The name of the sport may differ depending on region.
Music
Optimizes the sound for music.Game Optimizer
Optimizes the sound for gameplay.Precision Sound Master Pro
This feature analyzes the audio content and optimizes sound settings in real-time. It enhances dialogue clarity and creates a virtual surround sound effect.
- The configurable items differ depending upon model.
- If you connect an LG Soundbar that supports TV Sound Mode Share to the HDMI port, you can select Sound Mode provided by the LG Soundbar on the device.
You can output the device's Sound Mode through the LG sound bar.Press the button on the remote control, then navigate to Sound Advanced Settings TV Sound Mode Share on the screen.Set TV Sound Mode Share to On.
6.3.2. Personalized Sound Wizard
[Go to table of contents]- Press the button on the remote control.
- Enter the following path on the screen. Sound Personalized Sound Wizard
- Press Start on the screen and select your favorite audio source for each step.
- When you complete the setup of Personalized Sound Wizard settings, Sound Mode for all inputs changes to Personalized Sound.
You can set different Sound Mode for each input mode as follows.Press the button on the remote control to select the input you want to change, and press the button on the remote control, then enter to Sound Select Mode on the screen to change to the desired Sound Mode.
- After logging in with your LG Account and running Personalized Sound Wizard, settings are saved for each account.
- Depending on the model or region, the labeling and operation of the remote control buttons may vary.
- If your remote control doesn't have a button, press and hold the button to execute Home Hub.
- If your remote control doesn't have a
6.3.3. Use TV Speaker
[Go to table of contents]- Press the button on the remote control.
- Enter the following path on the screen. Sound Sound Out Use TV Speaker
6.3.4. Use Wireless Speaker
[Go to table of contents]- Press the button on the remote control.
- Enter the following path on the screen. Sound Sound Out Use Wireless Speaker
Bluetooth Device
Wirelessly connect a Bluetooth audio device to enjoy the sound more conveniently.
Refer to the user manual of the Bluetooth audio device for details on how to connect and use the device.- Press on the screen to view the connected devices or any devices that can be connected and connect to any one of them.
- For some Bluetooth devices, the device volume can be controlled by selecting from the connection list.
- If the LG Sound Sync device was connected most recently, it will attempt to connect automatically when the device is powered on.
- We recommend that you connect an LG audio device that supports LG Sound Sync, using LG TV mode or LG Sound Sync mode on the device.
- Some models may not be supported.
- The audio codec that can be output via Bluetooth is SBC/aptXTM.
- If the device fails to connect, check the power of the device to connect to and check if the audio device is working properly.
- Using a Bluetooth headset is recommended when you connect two Bluetooth devices.
- Depending on the type of the Bluetooth device, the device may not connect correctly or an abnormal behavior may occur such as unsynchronized video and audio.
- The mobile-only headsets may not work.
- If two different Bluetooth devices are connected and used at the same time, the voice may not match.
- Sound may stutter or sound quality may be reduced if:
- the Bluetooth device is too far from this device;
- there are obstacles between the Bluetooth device and this device; or
- used together with radio equipment such as a microwave oven or wireless LAN
- If the Picture Select Mode is set to Game Optimizer and Sound Out is set to Bluetooth Device, the Picture Select Mode changes to Standard.
- If you continue to experience problems, we recommend using a wired connection.(Optical digital, HDMI port)
- Press
LG WOWCAST Device
You can enjoy rich sound without degraded quality, even if you wirelessly connect a soundbar that supports LG WOWCAST.- Some models may not be supported.
- It is recommended to connect to a wireless network using 5 GHz.The network does not operate on 6 GHz or DFS channels.If you share your screen with mobile devices or connect Wi-Fi Direct when connected to a 2.4 GHz network, LG WOWCAST will disconnect.
- If you connect the LG WOWCAST dongle, the dongle is connected first.
WiSA Speakers
You can wirelessly connect the device to the WiSA Speakers to enjoy high-quality sound.
Select on the screen to adjust detailed settings for WiSA Speakers.- Some models may not be supported.
- To use the WiSA speakers, you need to connect the exclusive dongle.
- Connection issues between the WiSA Dongle and WiSA Speaker may occur in environments with wireless interference. In this case, contact the speaker manufacturer.
- For more information on the purchase of WiSA authorized products, check on www.wisaassociation.org.
Mobile Device
If you install the LG ThinQ app on a mobile device and connect it to this device, you can use connected device as a speaker for this device.
6.3.5. Use Wired Speaker
[Go to table of contents]- Press the button on the remote control.
- Enter the following path on the screen. Sound Sound Out Use Wired Speaker
Optical Out Device
You can connect an audio device that supports Optical to the optical digital audio output port to enjoy your device's sound in richer quality and greater convenience.- Only available for models with an optical digital port.
- You can control the volume of a sound bar that supports LG Sound Sync with this device's remote control.Press the button on the remote control, then navigate to Sound Advanced Settings LG Sound Sync on the screen.Set LG Sound Sync to On.
HDMI(ARC) Device
Sound can be output through an external audio device connected via a HDMI (eARC/ARC) port.- Select HDMI(ARC) Device to automatically turn on SIMPLINK. Once SIMPLINK is turned off, the output speaker settings automatically revert to the default settings for uninterrupted audio output.
Audio Out Device/Wired Headphones
Select Wired Headphones or Audio Out Device to optimise audio output according to the device connected.
- Some models may not be supported.
- If you connect the wired headphones while the device is powered on, it automatically detects the wired headphones and redirects audio through them.
6.3.6. Use External Speakers with TV Speaker
[Go to table of contents]- Press the button on the remote control.
- Enter the following path on the screen. Sound Sound Out Use External Speakers with TV Speaker
- The configurable items differ depending upon model.
Bluetooth Device + TV Speaker
Both the internal speaker of the device and the Bluetooth speaker can be used to output the sound at the same time or a surround sound can be used.
Up to two Bluetooth devices of the same model can be connected.- Select on the screen to connect a Bluetooth speaker.
- Run Audio Delay to synchronize the device's internal speaker with the Bluetooth speaker.You can adjust the sync automatically or manually.
- When you set Sound Out as Bluetooth Device + TV Speaker, if Picture Select Mode is Game Optimizer, it will be changed to Standard and Dolby Atmos will be turned off.
- While using Screen Share function, the video and audio may be out of sync.We recommend using Use TV Speaker in Sound Out.
- You can adjust the volume using the volume buttons on the Bluetooth device.Press the button on the remote control, then navigate to General Accessibility Listen simultaneously with a hearing aid on the screen.Set Listen simultaneously with a hearing aid to Bluetooth Device.
For Bluetooth devices that do not have volume buttons, you can adjust the volume of the device in the detailed settings screen of Bluetooth Device + TV Speaker. - If Listen simultaneously with a hearing aid is set to Bluetooth Device, only one Bluetooth device can be connected.
- Depending on the type of your Bluetooth device, two devices may not be connected at the same time.
- Depending on the type of the Bluetooth device, the device may not connect correctly or an abnormal behavior may occur such as unsynchronized video and audio.
- Select
LG WOWCAST Device + TV Speaker
Simultaneously outputs the sound through the device's internal speakers and a soundbar that supports LG WOWCAST.
You can select this option if you connect a soundbar that supports LG WOWCAST.Optical Out Device + TV Speaker
Audio is played through the device's internal speakers and the audio device connected to the digital optical audio output port simultaneously.HDMI(ARC) Device + TV Speaker
Connecting LG Soundbar with the WOW Orchestra function
The internal speakers and soundbar can simultaneously output sound for a richer audio experience.
If you connect the LG Soundbar to the HDMI (eARC/ARC) port, it will be connected automatically.- Set Sound Out to Use TV Speaker or Use Wired Speaker to disconnect.
- The codec output with a device may differ from input signals.
Connecting a hearing aid
You can adjust the volume of the internal speakers and hearing aid separately.
Connect the transmitter of the hearing aid to the HDMI (eARC/ARC) port.
Press the button on the remote control, then navigate to General Accessibility Listen simultaneously with a hearing aid on the screen.Set Listen simultaneously with a hearing aid to HDMI(ARC) Device.- To adjust the volume of the connected hearing aid on the device, press
 next to the HDMI(ARC) Device + TV Speaker.
- To adjust the volume of the connected hearing aid on the device, press
Wired Headphones + TV Speaker
Audio is played through internal speakers and the Wired Headphones simultaneously.- If you connect the wired headphones while the device is powered on, it automatically detects the wired headphones and redirects audio through them.
6.3.7. Soundbar App
[Go to table of contents]- Press the button on the remote control.
- Enter the following path on the screen. Sound Soundbar App
- The soundbar app will run.
- You can only select it when a soundbar that supports the soundbar app is connected.
6.3.8. Dolby Atmos
[Go to table of contents]Dolby Atmos creates an acoustic experience that appears to move around you using the internal speakers.
The menu, which acts as On/Off, the default value is On.
- Press the button on the remote control.
- Enter the following path on the screen. Sound Advanced Settings Dolby Atmos
- Set to On.
The Dolby Atmos effect applies to the Dolby Atmos content.
- Some Dolby Atmos contents may not be played.
6.3.9. Balance
[Go to table of contents]- Press the button on the remote control.
- Enter the following path on the screen. Sound Advanced Settings Balance
- This setting is only available for internal device speaker.
6.3.10. Equalizer
[Go to table of contents]- Press the button on the remote control.
- Enter the following path on the screen. Sound Advanced Settings Equalizer
- This option can be enabled if Sound Select Mode is set to Standard.
- This setting only applies to internal speakers of the device or LG Soundbars that support the TV Sound Mode Share.
6.3.11. Apply to All Inputs
[Go to table of contents]To apply your current sound settings to all input modes, select Apply to All Inputs.
- Press the button on the remote control.
- Enter the following path on the screen. Sound Advanced Settings Apply to All Inputs
6.3.12. Reset
[Go to table of contents]- Press the button on the remote control.
- Enter the following path on the screen. Sound Advanced Settings Reset
- This setting only applies to internal speakers of the device or LG Soundbars that support the TV Sound Mode Share.
6.3.13. Broadcasting on Auracast™
[Go to table of contents]- Set Sound Out to Use TV Speaker or Use Wired Speaker.
- Press the button on the remote control.
- Enter the following path on the screen. Sound Advanced Settings Broadcasting on Auracast™
- Set Authentication Code and Audio Quality on the screen.
- Select Start Broadcasting on the screen.
Use Authentication Code
Set to On.You can set an Authentication Code.
Due to potential copyright issues with the music or content being output, it is recommended to use an Authentication Code to allow access only to restricted users.Change Authentication Code
You can change the set Authentication Code.Audio Quality
You can set the quality of the output sound.
Setting it to High may cause some Auracast™ devices not to produce sound.
Connecting to the device directly
Check if the Bluetooth device that supports Auracast™ is in pairing mode.Select the name of the Bluetooth device that appears in Connectable Devices on the screen.The device will be registered.Select the device from Registered Devices.You can configure detailed settings for registered Bluetooth devices.
- Depending on the Bluetooth device, it may not appear in Connectable Devices.
- Volume settings may not be available depending on the connected Bluetooth device.
- The left and right wireless earphones may be detected, respectively.
If both sides are not connected automatically, please connect the left and right sides, respectively.You can configure detailed settings for the left and right sides, respectively.For some Bluetooth devices, the volume of both sides may not be synchronized.
Connecting with a mobile device
Connect a Bluetooth device that supports Auracast™ to your mobile device.Select this device in the Auracast™ settings on your mobile device.If using an Authentication Code, enter Authentication Code on your mobile device.The location of the Auracast™ settings menu may vary depending on your mobile device model.
Adjust the volume of the connected Bluetooth device on the mobile device to which it is connected.
- The mobile device to which the Bluetooth device is connected also needs to support Auracast™.
- You cannot connect Auracast™ supported Bluetooth devices and non Auracast™ supported Bluetooth devices simultaneously.
- Audio synchronization may not match for Bluetooth devices connected via Auracast™.The synchronization mismatch level may vary depending on the device connected.
6.3.14. Installation Type
[Go to table of contents]- Press the button on the remote control.
- Enter the following path on the screen. Sound Advanced Settings Installation Type
Stand
Select this if the device is installed in stand-type.Wall-mounted
Select this if the device is installed in wall-mounted type.
- This setting is only available for internal device speaker.
6.3.15. Automatic Volume Adjustment
[Go to table of contents]- Press the button on the remote control.
- Enter the following path on the screen. Sound Advanced Settings Automatic Volume Adjustment
- Set to On.
- This setting only applies to internal speakers of the device or LG Soundbars that support the TV Sound Mode Share.
6.3.16. Match Screen and Sound
[Go to table of contents]As the setting value increases, voice output becomes slower than the default.
If you select Bypass, Outputs the broadcast signals or the sound from external devices without any audio delay. The audio may be output before the video because of the time this device takes to process the video input.
- Press the button on the remote control.
- Enter the following path on the screen. Sound Advanced Settings Match Screen and Sound
- Available options vary by Sound Out setting.
6.3.17. Select HDMI Input Audio Format
[Go to table of contents]When connected to devices or content that support the latest surround sound technology, setting to Bitstream will enable you to listen to the intended sound quality.
When the voice delivered through the HDMI port is not synchronized, set it to PCM.
- Press the button on the remote control.
- Enter the following path on the screen. Sound Advanced Settings Select HDMI Input Audio Format
6.3.18. TV Sound Mode Share
[Go to table of contents]- Press the button on the remote control.
- Enter the following path on the screen. Sound Advanced Settings TV Sound Mode Share
- Set to On.
- Connect an LG soundbar that supports TV Sound Mode Share to enable this setting.
6.3.19. LG Sound Sync
[Go to table of contents]By setting this feature to On, you can adjust the volume of the connected LG Sound Sync device using a device remote control.
- Press the button on the remote control.
- Enter the following path on the screen. Sound Advanced Settings LG Sound Sync
- If the auto-power feature of the sound bar that supports LG Sound Sync is set to On, the sound bar will be turned on or off together when the device is turned on or off.
6.3.20. Digital Sound Output
[Go to table of contents]- Press the button on the remote control.
- Enter the following path on the screen. Sound Advanced Settings Digital Sound Output
- This setting is only available when Use Wired Speaker is set to Optical Out Device/HDMI(ARC) Device.Press the button on the remote control, then navigate to Sound Sound Out Use Wired Speaker on the screen.
- When Pass Through is enabled, sound effects may not be output.
- The codec output with a device may differ from input signals.
PCM
PCM Sound Input Digital Sound Output All PCM Auto / Pass Through
Auto / Pass Through Sound Input Digital Sound Output MPEG PCM Dolby Digital (Optical /HDMI ARC)Dolby Digital
(HDMI eARC)Dolby Digital /Dolby Digital Plus / Dolby MATDolby Digital Plus / Atmos (Optical)Dolby Digital
(HDMI ARC)Dolby Digital /Dolby Digital Plus / Atmos
(HDMI eARC)Dolby Digital /Dolby Digital Plus / Dolby MAT /AtmosDolby TrueHD
(HDMI only)(Optical)Dolby Digital
(HDMI ARC)Dolby Digital /Dolby Digital Plus / Atmos
(HDMI eARC)Dolby Digital /Dolby Digital Plus / Dolby TrueHD /Dolby MAT /AtmosHE-AAC/AAC (Optical)Dolby Digital
(HDMI ARC)Dolby Digital/Dolby Digital Plus
(HDMI eARC)Dolby Digital /Dolby Digital Plus / Dolby MATDTS /DTS Express /DTS-HD MA (Optical / HDMI ARC)DTS
(HDMI eARC)DTS /DTS-HD MADTS-HD (Optical / HDMI ARC)DTS
(HDMI eARC)DTS /DTS-HD /DTS-HD MADTS:X (Optical / HDMI ARC)DTS
(HDMI eARC)DTS /DTS-HD MA /DTS:X
- Dolby TrueHD,HDMI eARC,Dolby Atmos,DTS: Some models may not be supported.
- When connected with HDMI eARC, the output audio type will depend on the audio type supported by the connected device.
- Depending on the device connected and input audio type, it can be output as Dolby Metadata-Enhanced Audio Transmission PCM (Dolby MAT PCM).
- If Digital Sound Output is set to Pass Through and HDMI input is Dolby TrueHD or Multi-Channel PCM, audio can be output as Bypass.
6.3.21. eARC Support
[Go to table of contents]- Connect an audio device that supports eARC to the HDMI (eARC/ARC) port.
- Press the button on the remote control.
- Enter the following path on the screen. Sound Advanced Settings eARC Support
- Go to Sound Out Use Wired Speaker and choose HDMI(ARC) Device.
- Set eARC Support to On.
6.4. Accessibility
[Go to table of contents]6.4.1. Audio Guidance
[Go to table of contents]- Press the button on the remote control.
- Enter the following path on the screen. General Accessibility Audio Guidance
You can also set this function by pressing the button on the remote control and selecting Accessibility on the screen. - Set Enable the function to On.
Speed
Adjust the speed of spoken guide.Volume
Adjust the volume of spoken guide.Pitch
Adjust the tone of spoken guide.High-quality language pack
Audio Guidance will now be provided in a more natural-sounding voice.Audio Guidance will be available at standard quality even if the installed High-quality language pack is deleted.
- This feature is available on certain languages only.
- Some models may not be supported.
- The configurable items differ depending upon model.
- For visually impaired users.
- Setting the Audio Guidance to On automatically switches the Device Power Sound to On as well.
6.4.2. Learn Remote Control
[Go to table of contents]- Press the button on the remote control.
- Enter the following path on the screen. General Accessibility Learn Remote Control
You can also set this function by pressing the button on the remote control and selecting Accessibility on the screen. - Pressing the button twice in succession ends Learn Remote Control.
Press the button to turn off the device, then products with Always Ready enter Always Ready if Always Ready is turned on.
6.4.3. Extend Pressing Time on Remote
[Go to table of contents]- Press the button on the remote control.
- Enter the following path on the screen. General Accessibility Extend Pressing Time on Remote
You can also set this function by pressing the button on the remote control and selecting Accessibility on the screen. - Set Enable the function to On.
Activate time for long press
For functions that require pressing and holding a remote control button, you can set the duration for how long the button needs to be held.Interval time for repeated actions
For buttons that execute a function repeatedly while held down such as volume or channel buttons, you can adjust the repeat action speed.
6.4.4. Device Power Sound
[Go to table of contents]- Press the button on the remote control.
- Enter the following path on the screen. General Accessibility Device Power Sound
You can also set this function by pressing the button on the remote control and selecting Accessibility on the screen.
- Some models may not be supported.
- Setting the Audio Guidance to On automatically switches the Device Power Sound to On as well.
6.4.5. Screen Zoom
[Go to table of contents]- Press and hold the button on the Remote Control.
- You can easily move to different parts of the screen by moving the Magic Remote pointer to the edge of the screen.
- While zoomed in and viewing, you can display the zoom menu by pressing and holding the button on the Remote Control.You can move to different parts of the screen, change the magnification level, or exit the zoom.
- You can also perform Screen Zoom in the following ways.
Press the button on the remote control.Select Accessibility Vision Features Screen Zoom on the screen.
Press the button on the remote control.Select General Accessibility Screen Zoom on the screen.
Press and hold the button on the Remote Control.Select Accessibility Shortcuts Screen Zoom on the screen. - Depending on the model or region, the labeling and operation of the remote control buttons may vary.
- If your remote control doesn't have a button, press and hold the button to execute Accessibility Shortcuts.
- If your remote control doesn't have a
6.4.6. Listen simultaneously with a hearing aid
[Go to table of contents]- Press the button on the remote control.
- Enter the following path on the screen. General Accessibility Listen simultaneously with a hearing aid
You can also set this function by pressing the button on the remote control and selecting Accessibility on the screen.
Off
Turns off the Listen simultaneously with a hearing aid.Bluetooth Device
Sound Out changes to Bluetooth Device + TV Speaker.The existing Bluetooth connection history will then be deleted.Auracast™
Sound Out changes to Use TV Speaker.HDMI(ARC) Device
Sound Out changes to HDMI(ARC) Device + TV Speaker.
- The configurable items differ depending upon model.
- If you connect a device other than a hearing aid, this feature may not work properly.
- For Bluetooth devices, earphone or headset type is recommended.
- For instructions on how to connect and set up Bluetooth devices, please refer to the following User Guide.
Path: Settings Sound Use External Speakers with TV Speaker - Auracast™ must be selected to connect multiple hearing aids.Refer to the following User Guide for instructions on setting up Auracast™.
Path: Settings Sound Broadcasting on Auracast™
6.4.7. Sign Language Zoom
[Go to table of contents]- Press the button on the remote control.
- Enter the following path on the screen. General Accessibility Sign Language Zoom
You can also set this function by pressing the button on the remote control and selecting Accessibility on the screen. - Set Enable the function to On.
Automatically locate and zoom in on the sign language interpretation screen.If it does not zoom automatically, manual adjustments are required.
Manual Zoom
You can select the location or size you wish to zoom in.
You can select the position to zoom in with the pointer on the screen or the/// buttons on the remote control.
Use the channel buttons on the remote control to select the area you want to zoom in on.
- To use Sign Language Zoom, you must set Invert Colors to Off.
6.4.8. Closed Caption
[Go to table of contents]- Press the button on the remote control.
- Enter the following path on the screen. General Accessibility Closed Caption
You can also set this function by pressing the button on the remote control and selecting Accessibility on the screen. - Change Closed Caption to On and select caption setting.
Analog ModeCC 1-CC 4(Closed Captioning)/ TEXT 1-TEXT 4
Displays the audio part of the broadcast content as text on the device screen. CC 1 is the most common usage mode.
Field 1 data channels: two Captions (CC1, CC2), two Text (T1, T2).
Field 2 data channels: two Captions (CC3, CC4), two Text (T3, T4).Digital Mode
According to the digital broadcasting type you are watching, you can select the caption in HD Mode or the NEXTGEN TV Mode.- In the case of HD broadcasting, you can set the size and color of the caption at the HD Mode Option.Please select Set By Program or Custom.You can adjust detailed options such as the size and color of the caption by selecting the Custom.
- The configurable items differ depending upon model.
Position Settings
You can move the position of closed captionss.- This can only be operated while watching a broadcast.
6.4.9. Focus with High Contrast
[Go to table of contents]- Press the button on the remote control.
- Enter the following path on the screen. General Accessibility Focus with High Contrast
You can also set this function by pressing the button on the remote control and selecting Accessibility on the screen. - Set to On.
The selected item is highlighted more prominently when using the/// buttons on the remote control or the pointer of the Magic Remote. Using this feature makes it easier to distinguish the currently selected part.
6.4.10. Text with High Contrast
[Go to table of contents]- Press the button on the remote control.
- Enter the following path on the screen. General Accessibility Text with High Contrast
You can also set this function by pressing the button on the remote control and selecting Accessibility on the screen. - Set to On.
6.4.11. Grayscale
[Go to table of contents]- Press the button on the remote control.
- Enter the following path on the screen. General Accessibility Grayscale
You can also set this function by pressing the button on the remote control and selecting Accessibility on the screen. - Set to On.
6.4.12. Invert Colors
[Go to table of contents]- Press the button on the remote control.
- Enter the following path on the screen. General Accessibility Invert Colors
You can also set this function by pressing the button on the remote control and selecting Accessibility on the screen. - Set to On.
- This feature may not be applicable to some content.
6.5. Always Ready
[Go to table of contents]- Press the button on the remote control.
- Enter the following path on the screen. General Always Ready
- Set Enable the function to On.
Turning off the device switches the mode to Always Ready and displays the selected screen wallpaper, and then you can use voice recognition or output sound from your mobile device to the internal speaker.
You can also turn on the device with the voice recognition feature of an external AI speaker connected to the device.
Selecting Use Always Ready without wallpaper(LG Gallery+) enables Always Ready to be used without displaying the wallpaper.
For more details, please refer to the following User Guide.
Path: Smart Function Using Always Ready
- Energy consumption may increase during Always Ready.
- To use voice recognition in Always Ready, set Use Hands-free Voice Control to On.Press the button on the remote control, then navigate to General AI Service Voice Recognition Settings on the screen.
- Some models may not be supported.
6.6. AI Service
[Go to table of contents]6.6.1. AI Picture Pro
[Go to table of contents]- Press the button on the remote control.
- Enter the following path on the screen. General AI Service AI Picture Pro
- Set to On.
- It is supported for only digital broadcasting, videos of a USB memory device, and HDMI video input.
Depending on the model, some features may not be available. - If Picture Mode is Game Optimizer, you cannot set up this feature.Press the button on the remote control, then navigate to Picture Select Mode on the screen.
- Certain models do not work with copyrighted content.
6.6.2. AI Brightness Settings
[Go to table of contents]- Press the button on the remote control.
- Enter the following path on the screen. General AI Service AI Brightness Settings
- Set to On.
6.6.3. AI Genre Selection
[Go to table of contents]- Press the button on the remote control.
- Enter the following path on the screen. General AI Service AI Genre Selection
- Set to On.
- Certain models do not work with copyrighted content.
- If Picture Mode is Game Optimizer, you cannot set up this feature.Press the button on the remote control, then navigate to Picture Select Mode on the screen.
6.6.4. AI Sound
[Go to table of contents]- Press the button on the remote control.
- Enter the following path on the screen. General AI Service AI Sound/AI Sound Pro
- This setting only applies to internal speakers of the device or LG Soundbars that support the TV Sound Mode Share.
- When this feature is set to On, Sound Mode is changed to AI Sound/AI Sound Pro.
- The configurable items differ depending upon model.
6.6.5. AI Acoustic Tuning
[Go to table of contents]Select Start New Sound Tuning to measure the space in which the device is installed.
When the initial detection is complete, you can select your desired audio mode.
- Press the button on the remote control.
- Enter the following path on the screen. General AI Service AI Acoustic Tuning
Off
This option disables the use of AI Acoustic Tuning-adjusted audio.
Selecting this option outputs your device's default sound without making any adjustments to it.Standard
Selecting this option outputs AI Acoustic Tuning-adjusted audio in Standard mode.
This mode provides a clean and natural sound.Bass Boost
Selecting this option outputs AI Acoustic Tuning-adjusted audio with an emphasis on bass.Treble Boost
Selecting this option outputs AI Acoustic Tuning-adjusted audio with an emphasis on treble.
- If there is more than a library noise level (over 30 ~ 40 dBA), we recommend that you install from within 3 meters (9.8 feet).
- This function may not work properly
- The background noise is too large over 40 dBA.
- If the distance between the device and the Magic Remote is more than 5 m
6.6.6. Voice Recognition Help
[Go to table of contents]- Press the button on the remote control.
- Enter the following path on the screen. General AI Service Voice Recognition Help
6.6.7. Voice Recognition Settings
[Go to table of contents]- Press the button on the remote control.
- Enter the following path on the screen. General AI Service Voice Recognition Settings
6.6.8. AI Recommendation
[Go to table of contents]- Press the button on the remote control.
- Enter the following path on the screen. General AI Service AI Recommendation
Smart Tips
You can get an introduction to smart features you can use when watching a broadcast or using an app.Smart Tips in Settings
When configuring detailed settings, you can also receive recommendations for related features.
- The configurable items differ depending upon model.
6.7. Game Optimizer
[Go to table of contents]- Press the button on the remote control.
- Enter the following path on the screen. General Game Optimizer
- Set to On.
- It only works with HDMI inputs.
- If you set Picture Mode/Sound Mode to a mode other than Game Optimizer, some items in Game Optimizer cannot be set.
- If you turn this feature On, you cannot change some video settings items.
- When Game Optimizer is set to On, audio delays may occur if you set Sound Out to Bluetooth Device/WiSA Speakers/Optical Out Device/HDMI(ARC) Device.Switch Sound Out option to Use TV Speaker or switch Sound Advanced Settings Select HDMI Input Audio Format option to PCM.
- The configurable items differ depending upon model.
Game
Game Genre
You can optimize the screen depending on the genre of the game.OLED Motion/OLED Motion Pro
You can make your video clearer by eliminating afterimages.Reduce Blue Light
You can adjust the blue light output to rest your eyes while watching the screen.Dark Room Mode
You can adjust the brightness of the entire screen to reduce eye strain in a dark environment or when watching for a long time to make the screen easier to watch.Prevent input delay (input lag)
Minimize the input delay according to the image signal.Game Dashboard
Set to On.Press the button on the remote control during a game to display the Game Dashboard.Set to Off to display as Quick Settings during a game.
For more details, please refer to the following User Guide.
Path: Settings Quick Settings Game DashboardVRR
This reduces screen cracking and video lagging during game play.VRR & G-Sync
NVIDIA's display adaptive sync technology adjusts frames to minimize screen tearing and stuttering.Quick Frame Transport
Set to On.Reduce video input delay for faster video output.- Only works with inputs that support Quick Frame Transport.
- Some resolutions may not be supported.
AMD FreeSync Premium
Set to On.AMD's display adaptive sync technology adjusts the injection rate to minimize screen breaks and stuttering.- The LED/QNED model can be set up as follows:
High: The range of supported refresh rates is 90 Hz - 120 Hz.
Wide: The range of supported refresh rates is 48 Hz - 120 Hz.
Screen flickering may occur in some gaming environments.In this case, set it to High.
- The LED/QNED model can be set up as follows:
144Hz Mode/165Hz Mode
The screen is displayed more smoothly when gaming.- It only works with game or PC inputs that support the corresponding Hz refresh rate.
ALLM
The device will automatically switch to low-latency mode if this feature is turned on while playing games.In this case, some picture settings on the device may not be applied.- The device connected should support this service.
Fine Tune Dark Areas
You can calibrate the brightness of the dark areas with VRR, VRR & G-Sync or AMD FreeSync Premium set to On.- It may not operate normally depending on the features or settings of the connected PC or game console.
Menu Color
Menu color of Game Optimizer and Game Dashboard can be changed.User Guide
Move to the User Guide app.
Picture
Black Stabilizer
You can fine-tune dark areas.White Stabilizer
You can fine-tune light areas.Game Contrast
Adjusts the contrast of the bright and dark areas of the picture.Game Black Level
Adjusts the overall screen brightness.
You may use the Game Black Level settings specifically to set the dark part of the image.Adjust Game Sharpness
Adjusts the sharpness of the image.Game Color Depth
Tones down or up the colors displayed on the screen.Dynamic Tone Mapping
Suitable contrast settings based on image brightness of the HDR content.Reset
You can reset the settings.Wide Aspect Ratio
Supports resolutions with a screen ratio of 21:9 or 32:9.- It only works when the game or PC input supports a 21:9 or 32:9 screen ratio.
- To display the screen in the selected screen ratio, the resolution must be set up as shown below to match the desired screen ratio, even on the connected PC.
- 21:9: 3840 × 1600 (60 Hz signals only), 2560 × 1080
- 32:9: 3840 × 1080
Screen Position
You can change the position of the screen when you set it to a widescreen ratio.Advanced Picture Settings
Move to the Picture Advanced Settings.
Sound
AI Game Sound
Optimizes the sound for gameplay.- This setting only applies to internal speakers of the device or LG Soundbars that support the TV Sound Mode Share.
Game Equalizer
The sound can be adjusted by increasing or decreasing certain frequency bands of the voice signal.Dolby Atmos
The Dolby Atmos effect applies to the Dolby Atmos content.For more details, please refer to the following User Guide.
Path: Settings Sound Dolby AtmosSound Out
You can select an audio device that outputs sound from the device.- If you have selected a USB-type audio device when playing games on a PC, change the audio device to Use in PC in the Switching Hub.Sound lag can be minimized.Some models may not be supported.
Advanced Sound Settings
Move to the Sound Advanced Settings.
6.8. OLED Care
[Go to table of contents]- Press the button on the remote control.
- Enter the following path on the screen. General OLED Care
Care Picture Settings
It sets the screen mode suitable for your viewing pattern.
Picture Select Mode and General Energy Saving cannot be set while using the Care Picture Settings.Off
Turns off the Care Picture Settings.Comfort Mode
Displays the picture with normal contrast, brightness and sharpness levels.Theater Mode
Suitable picture for movies.Kids Care Mode
It adjusts the blue light to make the screen easier for children to view.
OLED Panel Care
With OLED Panel Care, you can improve image quality issues related to image sticking when the screen has been on for a certain amount of time.Pixel Cleaning
Calibrates potential screen issues when the device is on for an extended period.
Calibration takes a minimum of 10 minutes to a maximum of an hour and a half, depending on the model.- Do not unplug the power cord while it is in progress.
- Turning on the power during calibration Pixel Cleaning cancels operation.
Screen Move
This moves the screen slightly at regular intervals to prevent image sticking on the display panel.Adjust Logo Brightness
Adjust the luminance of static images such as logos within content to correct potential picture quality issues.Care Recommendations
It recommends Picture Settings suitable for eye strain or viewing environment by analyzing viewing patterns.
6.9. Usage Care
[Go to table of contents]- Press the button on the remote control.
- Enter the following path on the screen. General Usage Care
You can also set this function by pressing the button on the remote control and selecting LG Account on the screen.
My Usage
The displayed graph varies depending on the selected mode.
You can check data for the past 2 months.Normal Mode
You can view the device usage time and the top 3 most frequently used apps for the logged-in account.Parental Control Mode
You can view device usage time and the top three most frequently used apps when the Locks Control feature is activated.Memory Optimizer
You can optimize memory by pressing Memory Optimizer at the bottom of the chart.
Family Care
Parental Control
You can configure the device settings to ensure a safe usage environment for children.Locks Control
Set to On.You can set restrictions such as blocking inappropriate content and limiting viewing time for children.- For more details, please refer to the following User Guide.
Path: Settings System Safety
- For more details, please refer to the following User Guide.
Additional Settings
You can create a healthier device usage environment.Eye Care Mode
Set to On.A screen with lowered blue light is displayed for the protection of your eyes.- Using Eye Care Mode sets Picture Advanced Settings Reduce Blue Light to On.
- Using Eye Care Mode sets Picture
Volume Limit Mode
Set to On.The volume cannot be raised above a certain level for the protection of your hearing.- Volume Limit Mode may not work for audio devices connected to the optical digital/HDMI/headphone port.
- The configurable items differ depending upon model.
6.10. Channels
[Go to table of contents]6.10.1. Auto Tuning
[Go to table of contents]- Press the button on the remote control.
- Enter the following path on the screen. General Channels Channel Tuning Auto Tuning
- If the Antenna or Cable is not connected properly, channels are not added.
- Auto Tuning finds and adds only channels being broadcast.
- If Channel Locks is turned on; a pop-up window will appear asking for a password.
6.10.2. Manual Tuning
[Go to table of contents]You can check the signal strength of digital broadcasting.
- Press the button on the remote control.
- Enter the following path on the screen. General Channels Channel Tuning Manual Tuning
6.10.3. Channel Manager
[Go to table of contents]If Internet channels are set, you can also manage Internet channels in Channel Manager.
- Press the button on the remote control.
- Enter the following path on the screen. General Channels Channel Manager
Edit All Channels
In the full channel list, you can set selected channels to Lock / Unlock or set them to be skipped when switching channels.- Available features may vary depending on the broadcast signal.
Edit Favorites
You can add/delete desired channels to and from favorite channels, change their order, and more.
6.11. Network
[Go to table of contents]Setting a Wired Network
If the router connected to the network supports the DHCP feature, connecting the device and router by wire will automatically connects to the network.- Some models may not be supported.
- Connect the LAN port of the device and the router using a LAN cable.
The router should be connected to the Internet beforehand.- When you connect the device to the network with a LAN cable, the device is automatically connected to the network if the router supports DHCP.
If the Network Is Not Automatically Connected
If the automatic setup is not supported, you can select Edit to manually set up the network connection.
- Press the button on the remote control.
- Enter the following path on the screen. General Network Wired Connection (Ethernet)
Setting a Wireless Network
- Turn on the power of the router connected to the Internet.
- Press the button on the remote control.
- Enter the following path on the screen. General Network Wi-Fi Connection
- When the network search is complete, the list of networks available for connection is shown.
- Select a network to connect.
If your Wireless Router is password protected, enter the password configured for the router.
For more detailed settings, select Other Network Settings.
Add a Hidden Wireless Network
You can add a wireless network if you input the name of the network directly.Connect via WPS PBC
If the wireless router you want to connect to has a Wi-Fi Protected Setup-Push Button Configuration (WPS-PBC) feature, you can easily connect to the wireless router by pressing the WPS-PBC button on the router.Press the wireless router's WPS-PBC button and then press the device's [Connect] button.Connect via WPS PIN
This is a method to connect to an access point using a Wi-Fi Protected Setup-Personal Identification Number (WPS-PIN).Select the access point (AP) to which you would like to connect.Enter the PIN displayed on the access point's Wi-Fi device.Advanced Wi-Fi Settings
Once you connect to a wireless network you can view connection information such as detailed IP address information.In addition, you can change the IP address and DNS server address you want to connect to by pressing Edit.
Network Setting Warnings
- Use standard LAN cable (connect to Cat7 or higher with an RJ45 connector, 10 Base-T, or 100 Base TX LAN port).
- Resetting the router may cause network connection problems.In this case, the router will operate normally if you turn it off and disconnect the device, and then reconnect and turn it on.
- The manufacturer is not responsible for network connectivity or operation failure due to problems such as equipment failure or disconnected lines.
- The network connection may not work properly because of network settings or the Internet service provider.
- DSL service must use a DSL modem and cable service must use a cable modem. Since only a limited number of network connections may be available, device's network settings may not be used depending on the contract with Internet service provider. (If the contract does not allow more than one device per line, only the already-connected PC may be used.)
- A wireless network can experience interference from other devices that use the 2.4 GHz frequency (wireless phone, Bluetooth device, or microwave oven). Although interference can also happen when using the 5 GHz frequency, it is less likely to occur.
- The wireless environment can make wireless network service run slowly.
- Using several wireless devices at the same time can slow your network.
- The access point device must support wireless connections and wireless connection feature must be enabled on the device to have AP (access point) connection. Contact the service provider for availability of wireless connections on the access point.
- Check SSID and security settings of the AP. Refer to the appropriate documentation for SSID and security settings of the AP.
- If the network is changed by moving the device or changing the router, you must set up the wireless network again.Existing wireless network connections will not be saved.
- Invalid settings of network devices (wired/wireless line sharer, hub) can cause the device to operate slowly or not operate properly. Install the devices correctly according to the appropriate manual and network.
- The connection method may differ depending on the AP manufacturer.
- To troubleshoot issues related to this feature, please refer to the following User Guide.
Path: Troubleshooting Troubleshooting Network Connection Issues
6.12. External Devices
[Go to table of contents]6.12.1. Connect Bluetooth Controller
[Go to table of contents]- Press the button on the remote control.
- Enter the following path on the screen. General External Devices Connect Bluetooth Controller
- Turn on the input device you want to connect, set it to pairing mode, and press Connect on the screen.If you turn on the input device you've previously connected to, it connects automatically.To disconnect the existing connection, click Disconnect.
- This feature is available for Bluetooth-enabled models only.
- It is recommended that you use a gamepad that has been tested for compatibility with this devices.
Sony Dualshock4, Sony DualSense Controller, Sony DualSense Edge Controller, Microsoft Xbox One S Controller, Microsoft Xbox Series X Controller, Microsoft Xbox Adaptive Controller, NVIDIA SHIELD Controller, Amazon Luna Controller, Shaks S3b, Shaks S2b, Nintendo Switch Pro Controller, Nintendo Joy-con Controller, MOGA XP5-X Plus Controller, SteelSeries Stratus+ Controller - Some keyboards or mice may not function properly.
- Connecting multiple Bluetooth devices may result in poor connection or operation.
- If the Bluetooth device is too far from this device, or there are obstacles between them, they may not operate normally.
- Depending on the peripherals (wireless router, microwave oven, etc.), communication failures may occur.
- If the device you selected from Registered Devices does not reconnect, Disconnect and then reconnect the device.
- It differs among devices. When trying to connect to a device, refer to the device's User's Guide for more information.
6.12.2. Universal Control Settings
[Go to table of contents]For more details, please refer to the following User Guide.
Path: Remote Control Uses
Setting Universal Control- Press the button on the remote control.
- Enter the following path on the screen. General External Devices Universal Control Settings
6.12.3. HDMI Settings
[Go to table of contents]- Press the button on the remote control.
- Enter the following path on the screen. General External Devices HDMI Settings
4:4:4 Pass Through
Send 4:4:4 signals to the device outside of PC Mode but processing features like Noise Reduction, TruMotion, and more may be bypassed.This setting is suggested only for content creators who wish to send a signal that does not need additional processing.HDMI Deep Color
If you connect a device that supports HDMI Deep Color, you can enjoy a clearer image.After connecting the playback device, set HDMI Deep Color to 4K.
If the connected device does not support this function, it may not work properly.
When a screen problem occurs, change the HDMI Deep Color setting to Off.- Supported Display Resolution
4K: Supports 4K@120 Hz (4:4:4, 4:2:2, 4:2:0) (120 Hz models only), 4K@60 Hz (4:4:4, 4:2:2, and 4:2:0)
Off: Supports 4K@60 Hz (4:2:0) - 4K Supported Formats (3840 × 2160p,4096 × 2160p)
1) Supported when HDMI Deep Color is set to 4K.Supported Display Resolution Frame rate (Hz) Color Depth/Chroma Sampling 50
59.94
60
(60 Hz models only)8 bit:
YCbCr 4:2:0,YCbCr 4:2:2 1),YCbCr 4:4:4 1),RGB 4:4:4 1)
10 bit:
YCbCr 4:2:0 1),YCbCr 4:2:2 1)
12 bit:
YCbCr 4:2:0 1),YCbCr 4:2:2 1)50
59.94
60
(120 Hz models only)8 bit:
YCbCr 4:2:0,YCbCr 4:2:2 1),YCbCr 4:4:4 1),RGB 4:4:4 1)
10 bit:
YCbCr 4:2:0 1),YCbCr 4:2:2 1),YCbCr 4:4:4 1),RGB 4:4:4 1)
12 bit:
YCbCr 4:2:0 1),YCbCr 4:2:2 1),YCbCr 4:4:4 1),RGB 4:4:4 1)100 1)
120 1)
(120 Hz models only)
144 2)
(144 Hz models only)
165 3)
(165 Hz models only)8 bit:
YCbCr 4:2:0,YCbCr 4:2:2,YCbCr 4:4:4RGB 4:4:4
10 bit:
YCbCr 4:2:0,YCbCr 4:2:2,YCbCr 4:4:4,RGB 4:4:4
12 bit:
YCbCr 4:2:0,YCbCr 4:2:2,YCbCr 4:4:4,RGB 4:4:4
Supported when 2) Game Optimizer 144Hz Mode is set to On.
Supported when 3) Game Optimizer 165Hz Mode is set to On.- You can only change the settings of the HDMI you are watching at the time.
- You can specify a different setting for each HDMI port.
- Supported Display Resolution
Quick Media Switching
When content with a different number of frames per second (FPS) is played on an external device that supports QMS, it makes the screen transition smoothly without interruption.SIMPLINK (HDMI-CEC)
You can conveniently control and use various multimedia devices connected through HDMI with this device's remote control.For more details, please refer to the following User Guide.
Path: Remote Control Uses Connecting to SIMPLINK (HDMI-CEC)Dolby Vision PC
You can enjoy the Dolby Vision screen by enabling HDR in the display settings of the connected PC.
- The configurable items differ depending upon model.
6.12.4. TV On With Mobile
[Go to table of contents]- Press the button on the remote control.
- Enter the following path on the screen. General External Devices TV On With Mobile
- If Turn on via Wi-Fi or Turn on via Bluetooth is set to On, you can turn on your device using an application that supports TV On With Mobile.
- Some models may not be supported.
- The device should be connected to a network.
- This device and the device to be used should be connected to the same network.
- The Turn on via Wi-Fi feature must be used in an app on a mobile device that supports the feature.
- Turn on via Bluetooth is only available on some smartphones.
- The device must be plugged in.
- To connect for the first time make sure the device to be used is ready to connect.
6.12.5. Delete Connection History
[Go to table of contents]- Press the button on the remote control.
- Enter the following path on the screen. General External Devices Delete Connection History
6.13. System
[Go to table of contents]6.13.1. Language
[Go to table of contents]- Press the button on the remote control.
- Enter the following path on the screen. General System Language
Menu Language
You can select one of the menu languages to be displayed on the screen.The language for the speech recognition will be automatically set referring to the selected language for the menu.- The speech recognition is only applied to some models.
Audio Language
You can choose the language you want when watching a digital broadcasting program, which includes multiple audio languages.
For programs that do not support multiple languages, the default will be used.- Applies to digital broadcasting.
Keyboard Languages
Select the language to use the on-screen keyboard.
- The configurable items differ depending upon model.
6.13.2. Location
[Go to table of contents]- Press the button on the remote control.
- Enter the following path on the screen. General System Location
Address Setting
You can set the location in detail.Broadcast Country
You can set the broadcast country on your device.Country
Select the country for your country's special services.Zip Code
This function is used to set the broadcast location of the device by entering your zip code.LG Services Country
Select the country where you want to access LG's services. Services may vary depending on location.
If you haven't selected Set Automatically, you can select the country manually.Weather Location Setting
Set the region for displaying weather information.
- When you are not connected to the network you will be unable to set the City.
- You must set the country manually when you are not connected to the network.
- The configurable items differ depending upon model.
6.13.3. Time & Timer
[Go to table of contents]- Press the button on the remote control.
- Enter the following path on the screen. General System Time & Timer
Set Automatically
The device time is automatically set to the time of the digital broadcasting information sent from the broadcasting station or the time sent from the server.Time/Date/Time Zone
You can set the time and date manually if the automatically set current time is incorrect.- If you set the time manually with the antenna connected, schedule information, program guide, etc. may not function correctly.
Timers
Sleep Timer
Sets the device to turn off at a specified time.
If you do not want to use Sleep Timer, select Off.Power On Timer
Set Enable the function to On.
The device is turned on at the set time.- Time: Set the time at which to turn on the power.
- Timer Repeat: Set the day of the week.Set the option to None to operate the feature only once.
- Input: Set an external input to display when the power is turned on.
- Timer Channel: Set a channel to display when the power is turned on.This option can be set only when Input is set to TV.
- Volume: Set audio volume to use when the power is turned on.
Power Off Timer
Set Enable the function to On.
The device is turned off at the set time.- Time: Set the time at which to turn off the power.
- Timer Repeat: Set the day of the week.Set the option to None to operate the feature only once.
Auto Power Off after 4 Hours
If you do not press any button for 4 hours after the device is turned on by a feature such as Power On Timer, the device will be turned off automatically.
To ensure the product does not automatically turn off set Auto Power Off after 4 Hours to Off.- Some models may not be supported.
- To use Power On Timer/Power Off Timer set the time correctly.
6.13.4. Safety
[Go to table of contents]- Press the button on the remote control.
- Enter the following path on the screen. General System Safety
- Set Enable the function to On.
TV Program Locks
TV Lock
Blocks children's shows that you do not want your child to watch. Also uses the Parental Control function (V-Chip) to block preferred broadcasts based on their ratings.- Children Age: TV-Y (Preschool children aged 2-6 years), TV-Y7 (Advise school children aged over 6)
- Fantasy Violence: TV-Y7 (Advise school children; Suitable for children aged over 7 years. May contain fantasy violence.)
- General Age: TV-G (General Audience. All ages admitted.) TV-PG (Parental Guidance Suggested. Some material may not be suitable for preschool children.) TV-14 (Parents Strongly Cautioned. Some material may not be suitable for children under 14.) TV-MA (Adults Only. Not suitable for children under 17.)
- Sexually Suggestive Dialogue: TV-PG or TV-14
- Adult Language(Violent Language): TV-PG, TV-14 or TV-MA
- Sexual Situations(Sexually Explicit): TV-PG, TV-14 or TV-MA
- Violence: TV-PG, TV-14 or TV-MA
- The configurable items differ depending upon model.
Movie Lock
Blocks movies that are exclusively broadcast on the device and are deemed harmful based on MPAA (Motion Picture Association of America) ratings.- G: (General Audiences)All ages admitted
- PG: (Parental Guidance Suggested)Some content is inappropriate for children
- PG-13: (Parents Strongly Cautioned)Some material may be inappropriate for children under 13.
- R: (Restricted)Under 17 requires accompanying parent or adult guardian.
- NC-17: No one 17 and under admitted.
- X: Adults only
- The configurable items differ depending upon model.
Downloadable Rating
This function is only enabled when the device receives the Region 5 rated data.The name of the rating option may differ.- Supported only in the digital mode.
Channel Locks
Blocks the channels that contain inappropriate contents for children. The channels can be selected but the screen is blank and the audio is muted. To watch a locked channel, enter the password.Application Locks
You can lock or unlock the application.- The lock function is not immediately available for the currently running application.
Input Locks
You can lock or unlock the Inputs.Reset Password
Set or change the password for the device.- The default password is set as “0000”.
Resetting a Lost Password
If you lose the password you set, you can reset it as follows:- Press the button on the remote control.
- Enter the following path on the screen. General System Safety
- Press the channel buttons on the remote control in the order: .The master password input window will appear.
- Enter the numbers “0313” in the master password input window.The password will be reset.
- Press the button on the remote control.
- Enter the following path on the screen. General System Safety
- Set Enable the function to On.
TV Program Locks
TV Rating English
Select Canadian English Rating System.- E: Exempt
- C: Children
- C8+: Children aged 8 or older
- G: All ages admitted
- PG: Parental Guidance Suggested
- 14+: 14 or older
- 18+: Adults only
- Off: View all programs
- The configurable items differ depending upon model.
TV Rating French
Select Canadian French Rating System.- E: Exempt
- G: All ages admitted
- 8+: Children aged 8 or older
- 13+: Suitable for 13 years and over
- 16+: Suitable for 16 years and over
- 18+: Adults only
- Off: View all programs
- The configurable items differ depending upon model.
Downloadable Rating
This function is only enabled when the device receives the Region 5 rated data.The name of the rating option may differ.- Supported only in the digital mode.
Channel Locks
Blocks the channels that contain inappropriate contents for children. The channels can be selected but the screen is blank and the audio is muted. To watch a locked channel, enter the password.Application Locks
You can lock or unlock the application.- The lock function is not immediately available for the currently running application.
Input Locks
You can lock or unlock the Inputs.Reset Password
Set or change the password for the device.- The default password is set as “0000”.
Resetting a Lost Password
If you lose the password you set, you can reset it as follows:- Press the button on the remote control.
- Enter the following path on the screen. General System Safety
- Press the channel buttons on the remote control in the order: .The master password input window will appear.
- Enter the numbers “0313” in the master password input window.The password will be reset.
6.13.5. Quick Start+
[Go to table of contents]- Press the button on the remote control.
- Enter the following path on the screen. General System Additional Settings Quick Start+
- Set to On.
- Some models may not be supported.
- Turning this option on may increase energy consumption.
6.13.6. Home Settings
[Go to table of contents]- Press the button on the remote control.
- Enter the following path on the screen. General System Additional Settings Home Settings
Power On Screen
You can select the screen to be displayed when the power is turned on.Home Promotion
You can turn on or off the advertisements on the Home screen.Content Recommendation
You can receive content recommendations on the Home screen.Wallpaper
Your selected Home wallpaper is displayed in Black Mode.
- The configurable items differ depending upon model.
6.13.7. Screen Saver Settings
[Go to table of contents]- Press the button on the remote control.
- Enter the following path on the screen. General System Additional Settings Screen Saver Settings
Screen Saver Promotion
Setting to Off enables you to turn off the advertisements displayed on the screen saver.Screen Saver Standby Time
You can set the time for the screen saver to be activated.
6.13.8. Standby Light
[Go to table of contents]- Press the button on the remote control.
- Enter the following path on the screen. General System Additional Settings Standby Light
- Some models may not be supported.
6.13.9. Pointer Options
[Go to table of contents]- Press the button on the remote control.
- Enter the following path on the screen. General System Additional Settings Pointer Options
Tracking Speed
Sets the pointer speed.Pointer Size
Selects the pointer size.
6.13.10. Live Plus
[Go to table of contents]Path: Live Channel Watching and Scheduling
Using the Live Plus- Some models may not be supported.
6.13.11. Settings Help
[Go to table of contents]- Press the button on the remote control.
- Enter the following path on the screen. General System Additional Settings Settings Help
- Set to On.
6.13.12. Set ID
[Go to table of contents]- Press the button on the remote control.
- Enter the following path on the screen. General System Additional Settings Set ID
- This feature is for administrators.It is not recommended for use in a typical home environment.
6.13.13. Reset to Initial Settings
[Go to table of contents]- Press the button on the remote control.
- Enter the following path on the screen. General System Reset to Initial Settings
- After reset, the device will automatically turn off and on.
Reset All
This will return all settings to their default values.Reset all except network settings
All items except the network settings are changed to their default settings.
- If Safety is set to On; you should type the password to Reset to Initial Settings.
- Do not turn off the power during initialization.
- We recommend that you reset the device to Reset to Initial Settings before you sell it or transfer it to a third party.
6.14. Energy Saving
[Go to table of contents]- Press the button on the remote control.
- Enter the following path on the screen. General Energy Saving
Energy Saving Step
- Auto: The product's sensor detects the ambient lighting and automatically adjusts the screen brightness.
- Minimum Brightness: You can set how dark the screen is when the Energy Saving Step is set to Auto.
- Off: Turns off the Energy Saving Step.
- Minimum/Medium/Maximum: Use the power saving feature according to Energy Saving Step set on the device.
- The configurable items differ depending upon model.
- If you use Energy Saving Step function, brightness of the device will be affected.
Auto Power Off
When the device is on, it turns off automatically if you do not press any button within the set period of time.- Some models may not be supported.
Screen Off
Screen is turned off and only sound is played.
Press any button except the power and the volume buttons to turn the screen back on.- It may not be supported, depending on the running app or function.
6.15. Support
[Go to table of contents]6.15.1. Software Update
[Go to table of contents]- Press the button on the remote control.
- Enter the following path on the screen. Support Software Update
Auto Update
When it is set to On, updates are automatically made without a separate confirmation procedure except for some important updates.Check for Updates
When checking for the latest update version, you can perform updates only if an update file of a later version is available.The device automatically checks your software version but, if necessary, you can perform a manual check.
- The configurable items differ depending upon model.
- The latest version can be obtained via digital broadcast signals or internet connections.
- Changing the channel while downloading the software via digital broadcast signal interrupts the download process. Returning to the initial channel allows downloading to resume.
- If software is not updated, certain functions may not work properly.
- In some countries, Auto Update is not displayed if you are not connected to the Internet.
6.15.2. User Guide
[Go to table of contents]By pressing
User Guide on the screen while using the app, or by pressing during setup in Settings, you can check the description of the associated User Guide.- Shortcut: Redirect to the User Guide related to the description you're viewing.
 : The full table of contents of the User Guide can be expanded.
- Try Now: You can navigate to the corresponding feature or setting.
Text color in this User Guide is used to indicate the following:
- ■ Red: the names of the remote control buttons.
- ■ Yellow: the buttons and the text to be displayed on the screen.
- The images and information in the User Guide may differ depending on the model and operating environment.
- Product specifications may be changed without prior notice due to upgrade of product functions.
6.15.3. Screen Self-diagnosis
[Go to table of contents]- Press the button on the remote control.
- Enter the following path on the screen. Support Screen Self-diagnosis
- After running a test to verify that the image signal is output normally, you can select whether there is an error with the signal on the screen.
If there are no problems in the test, check the connected external device or broadcast signal.
6.15.4. Sound Self-diagnosis
[Go to table of contents]- Press the button on the remote control.
- Enter the following path on the screen. Support Sound Self-diagnosis
- Start the Sound Test to check that the sound signal output is normal, and then select whether there is an error.
If there are no problems in the test, check the connected external device or broadcast signal.
6.15.5. Memory Optimizer
[Go to table of contents]- Press the button on the remote control.
- Enter the following path on the screen. Support Memory Optimizer
6.15.6. Home/Store Mode
[Go to table of contents]- Press the button on the remote control.
- Enter the following path on the screen. Support Home/Store Mode
- You can choose between Home Mode and Store Mode.
To use the device at home, select Home Mode.
Select Store Mode only when the device will be displayed in store. The Store Mode provide settings optimized for store display.
6.15.7. TV Information
[Go to table of contents]- Press the button on the remote control.
- Enter the following path on the screen. Support TV Information
6.15.8. IP Control Settings
[Go to table of contents]- Press the button on the remote control.
- Enter the following path on the screen. Support IP Control Settings
6.15.9. Privacy & Terms
[Go to table of contents]- Press the button on the remote control.
- Enter the following path on the screen. Support Privacy & Terms
User Agreements
These are the terms and conditions related to use of the Smart function-related services and protection of privacy.Legal Notice
It's a legal notice for services provided via the device.Open Source Software Notice
You can view the instructions for each item.Advertisement
You can reset the information collected for the purpose of providing customized advertising or refuse the collection of ad-related information.Limit AD Tracking
If set to On, personalized advertisements based on user interests may not be provided.Reset AD ID
User interest information is newly collected, and advertisements are provided according to the information.
App Permissions
Camera
You can set access permissions to the camera for each app.Microphone
You can set access permissions to the microphone for each app.Nearby Devices
Nearby Devices access will be customized for individual apps.Access File
You can set app-specific file access permissions.
Delete My Personal Information
Delete Viewing Information
You can delete the viewing information collected from the device to the server.
Deleting this information may impact the recommendation services provided based on your viewing or device usage history.Delete Voice Information
You can delete the voice information collected from the device to the server.
Deleting this information may impact the recommendation services provided based on your voice history.- The deletion of this information requires a network connection and agreement to the Terms and Conditions.
Delete Voice ID
Delete the Voice ID information collected from the device.
- The configurable items differ depending upon model.
7. Reference
[Go to table of contents]7.1. Perform Check-up with the Quick Help
[Go to table of contents]- Press the button on the remote control.
- Enter the following path on the screen. Support Quick Help
You can also run Quick Help by pressing the button on the remote control and selecting Accessibility on the screen.
For a remote control with number buttons, you can also run Quick Help by pressing and holding the number 9 button.
Optimization Settings
You can automatically check the overall status of your device and view and change the recommended setting values.Help Library
Select the item that matches the symptom to find instructions that can help you solve the problem.Self-diagnosis and Care
You can check your device's current status for the selected item.LG Remote Service
You can get help for troubleshooting through the remote control.
For LG Remote Service, contact the manufacturer's customer service center.
- The configurable items differ depending upon model or country.
- If the problem persists, contact the manufacturer's customer service center.
7.2. Learn More About Always Ready
[Go to table of contents]- What is the difference between Always Ready and the power off?
- Unlike conventional power off, you can operate the device with Hands-free Voice Control, connect Bluetooth, and receive responses from a reserved Home IoT Devices.
However, standby power may be consumed more than when the power is turned off. - Depending on the model, some features may not be available.
- How can I use Always Ready?
- Change the settings as follows:
- Press the button on the remote control.
- Enter the following path on the screen. General Always Ready
- Set Enable the function to On.
- Press the
- When watching the device
Press the button on the remote control to switch to Always Ready with the screen on.
Press the button on the remote control twice to switch to Always Ready with the screen off. - When the device is Always Ready with the screen on
To watch the device, press the button or the button on the remote control.
To turn off the screen, press the button on the remote control.Always Ready will remain. - When the device is Always Ready with the screen off
To watch the device, press the button on the remote control.
To turn on the screen, press the Wheel (OK) button on the remote control.Always Ready will remain. - How can I continue to use Always Ready without a wallpaper?
- Change the settings as follows:
- Press the button on the remote control.
- Enter the following path on the screen. General Always Ready
- Select Use Always Ready without wallpaper(LG Gallery+) on the screen.
While watching on the device, you can press the button on the remote control to switch immediately to Always Ready, turning off the screen.
- Press the
- I don't want to use Always Ready.
- Change the settings as follows:
- Press the button on the remote control.
- Enter the following path on the screen. General Always Ready
- Set Enable the function to Off.
While watching on the device, you can press the button on the remote control to immediately turn off the power.
In this case, features such as Bluetooth connection or Hands-free Voice Control will not work.
- Press the
- When the device is Always Ready, the Standby Light is white. Did it turn off correctly?
- This only applies to models that support the Hands-free Voice Control.
The color of Standby Light differs, depending on whether Hands-free Voice Control is activated or not.If Hands-free Voice Control is enabled, it is displayed in white; if it is not available, it is displayed in red.
For more details, please refer to the following User Guide.
Path: Smart Function Using Hands-free Voice Control
7.3. Troubleshooting Power/Remote Control Issues
[Go to table of contents]- I cannot turn on the device.
- Make sure that the device's power plug is plugged into the outlet.
- Check that the power Standby Light on the device is red.If Standby Light is off, check the connection of the device power plug, as shown below.
- If you are using a multi-outlet, check if it is working properly.To check whether a power strip is working properly, plug the device's power plug directly to a wall outlet and observe its operation.
- Try to power on using the button on your device.
- The power is on, but the screen comes on later.
- This is because there is a noise-removal process to eliminate any possible noise that may appear during power-on. This does not mean the product is defective.
- The pointer of Magic Remote does not appear on the screen.
- Hold the remote control towards the device and press the and buttons at the same time for more than 5 seconds until instructions appear.The previously registered remote control is deregistered and then registered again.
- Replace the batteries when you are prompted to do so on your screen.(Use alkaline batteries.)
- If Audio Guidance is set to On, the pointer of the Magic Remote does not appear.
- Press the button on the remote control.
- Enter the following path on the screen. General Accessibility Audio Guidance
(Some models may not be supported.) - Set to Off.
- Press the
- I cannot turn the device on with the remote control.
- Make sure that the device's power plug is plugged into the outlet.
- Replace the batteries in the remote control.(Use alkaline batteries.)
- If you place an obstacle, such as a soundbar, in front of the device's remote control receiver, it may interfere with the reception of the remote control signal.Install it at least 10 cm(3.94 inches) away from the device's remote control receiver.
- When using a set-top box remote control, if the device integrated control function of the set-top box remote control is turned off, you cannot power on or off the device with the set-top box remote control.Please contact your set-top box provider.
- The power turns off suddenly.
- Check whether the following settings are turned on.
- Press the button on the remote control.
- Enter the following path on the screen. General System Time & Timer Timers Power Off Timer
- Press the
- The device will be turned off automatically if you do not press any buttons for 4 hours even after the device is turned on at the time set by Reminder or Power On Timer.
- There is also a chance that the internal protection circuitry has activated because the internal temperature of the product has risen unusually or excessively.
- If you are using a set-top box, the device may be set to turn off when the set-top box is turned off.To prevent the device from turning off when you turn off the set-top box, turn the device power sync function off on the set-top box.
- Every time I turn on the device, the Home screen appears.
- The Home screen is automatically displayed whenever you turn on the power.You can change settings to prevent the home screen from being displayed every time you turn on the device.
Press the button on the remote control, then navigate to General System Additional Settings Home Settings on the screen.Set Power On Screen to Recent Input. - I cannot turn on or operate the device with the device's remote control even after setting the universal remote control.
- Make sure that the device's power plug is plugged into the outlet.
- Replace the batteries in the remote control.(Use alkaline batteries.)
- Check if there are any obstacles blocking the signal in front of the connected device's remote control receiver.
7.4. Troubleshooting Screen Issues
[Go to table of contents]First of all, perform a Screen Self-diagnosis to check for any abnormalities in the device.
- Press the button on the remote control.
- Enter the following path on the screen. Support Screen Self-diagnosis
Make sure that the set-top box is correctly connected to your device.
- It says there is no signal on the screen.
- Ensure the cables from antennas or external devices are properly connected to this device.
- Go to button on the remote control to choose the connected input.
- Depending on the model or region, the labeling and operation of the remote control buttons may vary.
If your remote control doesn't have a button, press and hold the button to execute Home Hub.
- Depending on the model or region, the labeling and operation of the remote control buttons may vary.
- Check if your external device, such as set-top box or Blu-ray player, is turned on.
- I cannot see some channels.
- Check the settings as follows:
- Press the button on the remote control.
- Enter the following path on the screen. General Channels Channel Tuning Auto Tuning
- Press the
- If you are using a set-top box, consult its supplier.
- The screen is cut off.
- Change the settings as follows:
- Press the button on the remote control.
- Enter the following path on the screen. Picture Aspect Ratio
- Try changing the Aspect Ratio.
- Press the
- When viewing videos through an external device (set-top box, game console, etc.) or content app, check the screen size settings in the settings menu of the device/app.There may be differences in the screen ratio provided by each device/app.
- The screen shakes after the momentary appearance of vertical/horizontal lines and net pattern.
- Interference can occur from strong radio waves such as those from other electrical devices; therefore, use devices such as hair dryers or electric drills in different outlets.
- Each channel has a different image quality.
- Depending on the type of videos provided by the broadcasters, channels may have different image qualities.
- If you are using a set-top box, consult its supplier.
- Run Screen Self-diagnosis first. If it is normal, there may be a problem with the broadcast signal.
- There is a difference in image quality from those seen at the store.
- Depending on the type of video provided by the broadcasters, there may be a difference in image quality from those displayed at the store.
- Run Screen Self-diagnosis first. If it is normal, there may be a problem with the broadcast signal.
- A digitally broadcasted program stops or its screen is broken.
- This happens when a signal is weak or reception is unstable. Adjust the antenna direction or check the cable connection.
- If the signal strength is too low in Manual Tuning, contact the broadcasting station or management office to have the signals checked.
- Press the button on the remote control.
- Enter the following path on the screen. General Channels Channel Tuning Manual Tuning
- Press the
- If you are using a set-top box, consult its supplier.
- When HDMI input is in use, a vertical solid line or color blurring appears on the upper/lower/left/right edges of the screen.
- Just Scan shows you the original image as it is.If the signal is weak, the top/bottom/left/right sides of the screen may be snowy.
- Press the button on the remote control.
- Enter the following path on the screen. Picture Aspect Ratio Just Scan
- Set to Off.
- Press the
- I don't see anything, or the image keeps flickering when I try to connect the HDMI cable.
- Check whether your HDMI® cable is compliant with the specifications.You may experience flickering or a blank screen if the HDMI® cable is faulty (bent, broken).
- Make sure that the cable is correctly connected to the port.Bad or loose contact may cause display problems on the screen.
- If you're using a UHD set-top box, adjust HDMI Deep Color.
- Press the button on the remote control.
- Enter the following path on the screen. General External Devices HDMI Settings
- Select HDMI Deep Color.
- Press the
- The screen looks too dim or dark.
- Change the settings as follows:
- Press the button on the remote control.
- Enter the following path on the screen. Picture Select Mode
- Switch Select Mode to your desired picture mode.(Standard, Vivid, etc.)
This applies to the current input mode only.
- Press the
- Change the settings as follows:
- Press the button on the remote control.
- Enter the following path on the screen. Picture Advanced Settings Brightness Motion Eye Care
- Switch Motion Eye Care to Off.
This applies to the current input mode only.
- Press the
- Change the settings as follows:
- Press the button on the remote control.
- Enter the following path on the screen. Picture Advanced Settings Reduce Blue Light
- Switch Reduce Blue Light to Off.
- Press the
- Change the settings as follows:
- Press the button on the remote control.
- Enter the following path on the screen. General Energy Saving
- Switch Energy Saving Step to either Off or Minimum.
- Press the
- The game screen is too dark.
- If you connect an external device to run the HDR game, the screen brightness is optimized to the intended setting while creating the game.
If you want to change the optimized screen brightness, change the settings below.- Press the button on the remote control.
- Enter the following path on the screen. Picture Advanced Settings Brightness Dynamic Tone Mapping
- Set to Off.
- Press the
- The screen brightness keeps changing.
- Change the settings as follows:
- Press the button on the remote control.
- Enter the following path on the screen. General Energy Saving
- Switch Energy Saving Step to either Off or Minimum.
- Press the
- The screen is in black and white or displaying strange colors.
- Change the settings as follows:
- Press the button on the remote control.
- Enter the following path on the screen. General Accessibility Grayscale
- Set to Off.
- Press the
- Change the settings as follows:
- Press the button on the remote control.
- Enter the following path on the screen. General Accessibility Invert Colors
- Set to Off.
- Press the
- ULTRA HD video does not display.
- With some HDMI cables, signals may not be received.
- Change the settings of the connected device to the supported signal.
7.5. Troubleshooting Sound Issues
[Go to table of contents]First of all, perform a Sound Self-diagnosis to check for any abnormalities in the device.
- Press the button on the remote control.
- Enter the following path on the screen. Support Sound Self-diagnosis
Make sure that the set-top box is correctly connected to your device.
- Depending on the model or region, the labeling and operation of the remote control buttons may vary.
- More Actions button: ,
If your remote control doesn't have a More Actions button, press and hold the Yellow button to execute More Actions.
- More Actions button:
- The screen is fine, but it does not play any sound.
- Try another channel.
- Adjust the volume with the remote control for the device.
- When using a set-top box, no sound will be produced if the volume of the set-top box is set to 0 or mute.Set the volume to your preference with the volume button on the set-top box remote control.
- Change the settings as follows:
- Press the button on the remote control.
- Enter the following path on the screen. Sound Sound Out
- Set the Sound Out to Optical Out Device + TV Speaker or Use TV Speaker, and then check it once again.If you can hear the sound without any problem, check the connection with external speakers such as sound bar and the settings of the external speakers.
- Press the
- There is no sound coming from one of the speakers.
- Check the settings as follows:
- Press the button on the remote control.
- Enter the following path on the screen. Sound Advanced Settings Balance
- Adjust the balance as necessary with the Navigation button in Balance.
- Press the
- The sound is not synchronized with the picture, or the sound sometimes breaks up.
- If this happens on only some of the channels, it may be caused by the broadcasting company's transmission signal. Please have your broadcasting services provider (wired/cable) diagnose the problem.
- If all of the channels are out of sync, adjust the sync in Match Screen and Sound.
- Press the button on the remote control.
- Enter the following path on the screen. Sound Advanced Settings Match Screen and Sound
- Press the
- If you are using a set-top box, consult its supplier.
- The volume changes when I change the channel.
- The volume of different broadcasting stations' transmission output may vary.
- Change the settings as follows:
- Press the button on the remote control.
- Enter the following path on the screen. Sound Advanced Settings Automatic Volume Adjustment
- Set to On.
- Press the
- If you are using a set-top box, consult its supplier.
- The volume keeps changing.
- Change the settings as follows:
- Press the button on the remote control.
- Enter the following path on the screen. Sound Advanced Settings Automatic Volume Adjustment
- Set to On.
- Press the
- The sound does not work or only the background music is played in some programs.
- Set your language preference in Audio Language.
- The voice resonates excessively.
- Change the settings as follows:
- Press the button on the remote control.
- Enter the following path on the screen. Sound Select Mode
- Set Select Mode to Clear Voice/Clear Voice Pro.
- Press the
- A voice is emitted when setting menus or operating channels, volume, etc. with the remote control.
- Change the settings as follows:
- Press the button on the remote control.
- Enter the following path on the screen.
- General Accessibility Audio Guidance
- General Accessibility Audio Description
- Set to Off.
- Depending on the model, some features may not be available.
- Press the
7.6. Troubleshooting Device Connection Issues
[Go to table of contents]- Screen Share does not work.
- Check if your mobile device supports the Screen Share function.
- If this device is not detected on your mobile device, turn all devices off and back on again.
- Make sure you have selected the device from the list of devices found on your mobile device.
- Change the settings as follows:
- Press the button on the remote control.
- Enter the following path on the screen. Support TV Information Device Name
- Change the device name.
- Press the
- When using the AirPlay function, ensure that the device is connected to the same Wi-Fi.
Make sure that Home Hub AirPlay is set to On.
Some models do not support AirPlay. - The screen remains blank after it is connected to a PC.
- Check that the PC is properly connected to the device.
- Turn the device off and back on using the remote control.
- Restart the PC with the device on.
- Make sure that the output resolution set on the PC is set to the HDMI-PC supported resolution of the device.
- To use dual monitors, check that the PC or notebook supports dual-monitor mode.
- Reconnect the high speed HDMI cable.
- If you have connected the RGB output port of your PC to the HDMI of your device, you need an RGB to HDMI gender.
You will not see anything on the screen if you use an HDMI to RGB gender. - The screen is not fully shown or is lopsided when connected to a PC.
- Set the PC's resolution to one supported by the device.For more details, please refer to the following User Guide.
Path: Reference Supported Resolution: HDMI-PC - Set the connected HDMI device's name to PC.
- Press the button on the remote control.
Entering into the Home Hub. - Select Edit Inputs in the upper right corner.
- Change the icon of the HDMI port connected to Inputs to PC and select Save.
- Depending on the model or region, the labeling and operation of the remote control buttons may vary.
- If your remote control doesn't have a button, press and hold the button to execute Home Hub.
- If your remote control doesn't have a
- Press the
- The sound does not play when the PC is connected with an HDMI cable.
- In the PC settings, go to Control Panel Sound Playback to ensure the correct device is selected as the default.
- Consult your manufacturer on whether your graphics card supports HDMI audio output.
- I cannot set the refresh frequency to 144 Hz for a PC connected to a model that supports 144 Hz.
I cannot set the refresh frequency to 165 Hz for a PC connected to a model that supports 165 Hz. - Change the settings as follows:
- Press the button on the remote control.
- Enter the following path on the screen. General Game Optimizer 144Hz Mode/165Hz Mode
The configurable items differ depending upon model. - Set to On.
- Press the
- The screen of the set-top box connected to the 144 Hz supported model does not appear.
The screen of the set-top box connected to the 165 Hz supported model does not appear. - Some devices may have compatibility issues with 144 Hz / 165 Hz.
- Press the button on the remote control.
- Enter the following path on the screen. General Game Optimizer 144Hz Mode/165Hz Mode
The configurable items differ depending upon model. - Set to Off.
- Press the
7.7. Troubleshooting Movie Playback Issues
[Go to table of contents]For detailed information about supported files, please refer to the following User Guide.
Path: Reference
Supported Video File Formats- I cannot find a file in the Media Player.
- Check whether the files saved on your USB storage device can be read by the PC.
- Check that the file extension is supported.
- Change the filter to All.
- I see a message that says the file is not supported.
- Check that the file plays without any problems on the video player on a PC. (Check for file damage.)
- Check that the file extension is supported.
- Check that the resolution is supported.
- Check that the video codec is supported.
- Check that the frame rate is supported.
- I get a message saying “This audio is not supported” or the video is playing normally but the audio is not.
- Check that the file plays without any problems on the video player on a PC. (Check for file damage.)
- Check that the file extension is supported.
- Check that the audio codec is supported.
- Check that the bit rate is supported.
- Check that the sample frequency is supported.
- Check that the number of audio channels is supported.
- I cannot see the subtitles.
- Check that the file plays without any problems on the video player on a PC. (Check for file damage.)
- Check that the video and subtitle files have the same name.
- Also check that both the video file and the subtitle file are in the same folder.
- Check that the subtitle file format is supported.
- Check that the language is supported.
(You can check the language of the subtitle file by opening the file in the Notepad.) - If subtitles encoding is incorrectly set, subtitles may not be displayed properly.
Press on the screen while using the playback control.Select and change the Code Page value. - If you play a video file stored on another device by using the content sharing feature, subtitles may not be available depending on the program you use.
- Some NAS devices may not support captions when playing a video.
- My USB storage device is not recognized when connected.
- Check whether it is a USB storage device supported by this device.
For more details, please refer to the following User Guide.
Path: Allow New Connections Connecting USB Storage Devices
7.8. Troubleshooting Network Connection Issues
[Go to table of contents]Before connecting to a wireless network, check the name and password of the Wi-Fi device to connect.
You can check the network connection status as shown below.
- Press the button on the remote control.
- Enter the following path on the screen. General Network Wired Connection (Ethernet) General Network Wi-Fi Connection Other Network Settings Advanced Wi-Fi Settings
- Some models may support the Wi-Fi Connection function only.
- The wireless network connection is not working.
- Change the settings as follows:
- Press the button on the remote control.
- Enter the following path on the screen. General System Additional Settings Quick Start+
- Set to Off.
- Turn off the device and turn it back on, then connect to the wireless network.
- Press the
- If it cannot connect to the router, try connecting it to the mobile hotspot on your smartphone.If it can be connected to the mobile hotspot, this indicates that it is a router problem. In this case, please check the router.
If you use the network with a device connected to a mobile hotspot, you may be charged according to the contract with your carrier. 
When X appears next to the device- Check the device or the AP (Router).
- Check the connection status of the device, AP (Router) and cable modem.
- Power off and power on in the following order;
1. Turn your cable modem off and back on, and wait for the device to reset.
2. Turn the wired/wireless router off and back on, and wait for the device to reset.
3. Turn the device off and on. - If you want to establish a wired LAN connection check whether an IP address can be obtained from your router properly.If you are setting up your network manually check whether all settings are correct.
- If you want to establish a wireless connection check the following points as well.
①Set your router's SSID (network name) or wireless channel.
②Set your router's security key.
If you can't complete this setting, refer to the router's user manual and the instructions provided by your Internet provider.If you are still unable to establish your configuration, consult your router's manufacturer or your Internet service provider. - If you are using a static IP, enter the IP directly.

When X appears next to Gateway- Check the AP (Router) or consult your Internet service provider.
- Unplug the router/cable modem from the wall outlet, wait 10 seconds and reconnect it.
- Initialize (Reset) on the AP (Router) or Cable Modem.
- Check the AP (Router) manufacturer's website to make sure your router has the latest firmware version installed.
- If you can't complete this setting, refer to the router's user manual and the instructions provided by your Internet provider.If you are still unable to establish your configuration, consult your router's manufacturer or your Internet service provider.

When X appears next to DNS- Check the AP (Router) or consult your Internet service provider.
- Unplug the router/cable modem from the wall outlet, wait 10 seconds and reconnect it.
- Initialize (Reset) on the AP (Router) or Cable Modem.
- Check that the MAC address of the device/AP (Router) is registered with your Internet service provider. (The MAC address displayed on the pane of the network status window should be registered with your Internet service provider.)
- If you can't complete this setting, refer to the router's user manual and the instructions provided by your Internet provider.If you are still unable to establish your configuration, consult your router's manufacturer or your Internet service provider.
7.9. Troubleshooting LG Account Issues
[Go to table of contents]- I've signed up for the membership on the device. Do I have to sign up again on the website (www.lgappstv.com)?
- You can use the website and LG ThinQ app with the member information registered on the device.
- I forgot my password. What should I do?
- On the device's login screen, select Forgot Password? to go to the find password page.Enter your email address on the find password page, and we'll send you a link to reset your password.
- You can also reset your password in LG Account Reset Password on the website (www.lgappstv.com).
- I wish to delete the account saved on the device.
- When you log in to your LG account on the device, the account will be saved to the device.
You can delete accounts stored on the device at any time, as follows.- Press the button on the remote control and select LG Account on the screen.
- Select More account information at the top of the screen.
- Select Edit Account List on the screen.
- Pressing Delete will delete the account.
It will not delete the login history or close the account.
- Press the
- I want to delete the viewing information collected based on LG Account from the device.
- You can delete the viewing information stored based on the logged-in LG Account at any time.
- Press the button on the remote control and select LG Account on the screen.
- Select More account information at the top of the screen.
- Select Account Management for the account you wish to set up.
- Select Delete Viewing Information and follow the on-screen instructions to delete the information.
- Press the
- I wish to close my account on the device.
- You can also close your LG account on the device as follows.
- Press the button on the remote control and select LG Account on the screen.
- Select More account information at the top of the screen.
- Select Account Management for the account you wish to set up.
- Select Terminate My Account.
- Enter your password and press OK to close your account.
- Press the
- In some countries, access to the website (www.lgappstv.com) may be restricted.
7.10. Troubleshooting Contents Issues
[Go to table of contents]- I cannot see any content in HOME.
- You may not be able to see the content if the service country setting has been changed.
- Press the button on the remote control.
- Enter the following path on the screen. General System Location LG Services Country
(Some models may not be supported.) - Change to the country you want to use.
- Press the
- If some apps are not visible, they may have been hidden or deleted.Unhide the app from Hidden apps list in Edit App List or reinstall the app.
- If the app is deleted, you can download the app at Apps and reinstall it.Press the button on the remote control, then search for the desired app in Apps on the screen and install it.
- The type of supported content differs by country.
- The content offerings are subject to change or interruption by the service provider.
7.11. Troubleshooting Internet Browser Issues
[Go to table of contents]- Some parts of a particular website are not visible when I am using the Internet.
- The Web Browser supports only HTML5 media, it does not support Flash Plug-in.
- The Web Browser does not support plug-in installation.
- On the Web Browser, it may not be possible to play media files in formats other than:
JPEG/PNG/GIF - Only files that can be played by Media Player can be saved.
- If the Use Block Ads feature is turned on, the area on the website that appears to show an ad will appear blank.If some content on the website is hidden and invisible, try setting Settings Use Block Ads to Off in Web Browser.Sponsored AD on the new tab page will be displayed even if you set the Use Block Ads feature to Off.
- The Web Browser automatically shuts down when I visit a website.
- The Internet browser may be forced to shut down if the available memory size is not sufficient to accommodate the image information for a website.Check if you can access the site with the issue on your PC.
- When watching a video in Web Browser, the video is forced off.
- You may be able to fix this by setting Settings Adaptive Streaming using JavaScript to Off in Web Browser.The setting is not applied to tabs that were open before the change, and is only applied to tabs opened after the change.
8. Reference
[Go to table of contents]8.1. Supported Photo File Formats
[Go to table of contents]| Extension | Resolution |
|---|---|
| jpeg jpg jpe | Minimum: 64 × 64 Maximum Normal Type: 15360 (W) × 8640 (H) Progressive Type: 4800 (W) × 3600 (H) |
| png | Minimum: 64 × 64 Maximum: 5760 (W) × 5760 (H) |
| bmp | Minimum: 64 × 64 Maximum: 1920 (W) × 1080 (H) |
| avif heic heif | Minimum: 64 × 64 Maximum: 4800 (W) × 3600 (H) 9600 (W) × 7200 (H)(8K models only) |
8.2. Supported Video File Formats
[Go to table of contents]Maximum Data Transfer Rate
- Full HD video
H.264 1920 × 1080@60P BP/MP/HP@L4.2 Maximum 40Mbps
HEVC 1920 × 1080@60P Main/Main10@L4.1 Maximum 40Mbps - ULTRA HD video(ULTRA HD models only)
H.264 3840 × 2160@30P BP/MP/HP@L5.1 Maximum 50Mbps
HEVC 3840 × 2160@60P Main/Main10@L5.1 Maximum 60Mbps - HFR video(HFR support models only)
HEVC 3840 × 2160@120P Main/Main10@L5.2 Maximum 60Mbps - Dolby Vision video(Dolby Vision support models only)
HEVC 3840 × 2160@60P Main/Main10@L5.1 Maximum 50Mbps - 8K video(8K models only)
AV1 7680 × 4320@60P Maximum 50Mbps
HEVC 7680 × 4320@60P Main/Main10@L6.1 Maximum 100Mbps
Supported External Subtitles
- smi, srt, sub (MicroDVD, SubViewer 1.0/2.0), ass, ssa, txt (TMPlayer), psb (PowerDivX), dcs (DLP Cinema)
Supported Embedded Subtitles Format
- Matroska (mkv): Sub Station Alpha (SSA), Advanced Sub Station Alpha (ASS), SRT
- MP4: Timed Text
Supported Video Codecs
| Extension | Codec |
|---|---|
| asf wmv | Video: VC-1 Advanced Profile (except for WMVA), VC-1 Simple and Main Profiles Audio: WMA Standard (except for WMA v1/WMA Speech) |
| avi | Video: Xvid (GMC is not supported), H.264/AVC, Motion Jpeg, MPEG-4 Audio: MPEG-1 Layer I, II, MPEG-1 Layer III (MP3), Dolby Digital, LPCM, ADPCM |
| mp4 m4v mov | Video: H.264/AVC, MPEG-4, HEVC, AV1 Audio: Dolby Digital, Dolby Digital Plus, AAC, MPEG-1 Layer III (MP3), Dolby AC-4, DTS, DTS-HD, DTS:X |
| 3gp 3g2 | Video: H.264/AVC, MPEG-4 Audio: AAC, AMR-NB, AMR-WB |
| mkv | Video: MPEG-2, MPEG-4, H.264/AVC, VP8, VP9, HEVC, AV1 Audio: Dolby Digital, Dolby Digital Plus, AAC, PCM, DTS, DTS-HD, DTS:X, MPEG-1 Layer I, II, MPEG-1 Layer III (MP3) |
| ts trp tp mts | Video: H.264/AVC, MPEG-2, HEVC Audio: MPEG-1 Layer I, II, MPEG-1 Layer III (MP3), Dolby Digital, Dolby Digital Plus, AAC, PCM, DTS, DTS-HD, DTS:X, Dolby AC-4 |
| mpg mpeg dat | Video: MPEG-1, MPEG-2 Audio: MPEG-1 Layer I, II, MPEG-1 Layer III (MP3) |
| vob | Video: MPEG-1, MPEG-2 Audio: Dolby Digital, MPEG-1 Layer I, II, DVD-LPCM |
- VC-1(WMV),WMA,Dolby AC-4,DTS,DTS-HD,DTS:X: Some models may not be supported.
Cautions for Video Playback
- Some user-created subtitles may not work properly.
- A video file and its subtitle file must be in the same folder. For subtitles to be displayed properly, make sure that the video file and the subtitle file have the same name.
- Subtitles on a Network Attached Storage (NAS) device may not be supported depending on the manufacturer and model.
- Streams that include Global Motion Compensation (GMC) and Quarterpel Motion Estimation (Qpel) are not supported.
- ULTRA HD video(ULTRA HD models only): 3840 × 2160, 4096 × 2160
Some HEVC-encoded ULTRA HD videos other than the content officially provided by the manufacturer may not be played.
Some codecs can be supported after a software upgrade.Extension, Codec Extension Codec mkv
mp4
tsVideo: H.264/AVC, HEVC
Audio: Dolby Digital, Dolby Digital Plus, AAC - Only Window Media Audio V7 and later are supported.
- The AAC main profile is not supported.
- Video files created by some encoders may not be played.
- Video files in a different format than specified may not be played properly.
- Video files stored on a USB storage device that does not support High Speed may not be played properly.
8.3. Supported Music File Formats
[Go to table of contents]| Extension | Info |
|---|---|
| mp3 | Bit rate: 32 kbps ~ 320 kbps Sample freq.: 16 kHz ~ 48 kHz Support: MPEG-1, MPEG-2 Channels: mono, stereo |
| wav | Bit rate: - Sample freq.: 8 kHz ~ 96 kHz Support: PCM Channels: mono, stereo |
| ogg | Bit rate: 64 kbps ~ 320 kbps Sample freq.: 8 kHz ~ 48 kHz Support: Vorbis Channels: mono, stereo |
| wma | Bit rate: 128 kbps ~ 320 kbps Sample freq.: 8 kHz ~ 48 kHz Support: WMA Channels: up to 6 ch |
| flac | Bit rate: - Sample freq.: 8 kHz ~ 96 kHz Support: FLAC Channels: mono, stereo |
- WMA: Some models may not be supported.
- The number of supported channels may vary depending upon the sample frequency.
8.4. Supported Resolution: HDMI-DTV
[Go to table of contents]| Resolution | Horizontal Frequency (kHz) | Vertical Frequency (Hz) |
|---|---|---|
| 640 × 480p | 31.46 | 59.94 |
| 31.5 | 60 | |
| 720 × 480p | 31.46 | 59.94 |
| 31.5 | 60 | |
| 720 × 576p | 31.25 | 50 |
| 1280 × 720p | 37.5 | 50 |
| 44.95 | 59.94 | |
| 45 | 60 | |
| 1920 × 1080i | 28.12 | 50 |
| 33.71 | 59.94 | |
| 33.75 | 60 | |
| 1920 × 1080p | 26.97 | 23.97 |
| 27 | 24 | |
| 28.12 | 25 | |
| 33.71 | 29.97 | |
| 33.75 | 30 | |
| 56.25 | 50 | |
| 67.43 | 59.94 | |
| 67.5 | 60 | |
| 1920 × 1080p (Ultra HD 120 Hz or higher, 8K 120 Hz models only) | 112.5 | 100 |
| 134.86 | 119.88 | |
| 135 | 120 | |
| 2560 × 1080p 4) 5) (ULTRA HD, 8K models only) | 66 | 60 |
| 2560 × 1080p 4) 5) (Ultra HD 120 Hz or higher, 8K 120 Hz models only) | 131.74 | 120 |
| 3840 × 2160p (ULTRA HD, 8K models only) | 53.94 | 23.97 |
| 54 | 24 | |
| 56.25 | 25 | |
| 67.43 | 29.97 | |
| 67.5 | 30 | |
| 112.5 | 50 | |
| 134.86 | 59.94 | |
| 135 | 60 | |
| 3840 × 2160p 1) 2) 3) (Ultra HD 120 Hz or higher, 8K 120 Hz models only) | 225 | 100 |
| 269.73 | 119.88 | |
| 270 | 120 | |
| 4096 × 2160p (ULTRA HD, 8K models only) | 53.94 | 23.97 |
| 54 | 24 | |
| 56.25 | 25 | |
| 67.43 | 29.97 | |
| 67.5 | 30 | |
| 112.5 | 50 | |
| 134.86 | 59.94 | |
| 135 | 60 | |
| 4096 × 2160p 1) 2) 3) (Ultra HD 120 Hz or higher, 8K 120 Hz models only) | 225 | 100 |
| 269.73 | 119.88 | |
| 270 | 120 | |
| 7680 × 4320p 1) 2) (8K models only) | 107.89 | 23.97 |
| 108 | 24 | |
| 110 | 25 | |
| 131.87 | 29.97 | |
| 132 | 30 | |
| 220 | 50 | |
| 263.74 | 59.94 | |
| 264 | 60 |
2) Supported when HDMI Deep Color is set to 8K.
3) (ULTRA HD models only) Only some HDMI input ports are supported.
4) Supported when Wide Aspect Ratio is set to 21:9.
5) Supported when Wide Aspect Ratio is set to 32:9.
8.5. Supported Resolution: HDMI-PC
[Go to table of contents]| Resolution | Horizontal Frequency (kHz) | Vertical Frequency (Hz) |
|---|---|---|
| 720 × 400 | 31.46 | 70.08 |
| 640 × 480 | 31.46 | 59.94 |
| 800 × 600 | 37.87 | 60.31 |
| 1024 × 768 | 48.36 | 60 |
| 1152 × 864 | 54.34 | 60.05 |
| 1360 × 7683) | 47.71 | 60.01 |
| 1280 × 1024 (Full HD, ULTRA HD, 8K models only) | 63.98 | 60.02 |
| 1920 × 1080 | 67.5 | 60 |
| 1920 × 1080 (Ultra HD 120 Hz or higher, 8K 120 Hz models only) | 134.86 | 119.88 |
| 135 | 120 | |
| 1920 × 1080 6) 7) (Only applicable for 144 Hz, 165 Hz models) | 166.58 | 144 |
| 192.78 | 165 | |
| 2560 × 1080 4) 5) (ULTRA HD, 8K models only) | 66 | 60 |
| 2560 × 1080 4) 5) (Ultra HD 120 Hz or higher, 8K 120 Hz models only) | 131.74 | 120 |
| 2560 × 1080 4) 6) 7) (Only applicable for 144 Hz, 165 Hz models) | 166.54 | 144 |
| 192.83 | 165 | |
| 2560 × 14401) (Only applicable for UltraHD 60 Hz, 8K 60 Hz models) | 88.78 | 59.95 |
| 2560 × 14401) (Ultra HD 120 Hz or higher, 8K 120 Hz models only) | 182.99 | 119.99 |
| 2560 × 1440 6) 7) (Only applicable for 144 Hz, 165 Hz models) | 222.15 | 144 |
| 257.16 | 165 | |
| 3840 × 1080 5) (ULTRA HD, 8K models only) | 66.62 | 60 |
| 3840 × 1080 5) (Ultra HD 120 Hz or higher, 8K 120 Hz models only) | 137.25 | 120 |
| 3840 × 1080 5) 6) 7) (Only applicable for 144 Hz, 165 Hz models) | 166.56 | 144 |
| 192.87 | 165 | |
| 3840 × 1600 4) (ULTRA HD, 8K models only) | 99.41 | 60 |
| 3840 × 1600 4) 6) 7) (Only applicable for 144 Hz, 165 Hz models) | 246.81 | 144 |
| 285.75 | 165 | |
| 3840 × 2160 (ULTRA HD, 8K models only) | 53.94 | 23.97 |
| 54 | 24 | |
| 56.25 | 25 | |
| 67.43 | 29.97 | |
| 67.5 | 30 | |
| 112.5 | 50 | |
| 134.86 | 59.94 | |
| 135 | 60 | |
| 3840 × 2160 1) (Ultra HD 120 Hz or higher, 8K 120 Hz models only) | 225 | 100 |
| 269.73 | 119.88 | |
| 270 | 120 | |
| 3840 × 2160 6) 7) (Only applicable for 144 Hz, 165 Hz models) | 333.18 | 144 |
| 385.75 | 165 | |
| 4096 × 2160 (ULTRA HD, 8K models only) | 53.94 | 23.97 |
| 54 | 24 | |
| 56.25 | 25 | |
| 67.43 | 29.97 | |
| 67.5 | 30 | |
| 112.5 | 50 | |
| 134.86 | 59.94 | |
| 135 | 60 | |
| 4096 × 2160 1) (Ultra HD 120 Hz or higher, 8K 120 Hz models only) | 225 | 100 |
| 269.73 | 119.88 | |
| 270 | 120 | |
| 7680 × 4320 2) (8K models only) | 107.89 | 23.97 |
| 108 | 24 | |
| 110 | 25 | |
| 131.87 | 29.97 | |
| 132 | 30 | |
| 220 | 50 | |
| 263.74 | 59.94 | |
| 264 | 60 |
2) Supported when HDMI Deep Color is set to 8K.
3) Supported when HDMI Deep Color is set to Off.
4) Supported when Wide Aspect Ratio is set to 21:9.
5) Supported when Wide Aspect Ratio is set to 32:9.
6) Supported when 144Hz Mode is set to On.
7) Supported when 165Hz Mode is set to On.
- Supported HDMI-PC port may differ by model. Refer to the manual that is provided with the product.
8.6. License Information
[Go to table of contents]Dolby
Manufactured under license from Dolby Laboratories. Dolby, Dolby Vision, Dolby Vision IQ, Dolby Audio, Dolby Atmos, and the double-D symbol are trademarks of Dolby Laboratories Licensing Corporation.HDMI
The terms HDMI, HDMI High-Definition Multimedia Interface, HDMI Trade Dress and the HDMI Logos are trademarks or registered trademarks of HDMI Licensing Administrator, Inc.Bluetooth
The Bluetooth® word mark and logos are registered trademarks owned by Bluetooth SIG, Inc. The Auracast™ word mark and logos are trademarks owned by the Bluetooth SIG. Any use of such marks by LG Electronics Inc. is under license. Other trademarks and trade names are those of their respective owners.Quickset

HEVC