1. Getting Started with LG webOS
[Go to table of contents]1.1. Home Tutorial
[Go to table of contents] button on your remote control.
Roll the Wheel (OK) button on the Magic Remote to scroll through the menu.You can open apps and content or use various features of the smart monitor.
Press the
 button on the remote control.You can relaunch or exit the apps you used recently.
- You can purchase the Magic Remote separately if it is not provided.
- Standard remote control allows you to scroll through the menu with the
 /
 buttons.
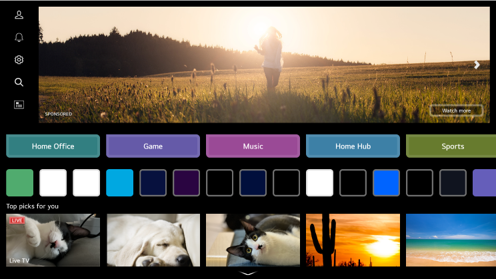
 : Launch LG Account.
For more details, please refer to the following User Guide.
Path: Getting Started with LG webOS Managing Your LG Account
 : Launch Notifications.
For more details, please refer to the following User Guide.
Path: Making the Most of Smart Monitor Notifications : Launch Quick Settings.
For more details, please refer to the following User Guide.
Path: Settings Quick Settings To Use Setting Function Quickly : Launch Search.
For more details, please refer to the following User Guide.
Path: Apps and Content Content Search : Launch Guide.
For more details, please refer to the following User Guide.
Path: Enjoy Live Channel Viewing Guide
You can use various functions or services.
You can run, move, and delete the apps installed on your monitor.- Recent Input: Returns to the most recently used external input.
- The Home screen is automatically displayed whenever you turn on the monitor.You can change settings to prevent the home screen from being displayed every time you turn on the device.
Press the button on the remote control, then navigate to General System Additional Settings Home Settings on the screen.Set Power On Screen to Recent Input.
- The home screen shows advertisements.You can change settings to turn the advertisements on or off.
Press the button on the remote control, then navigate to General System Additional Settings Home Settings Home Promotion on the screen. - The availability of and access to Contents and Services in LGE Device are subject to change at any time without prior notice.
- Available features vary depending on the region or service.
1.2. Manage Home
[Go to table of contents] button on the remote control.Edit Card List
- Select the card you want to edit, and then press and hold the Wheel (OK) button on the remote control to enter the Edit Card List mode.
Alternatively, you can press the Edit Card List button located at the end of the Card List. - Move to the desired position and press the Wheel (OK) button on the remote control to change the position of the app.
To delete an card, select the icon above the card.
- You can also move cards with the
 /
 buttons on your remote control.
- Select
 on the screen.
Home Settings: When turning the power on, go to the screen that sets the Home behavior or advertising display.
User Guide: Move to the User Guide app. - Some cards cannot be deleted.
- You can also move cards with the
- After editing is complete, Press the button on the remote control to exit the Edit Card mode.
Edit App List
- Select the app you want to edit, and then press and hold the Wheel (OK) button on the remote control to enter the Edit App List mode.
Alternatively, you can press the Edit App List button located at the end of the App List. - Move to the desired position and press the Wheel (OK) button on the remote control to change the position of the app.
To delete an app, select the icon above the app.
- You can also move apps with the / buttons on your remote control.
- Press the
 button on the remote control.
Reset App Order: Resets the order of items in the app list.
Home Settings: When turning the power on, go to the screen that sets the Home behavior or advertising display.
User Guide: Move to the User Guide app. - Default apps cannot be deleted.
- You can also move apps with the
- After editing is complete, click Close at the bottom of the screen to exit the Edit App mode.
Edit Contents List
- Scroll down to the bottom of the Home screen by rolling the Wheel (OK) button on the remote control, and select
 on the screen to enter Edit Contents List mode.
- Select the list you want to move with the Wheel (OK) button on the remote control, move it to the desired location, then press the Wheel (OK) to confirm.You can also move the list with the /// buttons on the remote control.
- Press the button on the remote control.
Home Settings: When turning the power on, go to the screen that sets the Home behavior or advertising display.
User Guide: Move to the User Guide app. - Some lists cannot be moved.
- Press the
- After editing is complete, click Close at the bottom of the screen to exit the Edit Content List mode.
1.3. Connecting to the Network
[Go to table of contents]Setting a Wired Network
- Connect the LAN port of the monitor and the router using a LAN cable.
When you connect the monitor to the network with a LAN cable, the monitor is automatically connected to the network if the router supports DHCP.
The router should be connected to the Internet beforehand. - If the Network Is Not Automatically Connected
Press the button on the remote control. - Enter the following path on the screen. General Network Wired Connection (Ethernet)
For more details, please refer to the following User Guide.
Path: Settings Network Wired Connection (Ethernet)
- Some models may not be supported.
Setting a Wireless Network
- Turn on the power of the router connected to the Internet.
- Press the button on the remote control.
- Enter the following path on the screen. General Network Wi-Fi Connection
- When the network search is complete, the list of networks available for connection is shown.
- Select a network to connect.
If your wireless LAN router is password protected, enter the password configured for the router.
For more details, please refer to the following User Guide.
Path: Settings Network Wi-Fi Connection
Network Setting Warnings
- Use standard LAN cable (connect to Cat7 or higher with RJ45 connector, 10 Base-T, or 100 Base TX LAN port).
- Resetting the router may cause network connection problems.In this case, the router will operate normally if you turn it off and disconnect the monitor, and then reconnect and turn it on.
- LG Electronics is not responsible for network connectivity or operation failure due to problems such as equipment failure or disconnected lines.
- The network connection may not work properly because of network settings or the Internet service provider.
- DSL service must use a DSL modem; and cable service must use a cable modem.Since only a limited number of network connections may be available, monitor network settings may not be used depending on the contract with Internet service provider.If the contract does not allow more than one device per line, only the already-connected PC may be used.
- A wireless network can experience interference from other devices that use the 2.4 GHz frequency (wireless phone, Bluetooth device, or microwave oven). Although interference can also happen when using the 5 GHz frequency, it is less likely to occur.
- The wireless environment can make wireless network service run slowly.
- Using several wireless devices at the same time can slow your network.
- The access point device must support wireless connections and wireless connection feature must be enabled on the device to have AP (access point) connection. Contact the service provider for availability of wireless connections on the access point.
- Check SSID and security settings of the AP. Refer to the appropriate documentation for SSID and security settings of the AP.
- If the network is changed by moving the monitor or changing the router, you must set up the wireless network again.Existing wireless network connections will not be saved.
- Invalid settings of network devices (wired/wireless line sharer, hub) can cause the monitor to operate slowly or not operate properly.
- The connection method may differ depending on the AP manufacturer.
- To troubleshoot issues related to this feature, please refer to the following User Guide.
Path: Troubleshooting Troubleshooting Network Connection Issues
1.4. Managing Your LG Account
[Go to table of contents]You can sign up for LG membership and log in with your email address in LG Account.
Alternatively, you can sign up for LG membership using the ID and password of an external service account.
- Press the button on the remote control.
- Select on the screen.
- Start signing up for LG Membership by selecting one of the suggested login methods.
- Agree to the User Agreements and enter the information required to sign up.Required information may vary depending on the country.
- A verification link will be sent to the email address you entered when you signed up.Please complete email verification within the validity period.
- Once your email address is verified, you can log in with your credentials.
- When you enter LG Account, the previously logged-in account is displayed, and you can select an account to log in or edit the account list.
Basic information about the account can be viewed by selecting Account Management under the logged-in account.Also, you can change your password or edit your account information.
- This feature may not be available in some countries.
- Age restrictions may apply for signing up.
- To troubleshoot issues related to this feature, please refer to the following User Guide.
Path: Troubleshooting Troubleshooting LG Account Issues
1.5. About User Guide
[Go to table of contents]By pressing
User Guide on the screen while using the app, or by pressing  during setup in Settings, you can check the description of the associated User Guide.
If you click on Try Now in User Guide, you can navigate to that feature or setting.
Text colour in this User Guide is used to indicate the following:
- ■ Red: the names of the remote control buttons.
- ■ Yellow: the buttons and the text to be displayed on the monitor screen.
- ■ Green: the names of the monitor input connectors.
- The images and information in the User Guide may differ depending on the model and operating environment.
- Product specifications may be changed without prior notice due to upgrade of product functions.
2. How to Operate Monitor
[Go to table of contents]2.1. Learn More about Magic Remote
[Go to table of contents]- You can purchase the Magic Remote separately if it is not provided.
Pairing the Magic Remote
You must pair the Magic Remote with the LG webOS TV to use it.Pair the Magic Remote prior to use as follows:
- Turn on the monitor and press the Wheel (OK) button on the remote control towards the monitor after approximately 20 seconds.
- The remote control will be registered automatically, and the pairing completion message is displayed on the screen.
- If the Magic Remote failed to register, turn the monitor off and back on, and then try to register again.
Re-registering the Magic Remote
If the Magic Remote’s pointer does not appear on the monitor, you must re-register it.- Hold the remote control towards the monitor and press the and buttons at the same time for more than 5 seconds until instructions appear.
- The previously registered remote control is deregistered and then registered again.
Unregistering Magic Remote
If you have multiple LG Smart Monitors and want to register the Magic Remote currently in use to another monitor, you must unregister the previous one.- If you press the button and the button on the remote control at the same time for more than 5 seconds, the lamp on Magic Remote will blink and the registration will be canceled.
- If you want to unregister and register for another LG Smart Monitor, please follow the registration method above.
2.2. Using Monitor Functions through Speech
[Go to table of contents]- Press and hold the
 button on the remote control and speak out the function you want to launch or the keyword you want to use for your search.
- Once you release the button after your speech input, the corresponding function is launched.
- This feature can only be used with the Magic Remote.
- You can purchase the Magic Remote separately if it is not provided.
- Some models may not be supported.
- Menu Language must be set as the official language of the country in Location to see correct search results.If Menu Language is not set as the official language, some functions may be limited.
- You can change the voice recognition language.
Press the button on the remote control, then navigate to General System Language Menu Language on the screen. - The languages available for voice recognition features may be changed in accordance with Service Operation Policy.
- Details of service may vary by model.
- Please note that the services enabling voice commands, voice recognition and other smart features may be changed, removed or terminated, without notice, by LGE or its third party providers.
- You can change voice-related settings or confirm which features can be controlled by voice commands.Press the button on the remote control, then navigate to General AI Service Voice Recognition Settings/Voice Recognition Help on the screen.
Using the speech recognition function with the LG ThinQ app
You can use the speech recognition function by pressing the button on the LG ThinQ app installed on your smart device.
For more details, please refer to the following User Guide.
Path: Connecting External Devices
Connecting Smart Devices- When using the speech recognition function through the LG ThinQ app, some functions or devices may not work.
Cautions for Speech Recognition
- If you have a network connection, you need to accept the terms and conditions to use speech recognition.
- To use all speech recognition features, you need to set your programmes, region, etc. Otherwise, you cannot use some features.
- You must have a network connection to use the speech recognition feature.
- To control a set-top box connected to the device using voice recognition, you need to set up the universal remote.Press the button on the remote control, then navigate to General External Devices Universal Control Settings on the screen.
- It is recommended to point Magic Remote toward the set top box after the voice input.
- The Speech to Text rate may vary depending on the user’s characteristics (voice, pronunciation, intonation and speed) and the environment (noise and monitor volume).
- To achieve accurate recognition of your speech, you must pronounce words in a slow and accurate manner at an appropriate voice volume at a distance of about 10 cm away from the Magic Remote’s microphone.
- If your speech is not recognised properly, speech recognition may operate differently than you originally intended.
2.3. Speech to Text
[Go to table of contents]Select the
button on the keyboard screen to switch to speech input mode.- Tap the text input field on the screen with the Magic Remote pointer.The keyboard will be displayed.
- Select the key on the screen keyboard.The voice recognition function activation guide will be displayed.
- Speak slowly and clearly into the remote control microphone.If there are words similar to that which you spoke out loud, you may see a list of multiple results as shown below.Select a result and it will be displayed on the text box.If you do not get the results you want, press RETRY.
- To use this feature:
- This feature can only be used with the Magic Remote.
You can purchase the Magic Remote separately if it is not provided. - You must be connected to a network.
- You must agree to the terms of use for voice recognition.
- This feature can only be used with the Magic Remote.
- You can change the voice recognition language.
Press the button on the remote control, then navigate to General System Language Menu Language on the screen.
To temporarily switch to another speech recognition language, press the Red button in the voice recognition information display window. - The Speech to Text rate may vary depending on the user’s characteristics (voice, pronunciation, intonation and speed) and the environment (noise and monitor volume).
- To improve the accuracy of Speech to Text, you must speak clearly and loudly about 10 cm from the Magic Remote microphone.
- Voice recognition is unavailable in any password input field and the address bar of your Web Browser (excludes general search).
2.4. How to use Alexa on your monitor
[Go to table of contents] (Alexa) button on your Magic Remote.During setup you will log into your Alexa account, do a quick test command to make sure Alexa works and you’ll be ready to go.
To use Alexa, press and hold the
(Alexa) button on your Magic Remote.Once the blue animation appears at the bottom of your screen, say a command such as “Alexa, open Prime Video.”Press the
(Alexa) button on your Magic Remote once (without holding) to access the Alexa App on your monitor.here you’ll find more ways to use Alexa as well as setting features such as turning on the Hands-Free option (if available).- This feature can only be used with the Magic Remote.
- You can purchase the Magic Remote separately if it is not provided.
- Alexa is not available in all languages and countries.
- Alexa features and functionality may vary by location.
2.5. To View More Features of the Remote Control
[Go to table of contents]- Press the button on the remote control.
- Using the remote control, select your desired button on More Actions displayed on your monitor screen.
- The types of buttons appearing on the More Actions vary, depending on the region and the type of connected device.
2.6. Setting Universal Control
[Go to table of contents]- This feature can only be used with the Magic Remote.
- You can purchase the Magic Remote separately if it is not provided.
- Some models may not be supported.
- When changing settings on a device, make sure it is powered on first.
- To set up a universal remote control with the latest information, connect to the network and accept the User Agreements.
- The manual setting feature for universal remote control is not supported for a game console.
- Some buttons may not work depending on the model of the external device.
- Point the Magic Remote at the device you want to control.Make sure that there are no objects in front of the device to ensure that the remote control signal is well received.
Automatically Setting the Universal Remote Control
Connect the devices to be set to the monitor's HDMI IN, and turn the power of the device on.The monitor will recognise the connected device to automatically set the universal remote control without manual setting.
- After setting the universal remote control, you may need to do some additional user settings.
- It may take several seconds to complete the settings for the universal remote control.
- In some models, you can set the universal remote control only after converting to an input of a connected device.
- Depending on the connected device, the automatic setting feature for universal remote control (automatic device connection) may not be supported.
Manually Setting the Universal Remote Control
If the universal remote control has not been set automatically, you can set it up manually.- Press the button on the remote control.
- Enter the following path on the screen. General External Devices Universal Control Settings
- Select the type of the device you want to set.
- Complete the settings for the universal remote control according to the guidance on the screen.
You can change or cancel the universal remote control settings.
2.7. Launching Apps through Quick Access
[Go to table of contents]Setting Quick Access
- Open an app you want to register or select an external input.
- Press and hold the number button (1~8) you want to register.
No. 9 is fixed to Quick Help. - When the registration pop-up window appears, select Yes.
- If you press and hold a number button that has already been registered, the registered function will be performed.
- To see the items that can be registered, select a number that has not been registered in the Quick Access edit mode.
- If you are in a mode where Quick Access cannot run, no action will be performed.
- If you delete a registered app, Quick Access will be deregistered as well.
Checking and Editing Quick Access
- Press and hold the 0 button on the remote control.
The Quick Access edit screen appears. - Selecting a number that has already been registered allows deregistering it.
When you select a number that has not been registered, items that can be registered will be shown.
An item that has been registered to a different number is indicated with a check mark.
Select Help on the screen.You can view a brief instruction for this function.
2.8. Connecting to SIMPLINK (HDMI-CEC)
[Go to table of contents]- Up to three devices can be connected and used simultaneously.
- Connect the HDMI IN port of the monitor and the HDMI output port of the Simplink device with an HDMI cable.
- Press the button on the remote control.
- Enter the following path on the screen. General External Devices HDMI Settings/Input Settings
- Set SIMPLINK (HDMI-CEC) to On.
- Turn on the connected device.The input on the monitor automatically changes to the input of the corresponding device.
If the device is not automatically connected, click the button on the remote control and select the device you wish to connect to.
- This feature works only with devices with the
 logo. Check for the SIMPLINK logo on the external device.
Use of any product other than those specified may cause problems during operation. - To use SIMPLINK, you need to use a high-speed HDMI® cable with CEC (Consumer Electronics Control) function.The High-Speed HDMI® cable has the pin 13 for enabling information exchange between devices.
- To output sound from an external audio device, connect the audio device to the monitor's HDMI (eARC/ARC) port with an HDMI cable.Set Sound Out to HDMI(ARC) Device and set SIMPLINK (HDMI-CEC) to On.
Supported SIMPLINK Functions
Instant Play
When you start a multimedia device, you can immediately watch content from the device on the monitor without having to control anything.Controlling Devices with the Monitor Remote Control
Enables the user to control multimedia devices with the monitor remote control to watch content.- The menu of the multimedia device can be operated with the arrow keys on the remote control.
Main Power Off
Turning off the monitor will also turn off the devices connected through SIMPLINK.- This feature is only available in certain devices.
Main Power On
Turning on a SIMPLINK device will also turn on the monitor.- Some models may not be supported.
2.9. Shortcuts to Accessibility
[Go to table of contents]Press and hold the
 button on your remote control.
In Accessibility, you can set up High Contrast, Greyscale, Invert Colours, etc.
2.10. Connecting an Input Device to USB
[Go to table of contents]Using a USB Wired/Wireless Mouse
Connect your mouse to the USB IN port.Use the mouse to move the pointer on the monitor screen and select the menu you want.- Right-click on the mouse to return to the previous screen.
Press the scroll wheel button to move to the Home screen.
This feature may not work with some apps. - When using a wireless USB mouse, the connection can be lost or slowed, depending on the distance between the monitor and mouse and the wireless environment.
Using a USB Wired/Wireless Keyboard
Connect your keyboard to the USB IN port.You can enter text with the connected keyboard device.- It is not possible to enter text on some screens.
- It is recommended that you use a product that has been tested for compatibility with LG monitors.
Logitech K360, Logitech K400, Logitech K750 - You can change the input language by pressing the language switch key or the right Alt key, And also can change by pressing the Ctrl key and the Space key at same time.
- When using a wireless USB keyboard, the connection can be lost or slowed, depending on the distance between the monitor and keyboard and the wireless environment.
- To enter text in the text field, use the on-screen keyboard on your monitor or a USB keyboard.
- ESC:Back
Enter:OK
F2:Input
F4/ :Home
F5:Quick Settings
F7:LG Channels
F10:Mute
F11, F12:Volume
Up, Down, left, right:4-way Button Navigation
This feature may not work with some apps.
Using a Gamepad
Connect your gamepad to the USB IN port.You can enjoy games exclusively for gamepads.- It is recommended that you use a product that has been tested for compatibility with LG monitors.
Sony DualShock 4, Sony DualShock 3, Microsoft Xbox 360 Controller, NVIDIA SHIELD Controller, Logitech F310, Logitech F710, Amazon Luna Controller, Shaks S3b, Shaks S2b
Connecting Bluetooth Input Devices
You can connect and use devices such as a Bluetooth-enabled keyboard, mouse, or a gamepad with your monitor.For more details, please refer to the following User Guide.
Path: Settings
External Devices Connect Bluetooth Controller2.11. Operating a PC with Input Devices Connected to the Monitor
[Go to table of contents]- Connect the UPSTREAM port on the monitor and the PC with a USB-C™ cable.
- Connect a headset or an input device - such as a mouse or keyboard - to the monitor.
- Turn on the power of the monitor and PC.
- Select USB-C™ for an external input from the Home Hub.
- Some models do not support this function.
- If you display the Home screen by pressing the button on the remote control, you cannot use input devices on the PC.
- You cannot use input devices on the PC when the monitor is in the Energy Saving mode.
3. Enjoy Live Channel
[Go to table of contents]3.1. Watching LG Channels
[Go to table of contents]You can see information on new Internet Programmes or manage the programmes you like in LG Channels.
Press the
button on the remote control and select LG Channels on the screen.You can also watch LG Channels by pressing the
 (Programmes)
 /
 buttons on the remote control.
You can use the ’Interactive Programme’ service that enables users to conveniently enjoy content related to the current programme without having to switch apps.
You can use the ’Interactive Programme’ by pushing the buttons on your remote control or clicking your screen according to the instructions that appear on the Internet programme screen.
- Some models may not be supported.
- You must connect to the network and agree to User Agreements before you use it.
- If Country and LG Services Country are set differently, you cannot use LG Channels.You can access this setting by pressing the button on the remote control, then navigating to General System Location on the screen.
- While watching an Internet Programme, click the Green button on the Remote control. You can start the LG Channels.
- Selecting LG Channels will change the input mode to LG Channels.Some content can cause a switch from LG Channels app to a different app.
- Some Internet programmes may not support this service.
- Internet Programme services may be stopped or changed without prior notice by the broadcasting company.
3.2. Making the Most of Live Menu
[Go to table of contents]Press and hold the GUIDE button on the Magic Remote.
Or press the LIST button on the standard remote control.
- Guide: You can view programmes and the schedule of each programmes.
For more details, please refer to the following User Guide.
Path: Enjoy Live Channel Viewing Guide - Programmes: View a list of broadcast content that is currently being broadcast.
- Scheduler: You can set the date and time of the desired broadcasting programme, and watch the programme.
For more details, please refer to the following User Guide.
Path: Enjoy Live Channel Using the Scheduler
- This function may not be available in some countries or models.
- The configurable items differ depending on model.
- You can purchase the Magic Remote separately if it is not provided.
- You must complete the settings of the network and region to receive normal live broadcast service.
3.3. Viewing Guide
[Go to table of contents]- Press the button on the remote control and select LG Channels on the screen.
- Press the button on the remote control and select Guide on the screen.
Guide screen will appear. - Select the programme you want.You can view more information on the programme and perform Watch or Reminder, etc.
- Go to Current Time: You will be taken to the programme list for the current date and time.
- Select on the screen.
Programme Manager: Launch Programme Manager.
Programme Row: You can change the size of the programme list to adjust the number of programmes displayed on the screen.
Filters: The type of channel displayed on the screen can be set.
User Guide: Move to the User Guide app.  : Closes the app.
- This function may not be available in some countries or models.
- The configurable items differ depending on model.
- Programme information is not displayed for programmes with no provided broadcast information.
3.4. Checking Programme Info
[Go to table of contents]- During watch the Live broadcast, press the Wheel (OK) button.The Programme Banner appears.
- Select on the screen.You can also press the button on the remote control.
You can move the position of the banner by selecting Change Banner Location in More Actions. - Select a programme banner to enter the detailed information pop-up to see the detailed programme information or run additional features related to the banner.
You can view broadcast information about other programmes using the/ buttons on the remote control.
You can view broadcast information about the programme you are currently watching using the/ buttons on the remote control. - You can get recommendations for what to watch next by setting Next Picks to On.
- This feature may not be available in some countries.
- Available features may vary depending on the broadcast signal.
3.5. Using the Scheduler
[Go to table of contents]- Press on the remote control to select LG Channels and view the live broadcast.
- Press the button on the remote control and select Scheduler on the screen.
The Scheduler screen will be displayed.
- This function may not be available in some countries or models.
- Select
 on the screen.
You can set the New Reminder. - By selecting on the screen, you can adjust the settings related to Scheduler.
Sort: You can sort the list.
Delete: You can set the Delete Mode.
Guide: Launch Guide.
User Guide: Launch User Guide.
Quit App: Turns off the app from running in the background. - : Closes the app.
Scheduling a selected broadcast from Guide
You can select a show to schedule it for watching.- Press the button on the remote control and select LG Channels on the screen.
- Press the button on the remote control and select Guide on the screen.
- Select the programme you want.
If you want to watch a live broadcast, click the Watch button.
In case of an upcoming programme, click the Reminder button.
- This feature may not be available in some countries.
- Applies to Digital broadcasting.
Manual Scheduling
You can select the date, time, and programme to watch the programmes.- Press the button on the remote control and select LG Channels on the screen.
- Press the button on the remote control and select Scheduler on the screen.
- Select the .
- Select Create Manually.
- Set the date, time, and programme to watch.
- Some models may not be supported.
4. Apps and Content
[Go to table of contents]4.1. Installing Apps
[Go to table of contents]- Press the button on the remote control.
- Select Apps on the screen.
- Select a category or press the button to search for an app.
- Select an app to install.
- Read the details of the app and then press Install.
- When the installation is complete, you can run the app immediately.
- : Searches for content.
For more details, please refer to the following User Guide.
Path: Apps and Content Content Search - : You can log in to your LG account.
For more details, please refer to the following User Guide.
Path: Getting Started with LG webOS Managing Your LG Account - : You can manage apps, such as updating or deleting installed apps.
- : Closes the app.
- To turn off the app from running in the background, press the button on the remote control and select Quit App on the screen.
- To turn off the app from running in the background, press the
- In order to install apps, you must be logged in.
- Available categories may vary depending on the country or service status.
- If the storage on your monitor is insufficient, you can install the apps by connecting an external memory device.
- Some USB storage devices may not be supported or may not work properly.
- USB stick containing apps from other monitors may not be used.
- Exercise caution when in use by children. Children may have access to inappropriate online content through this product.You can block inappropriate online content by restricting access to some apps.
Press the button on the remote control, then navigate to General System Safety Application Locks on the screen.
4.2. To Use Magic Explorer
[Go to table of contents]- Magic Explorer can be used if the pointer colour of the Magic Remote changes (e.g., to the
 ).
- You can purchase the Magic Remote separately if it is not provided.
- Press and hold the Wheel (OK) button on the image if you are watching a broadcast, or on the text if you are using Guide, Settings apps.
- On the broadcast screen, keywords associated with the programme appear.
On the text in the app, an icon appears that allows you to go to an item, such as Web Browser or Search. - Press
 on the screen to select the item you want to use.
- You can move an item by pressing the /// buttons on the remote control.
- You can move an item by pressing the
- You can exit Magic Explorer by pressing the button on the remote control.
- You can also use this feature by pressing and holding the OK button on the standard remote control.
- Available features vary depending on the region or service.
- Some models may not be supported.
4.3. Content Search
[Go to table of contents]- Press the button on the remote control.
- Select on the screen.
- Search for a variety of content and information using the desired search terms.
You can also search by selecting recommended search terms or genres on the screen.
When any search history is available, recent searches appear below the search box.
- You must connect to the network to use the search feature.
- Search results may vary depending on the region, network settings, and whether you have agreed to the terms and conditions.
5. Connecting External Devices
[Go to table of contents]5.1. Using Home Hub
[Go to table of contents]Press the
button on the remote control and launch Home Hub on the screen.You can also press and hold the
button on Magic Remote.- You can purchase the Magic Remote separately if it is not provided.
- Inputs: You can check and select the external device connected through the external input port or network.
- Camera: The connected camera is launched.
- Sound Out: The currently selected output speaker is displayed, and you can navigate to the output speaker settings screen.
- Mobile / Bluetooth: Connect your mobile device to monitor to share the mobile screen and enjoy the stored contents.
You can view the list of connected Bluetooth devices and select one.
Select AirPlay on the screen.Use Apple Home, AirPlay 2 to control your monitor and watch content from your iPad or Mac on the monitor screen.- The availability of and access to Contents and Services in LGE Device are subject to change at any time without prior notice.
- Smart Ways to Use Home Hub: You can check the connection guide for each type of Home IoT Devices.You can connect and see devices registered with your LG ThinQ account or IoT devices.
- : Launch LG Account.
- Select on the screen.
Edit Inputs: You can edit the name of the connected device or apply the related settings.
Universal Control Settings: Move to the Universal Control Settings app.
Edit List: You can hide or show the connected Home IoT Devices and rearrange the list.
Delete devices: You can delete the connected device.You can only delete certain devices from the monitor.
Notification: You can turn on or off the notifications on the connected device.
Show Connectable IoT Devices: Shows devices that are available for connection on the screen.
User Guide: Move to the User Guide app.
Quit App: Turns off the app from running in the background. - : Closes the app.
- Available settings vary depending on the model or region.
Connecting Home IoT Devices
You can check and control the status of the connected Home IoT Devices.- Install LG ThinQ app on your smartphone.
- Log in to your LG ThinQ account, and register your own LG ThinQ device.
- Press the button on the remote control and launch Home Hub on the screen.
- Select on the screen.
- Log in to your LG ThinQ account. A list of the registered LG ThinQ devices will appear.
- Available settings vary depending on the model or region.
- If you are in an area where the LG ThinQ app is not in service, LG ThinQ device connection will not be supported.
- To register your IoT device, select Connect Home IoT Devices and follow the instructions to apply settings.
- If you are controlling the external device from your mobile app, you might not be able to control the device from your monitor.Quit the mobile app to control it from your monitor.
- IoT devices that can be connected to a monitor are subject to change without notice.
- Connectable LG ThinQ devices and available functions may differ between mobile and monitor.
5.2. Connecting Smart Devices
[Go to table of contents]Connecting Your Smart Device to a Monitor Using the LG ThinQ App
- Download the LG ThinQ app from the app store of your smart device.
- Connect your monitor and smart device to the same Wi-Fi network.
- Run the LG ThinQ app installed on your smart device.
- Follow the instructions from LG ThinQ app to connect your smart device to the monitor.
- When your account information of LG ThinQ is linked to the monitor, you can manage the IoT devices linked to your account using Home Hub of the monitor.
- Voice commands can also be made through Smart Speaker linked to the account in the settings of the LG ThinQ app.
- The service may not offer depending on country.
Controlling Your Monitor with the LG ThinQ App
You can tap the buttons on your smart device’s screen to control the monitor.- Some controls may be limited in external input mode.
- The app’s screen and functionality are subject to change without prior notice.
- Available features may differ depending on your country and OS.
Using the Camera of a Connected Smart Device on the monitor
You can use the camera of a smart device connected with LG ThinQ on the monitor.- It is recommended that you always update your device to be connected to your monitor to the latest OS version for a reliable connection.
- Depending on the model or manufacturer of the smart device, the camera may not be connected.
- It is recommended that you connect the device to a 5 GHz router because the performance may be affected by your wireless environment.
- The response rate may vary depending on the user’s environment.
- If the connection fails repeatedly, turn off the monitor and the device you are trying to connect, then turn them back on and try again.
5.3. Connecting a Camera to the monitor
[Go to table of contents]- Connect the camera to the USB IN or USB-C™ port.
USB-C may not be supported on some models. - Press the button on the remote control and launch Home Hub on the screen.
- Select Camera.
- Select on the screen.
Camera List: You can select the camera to use from the list of connected cameras.It is only available when two or more cameras are connected.
Automatic Face Recognition: Set to On.Adjusts the camera to automatically centre a person or object that is recognised as a face on the screen.- Recognises up to six people.
- It may be recognised as a face, even if it is not a person.
- If the distance between the camera and the subject is too far, face recognition may not work.
User Guide: Move to the User Guide app.
Quit App: Turns off the app from running in the background. - : Closes the app.
- Depending on the model, some features may not be available.
- For a detailed description of the camera’s functions, refer to the device's manual.
- The camera must be purchased separately.
It is recommended that you use a product that has been tested for compatibility with LG monitors.
Amcrest AWC496/AWC195-B, Logitech BRIO/C920/C920c/C920e/C920s/C920x/C922 Pro/C922x/C925e/C930c/C930e, LG Smart Cam - The USB storage device may not work or function properly when a USB hub or extension cable is used.
- You can use the camera of a smart device connected with LG ThinQ on the monitor.
For more details, please refer to the following User Guide.
Path: Connecting External Devices Connecting Smart Devices
Video Conferencing
You can have a video conference using an Internet website or an app that enables video conferences.- This function may not be available in some countries or models.
- Internet connection is required to use this feature.
- Depending on camera performance or the network environment, the image quality may not be clear.
- You can check video conference sites or apps in the Internet service list of Home Office.Depending on the circumstances of the service provider, the use of the video conferencing site or app may be subject to suspension or change.
Making the Most of Multi View
By pressing Multi View, you can run the video screen or broadcast screen, and camera simultaneously.For more details, please refer to the following User Guide.
Path: Making the Most of Smart Monitor
Using Multi View- This feature is available only on models that support the Multi View feature.
5.4. Mirroring Smart Device Screen
[Go to table of contents]- Enable Screen Share mode on the smart device.
- Your monitor will be displayed in the list of available devices.
- Select your monitor and request connection.
- Select Accept in the connection request popup window.
- After the connection is established, the monitor will display the screen of the connected device.
- When you connect Screen Share for the first time, a popup will appear which allows you to select Accept, Decline or Block.
- Accept: You can connect the device.No connection popup will appear from the second time.
- Decline: Do not connect the device.If you try to connect again, the popup will appear.
- Block: Do not connect the device.Even if you try to connect again, the popup will not appear and the connection will not work.
You can unblock it by pressing Delete Connection History.Press the button on the remote control, then navigate to General External Devices on the screen.
- It is recommended that you always update your device to be connected to your monitor to the latest OS version for a reliable connection.
- Depending on the model or manufacturer of the smart device, the Screen Share feature may not be supported.
- iPad, iPhone, Mac, etc. can be connected through AirPlay 2.For more details, please refer to the following User Guide.
Path: Connecting External Devices Using Home Hub - It is recommended that you connect the device to a 5 GHz router because the performance may be affected by your wireless environment.
- The response rate may vary depending on the user’s environment.
- It’s differ form devices. For more information on the device you want to connect to, refer to its user guide.
- If the connection fails repeatedly, turn off the monitor and the device you are trying to connect, then turn them back on and try again.
5.5. Playing Sound from a Smart Device through the Monitor’s Speakers
[Go to table of contents]- Turn the smart device’s Bluetooth on, then select the monitor from the list of devices.
- The monitor will be connected to the smart device.
- The monitor may not be found in the list of smart devices while setting up a Bluetooth speaker.
- If you connect a smart device to the monitor via Bluetooth and listen to the sound of the smart device through the monitor speaker, the monitor may not be connected to any other smart device.
5.6. Connecting USB
[Go to table of contents]Tips for Using a USB Storage Device
- A USB storage device that has a built-in automatic recognition programme or uses its own driver might not be recognisable.
- Some USB storage devices may not be supported or may not work properly.
- If you use a USB extension cable, the USB storage device may not be recognised or may not work properly.
- Please use only USB storage devices formatted with the FAT32, exFAT or NTFS file system provided by Windows OS.
- It is recommended that you use an external USB HDD with a rated voltage of 5 V or less and a rated current of 500 mA or less.If you use a device requiring a higher voltage/current than the rated voltage/current, it may not operate properly due to lack of current.
- It is recommended that you use a USB hub or USB storage device with a power supply.
- We recommend using a storage device with a capacity of 32 GB for the USB memory and 2 TB or less for the USB hard disk.
- If a USB HDD with power-saving function does not work, turn the hard drive off and on again to make it work properly. See the owner’s manual for the USB HDD for more information.
- Data on a USB storage device may be damaged, so it is recommended that you back up any important files. Users are responsible for data management. The manufacturer bears no responsibility.
- Press the button on the remote control.To remove the USB storage device, press the Eject button, which appears at the top when you focus on the USB storage device you want to remove.If you disconnect the USB storage device without selecting Eject, an error may occur in your monitor or storage device.
- When you connect a USB storage device of a file system not supported by the monitor to the USB IN port, the format message appears.To use the connected USB storage device, you should format the device first.
Formatting deletes all data stored on the USB storage device, and the device is formatted with the FAT32, exFAT or NTFS file system. - Press the button on the remote control and launch Home Hub on the screen.Select the connected USB from Home Hub and select the Format button to format the USB storage device.
- When connecting a USB storage device, a random file/folder can be created to provide Smart Monitor services such as the saving and retrieving of thumbnail images.
5.7. Using the Media Player
[Go to table of contents]- Press the button on the remote control.
- Launch the Media Player app on the screen.
- Select a device to use from the device list.
- Select the content to play.
 : Move to the music playback screen.
Displayed only when music is playing.- : Launch Search.
- Select on the screen.
View Type: Selects a content display mode.
Sort: Select the option to sort content.
Group: If you filter by Music, you can group content into categories such as Artist and Album.
Selection Play: You can select and play multiple pieces of content.
Delete: You can select and delete multiple pieces of content.
User Guide: Move to the User Guide app.
Quit App: Turns off the app from running in the background. - : Closes the app.
- You cannot delete files that are shared from other devices.
- Different settings items are available depending on the filtering or model you selected.
- Certain content may not be displayed on the list if the number of all content exceeds 40,000.
Viewing Photos
You can select a photo from the Media Player app and view the photo.To use more features, press the Wheel (OK) button on the remote control and select
 on the screen.
 : Shows the previous content.
 : Starts the slide show.
 : Shows the next content.
 : Rotates photos.
 : Enlarges or reduces the photo.
 : 360-degree photos can be viewed in 360 degrees.
- Using the 360° VR Play on a normal photo may distort the image.
- Some models may not be supported.
 : Plays a music file selected from the storage device as background music.
 : Sets the photo size or changes the speed or effects for the slideshow.
- Some models may not be supported.
Playing Videos
You can select a video from the Media Player app and play the video.Pressing the
/ buttons on the remote control allows you to skip backward/forward 10 seconds.To use more features, press the Wheel (OK) button on the remote control and select
on the screen.- : Shows the previous video.
- : Plays or pauses the video.
- : Shows the next video.
 : You can change subtitle settings.
- : Rotates videos.
 : Fast-rewinds the video at higher speeds.
 : You can do the settings related to play on repeat of the video.
 : Fast-forwards the video at higher speeds.
- : 360-degree videos can be viewed in 360 degrees.
- Using the 360° VR Play on a normal video may distort the image.
- Some models may not be supported.
- Select on the screen.
Resume Play: You can set continue watching to resume playing from the last viewed scene.
Play Speed: Sets the playback speed.
Audio Track: You can set audio tracks.
Listening to Music
You can select a song from the Media Player app and play the song.To use more features, press the Wheel (OK) button on the remote control and select
on the screen. : You can set the random play mode.
- : You can set the repeat play mode.
 : Lyrics are available for music files that provide them.
In some music files, you can choose a lyric section and move the playback position.- The lyrics feature is only supported on some devices.
- The lyrics may not be displayed in sync depending on the lyrics data in the music file.
 : You can listen to music with the screen turned off.
- Select on the screen.
Lyrics Sync: You can set the lyric speed.- This feature may not be supported depending on the music.
5.8. Using Home Office
[Go to table of contents] button on the remote control and launch Home Office on the screen.The PC can be remotely operated from the monitor.
- Turn on the power of the PC to which you wish to connect.
- Press the button on the remote control and launch Home Office on the screen.
- Select Remote PC.A new PC can be connected.
- The PC to be connected must be powered on, and ‘Enable Remote Desktop’ must be turned on in the PC settings.
- Up to four devices can be connected to Remote PC.To add another PC, delete the previously registered PC.
- Only Windows 10 Professional or later operating systems can be connected.
A Windows user name and password must be set.Login via PIN input is not supported.
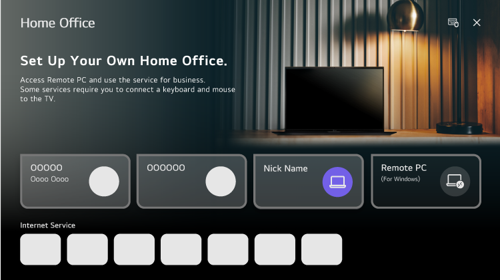

You can use the selected cloud PC service.: You can edit the connection information.: You can delete the connected PC.
Remote PC: A new PC can be connected.
You can use the Internet service provided by the PC on the monitor.
Available features may vary depending on the country. : You can connect a Bluetooth keyboard or mouse and set whether to use the connected device.
For more details, please refer to the following User Guide.
Path: Settings External Devices Connect Bluetooth Controller- : Closes the app.
- Connecting a keyboard and mouse to the monitor enables smooth operation.
If the keyboard layout of the keyboard connected to the PC and the keyboard connected to the monitor are different, certain keys may not work. - Both monitor and PC can be connected only after network connection and settings are set.
- If the monitor and PC are not connected to the same network, public IP information is required, and port forwarding settings of the router may be required.
- If the connection is restricted by the PC security policy, contact the network security manager.
- Some features or programmes of the PC cannot be used.
- When the power-saving function of the PC is activated, the connection is lost and cannot be reconnected.We recommend disabling the PC power-saving function before use.
5.9. Sharing PC Content
[Go to table of contents]Browse the Content on the PC to Display on the Screen (Windows 10)
- Connect your monitor and PC to the same network.
- Right-click the file you want to play and select “Cast to Device”.
- Select the name of the monitor you want to watch from the displayed list, and playback will start on that monitor.
- Even when multiple monitors or devices are connected, the selected file is played through only one device.The playback rate may vary depending on the network connection.
- To play on other operating systems or devices, refer to the manual of the operating system/device.
Browse and Watch the Content Stored on the PC Using the Monitor (Windows 10)
- Connect your monitor and PC to the same network.
- Open the “Start” menu on your PC screen, search for “media streaming options” and then select the result that appears.
- Select the “Turn on media streaming” button in the window that opens.
- Allow all of the “media streaming options”.
- Select “OK” to save the settings.
- Select the connected PC in the Home Hub app on the monitor, and then select and play the file you want.
- To play on other operating systems or devices, refer to the manual of the operating system/device.
Matters That Require Attention of Content Share
- Check your network settings if the content share option does not work properly.
- It is recommended that you connect the device to a 5 GHz router because the performance may be affected by your wireless environment.
- May not work properly depending on the network environment.
- If multiple monitors are connected to one device, the content may not be played properly depending upon server performance.
- To watch a 1080p video through the content sharing function, a router using the 5 GHz frequency is required.If you use the existing 2.4 GHz router, the video may be laggy or not play properly.
- The Content Share function may not be supported for a router that does not support multi-cast. For more information, refer to the user guide that came with your router or contact the manufacturer.
- Captions are only supported on some connected devices.
- If you have added a caption file afterward, disable the shared folder on the PC and then enable it again.
- The DRM files in the connected device will not play.
- Even for the file format supported by the monitor, the supported file format may differ depending on the connected device environment.
- If there are too many folders or files in a folder, it may not work properly.
- The information on the file imported from the connected device may not be displayed correctly.
- Depending on the encoding, some streams may not play in content sharing mode.
5.10. Mirroring PC Screen
[Go to table of contents]Connect Wireless (Windows 10)
- Click the Notification Centre icon on the taskbar on the PC screen and select Connect.
- Select your monitor and request connection.
- After the connection is established, the monitor will display the screen of the connected PC.
- It is recommended that you always update your device to be connected to your monitor to the latest OS version for a reliable connection.
- It is recommended that you use this function at close range.
- Start Screen Share faster by having your smart device or PC connected to the same network as the monitor.
- Though it can be connected without a wireless router, connecting your device to a 5 GHz router is recommended because the performance can be affected by the surrounding wireless environment.
- The response rate may vary depending on the user’s environment.
- It’s differ from Windows version. For more information on the device you want to connect to, refer to its user guide.
- If the connection fails repeatedly, turn off the monitor and the device you are trying to connect, then turn them back on and try again.
Connect Wired
- Connect your PC to the monitor using an HDMI or USB-C cable.
- Press the button on the remote control.
- Select Home Hub on the screen.
- Please switch the input to the port connected to the PC.
- After the connection is established, the monitor will display the screen of the connected device.
- USB-C may not be supported on some models.
- If you encounter connection issues, please refer to the following User Guide.
Path: Troubleshooting Troubleshooting Device Connection Issues
6. Making the Most of Smart Monitor
[Go to table of contents]6.1. Enjoying Game
[Go to table of contents]- Press the button on the remote control.
- Launch Game on the screen
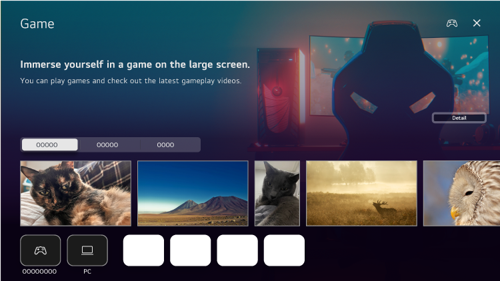

Select the desired service.The content provided by the service is shown below.
You can select a connected game device or a PC.Devices that are not connected are not displayed.
You can run an app related to the game. : Move to the Connect Bluetooth Controller.
- : Closes the app.
- This feature may not be available in some countries.
- Game devices and PCs connected to the HDMI IN are automatically added to the Game.
6.2. Enjoying Music
[Go to table of contents]- Press the button on the remote control.
- Select a Music card on the screen.
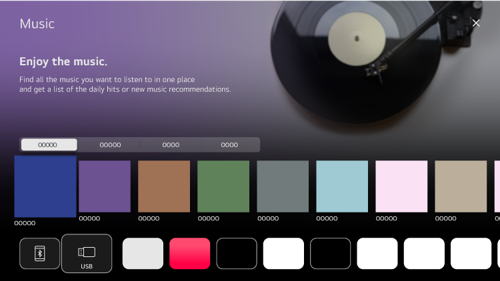
Select the desired service.The content provided by the service is shown below.
You can listen to music from a connected USB or smart device.Selecting the desired item will navigate to the corresponding app.
Displays music apps available on the monitor.Selecting the desired item will navigate to the corresponding app.- : Closes the app.
- This feature may not be available in some countries.
- You must connect to the network to use the Music feature.
- Available features vary depending on the region or service.
- Recommendations or search results may differ from those on a PC or smart device.
6.3. Surfing the Internet
[Go to table of contents]If you input the search word, it will find the information about search word base on the search engine.
- Press the button on the remote control.
- Launch the Web Browser app on the screen.
- Enter the website address in the address bar at the top of the screen to navigate, or directly enter a search term.View any previously opened tabs by pressing the number next to the address bar.
 : You can refresh the web page you are viewing.
- Select on the screen.You can zoom in or out on the screen while browsing the website.
Block Ads: You can block ads within the web page you are viewing.
It is only displayed when Settings Use Block Ads is set to On on the screen.
History: You can view and delete the website visit history.
Add to bookmarks: You can add the website you are currently viewing to your Favourites.
Add shortcut to the Home screen: You can add the website you are currently viewing as a shortcut to your Home.
Bookmarks: You can view and delete the list of websites you have added to your Favourites.
Settings: You can change the web browser settings.
User Guide: Launch User Guide.
Quit App: Turns off the app from running in the background. - : Closes the app.
- The new tab screen shows a list of Recommended Sites and Most Visited Sites.
If you do not want Recommended Sites to be displayed, set Show Recommended Sites to Off.
Recommended Sites may vary by country and is only available in certain countries.
- The Web Browser app on your monitor is a browser for monitor, so it may work differently than the browser for your PC.
- Some contents may not be played properly.
- Flash Plug-in is not supported, and only HTML5 media is supported.
- Plug-in installation is not supported.
- Media in formats other than JPEG/PNG/GIF may not be played.
- Apps may be forced to shut down if the monitor runs out of memory.
- The fonts provided on the monitor are used.Depending on the content, characters may look different from PC or mobile browsers.
- File and font downloads are not supported.
- Caution is required because malicious or phishing sites are not automatically blocked.
- Some functions of Web Browser may not be supported temporarily due to external factors.
- The website can be accessed through the monitor's Web Browser app, so care needs to be taken about children's access to harmful online contents.
You can lock the Web Browser app to prevent access to harmful online contents.
Press the button on the remote control, then navigate to General System Safety Application Locks on the screen. - If you encounter issues while using Web Browser, please refer to the following User Guide.
Path: Troubleshooting Troubleshooting Internet Browser Issues
Changing Web Browser Settings
Select Settings at the top of the Web Browser app.On Startup
You can choose the page that appears when you start the Web Browser app.Search Engines
You can select a search engine to search for when entering a keyword in the address bar.- Search engine settings may be subject to change without notice based on the supplier’s circumstances.
Show Recommended Sites
You can set whether or not to display a list of Recommended Sites on the new tab screen.Always Show Address Bar
When set to On, the address bar and menu bar area at the top will always be displayed.Automatic Web Browser Issue Report
When it is set to On, if a failure (malfunction, media playback failure, page loading failure, abnormal shutdown, delay in response due to insufficient memory, etc.) occurs while using the web browser, the relevant information will be automatically sent to the web browser development team at the LG Electronics headquarters (Korea).The submitted information will only be used to improve the Web Browser performance.Use Block Ads
When it is set to On, if you press the at the top of Web Browser, a button to turn on or off Use Block Ads will appear on the screen.Turning on the Use Block Ads feature speeds up page loading by blocking ads included in the website.Site Filtering
You can register websites to block or allow.- Approved Sites: You can configure the settings to open the previously registered web pages only.
- Blocked Sites: You can configure the settings to block specific websites.
- To use the Site Filtering function, you should enter the monitor password.
Pop-up Blocker
Blocks pop-ups that are automatically displayed by web pages.Private Browsing
If set to On, a history of website visits will not be stored.Do Not Track
You can request to not leave a history of your visit on the website. The operation may vary depending on the policy of the website.Adaptive Streaming using JavaScript
The media streaming technology using JavaScript allows you to view video with optimised resolution.
If this is set to Off, the resolution of the videos played in Web Browser is limited to 720p.Cookies Settings
Enables the website to store and use cookie data.Clear Browsing Data
- Clear Cookies: Deletes cookie data. When deleted, you are logged out of most sites.
- Clear All Browsing Data: Deletes all browsing history, including cookies.
6.4. Using the Sports Service
[Go to table of contents]- Press the button on the remote control.
- Select a Sports card on the screen.
- You can view the list of teams by league and detailed information.
- Press Add to register your preferred team or player.
By registering a team or player, you can view live scores and upcoming match schedules.Set a match alarm to receive notifications while watching.
- You must log in to your LG account to register your preferred team or player.
- The match schedule or status may differ from actual ones depending on the circumstances of the data provider.
- Real-time alarm may not be available when using certain apps.
- This feature is available only when the network is connected.
- Some models may not be supported.
6.5. Live Plus
[Go to table of contents]- Press the button on the remote control.
- Enter the following path on the screen. General System Additional Settings
- Set Live Plus to On.
- Some models may not be supported.
- You can still access some of the Live Plus features when using external devices such as a set-top box.
- If you set up a universal remote control, you can use Live Plus even when using external devices.
- This service is provided for only selected content with contracted partners.
6.6. Notifications
[Go to table of contents]- Press the button on the remote control.
- Select on the screen.
- You can check the details by selecting the desired item.If it supports shortcuts, you can launch the app.
- Press the button on the remote control.
Mark all as read: Changes all notifications to ‘Read’.
Delete: You can delete notifications.
Notification Settings: You can set whether to receive notifications for each app.If it is set to Off, any notifications previously received from the app will also be deleted.For external service apps, you can check notifications in Notification Settings after agreeing to receive notifications from the app.
User Guide: Move to the User Guide app.
7. Settings
[Go to table of contents]7.1. Quick Settings
[Go to table of contents]7.1.1. To Use Setting Function Quickly
[Go to table of contents] button on the remote control.You can quickly and easily use frequently used settings or functions.
Select
on the screen.You can add/delete items in Quick Settings and change the order.- : You can set more options.
You can also long-press button of the remote control to run the All settings directly.  : Directs to the Accessibility settings.
 : Directs to the Network settings.
- Recent History: The most recently selected item in Quick Settings is displayed.
- The configurable items differ depending on model.
7.1.2. Game Dashboard
[Go to table of contents]Press the
button on the remote control.- Dark Room Mode: You can adjust the brightness of the entire screen to reduce eye strain in a dark environment or when watching for a long time to make the screen easier to watch.
- Multi View: You can split the screen and use two apps simultaneously.
- Menu Colour: You can change the colour of the menu.
- Game Optimiser: Directs to the Game Optimiser settings.
For more details, please refer to the following User Guide.
Path: Settings Game Optimiser - All Settings: You can set more options.You can also long-press button of the remote control to run the All settings directly.
- : Launch User Guide.
- : The order of the items displayed on the Game Dashboard can be changed or replaced with other items.
- The configurable items differ depending on model.
- When you connect a game console and run a game, General Game Optimiser is changed to On, and Picture / Sound Select Mode is changed to Game Optimiser.If Game Dashboard does not display, please check each setting.
7.2. Picture
[Go to table of contents]7.2.1. Select Mode
[Go to table of contents]- Press the button on the remote control.
- Enter the following path on the screen. Picture Select Mode
- The configurable items differ depending on model.
When You Use Normal Signals
Vivid
Sharpens the image by increasing the contrast, brightness and sharpness.Standard
Displays the picture with natural contrast, brightness and sharpness levels.Auto Power Save
Auto Power Save mode reduces power consumption by using dimming control.- Energy saving feature like Energy Saving Energy Saving Step is switched Auto, and power use is much less than Vivid mode.
- Energy saving feature like Energy Saving
Cinema
Suitable picture for movies.Sports
Suitable picture for sports games. Sharpens the image of rapid movements such as kicking or throwing a ball.Game Optimiser
Suitable picture for gameplay.FILMMAKER MODE
Provides optimized Cinema Picture quality certified by UHD Alliance, the standard setting body for UHD-related technologies.- To auto-switch to FILMMAKER MODE when a signal that can be operated with this mode is entered, set FILMMAKER MODE Auto Start to On.
Expert (Bright space, daytime)/Expert (Dark space, night)
This mode is suitable for movies, etc. viewed in a dark environment.
Expert (Dark space, night) has lower color temperature than Expert (Bright space, daytime).
Select a mode that is suitable for the movie you are watching.
When You Use the HDR/Dolby Vision Signals
Vivid
Sharpens the image by increasing the contrast, brightness and sharpness.Standard
In a normal viewing environment, it opens a screen that can properly show the expressiveness and brightness of HDR.Cinema Home
The screen appears as a bright and clear screen than the Cinema.Cinema
Suitable picture for HDR video signal.Game Optimiser
Suitable picture for gameplay.FILMMAKER MODE
Provides optimized Cinema Picture quality certified by UHD Alliance, the standard setting body for UHD-related technologies.- To auto-switch to FILMMAKER MODE when a signal that can be operated with this mode is entered, set FILMMAKER MODE Auto Start to On.
- If the HDR/Dolby Vision video signal is input to the models that do not support the HDR/Dolby Vision technology, It will be provide normal signals picture mode options.
- Depending on the input signal, the available picture modes may be different.
- When watching online service content, the Picture Mode may be changed to match the content being shown.
- Expert is an option that allows a picture quality expert to fine-tune the quality of the standard picture. Thus, it may not be effective for a normal picture.
- Select Mode change may modify Energy Saving and Motion Eye Care settings and it can affect energy consumption. You can change the settings in General Energy Saving and Picture Advanced Settings Brightness Motion Eye Care.
7.2.2. Aspect Ratio
[Go to table of contents]- Press the button on the remote control.
- Enter the following path on the screen. Picture Aspect Ratio User Selection
21:9
Displays an aspect ratio of 21:9.16:9
Displays an aspect ratio of 16:9.Original
The optimal screen ratio changes depending on the input image signal.4:3
Displays an aspect ratio of 4:3.Vertical Zoom
You can adjust the vertical dimension of the screen and align the screen vertically by using Adjust Zoom Ratio and Adjust Screen Position.4-Way Zoom
You can adjust the horizontal/vertical/diagonal dimensions of the screen and align the screen horizontally/vertically by using Adjust Zoom Ratio and Adjust Screen Position.
- The configurable items differ depending on model.
- The picture may get distorted while zooming in or out.
- Selecting a different screen size from the original size may cause the image to look different.
- Depending on the combination of picture format and screen size, the edges may be hidden or shown in black, or both sides of the picture may flicker. Also, when selecting an item shown on the broadcast screen, the outline may not be aligned correctly.
- Depending on the input signal, the available screen sizes may be different.
View Screen with Just Scan
- Press the button on the remote control.
- Enter the following path on the screen. Picture Aspect Ratio Just Scan
If set to Auto, the feature switches between On or Off status depending on the information contained in the video signal.
- The items that can be selected may vary depending on the current input.
7.2.3. Brightness
[Go to table of contents]- Press the button on the remote control.
- Enter the following path on the screen. Picture Advanced Settings Brightness
Panel Brightness
Controls the level of screen brightness by adjusting the backlight. The closer to 100, the brighter the screen.- Decrease the Panel Brightness to reduce energy consumption.
- Depending on the Energy Saving (Auto/Maximum), you may not be able to adjust the Panel Brightness.
Press the button on the remote control, then navigate to General Energy Saving Energy Saving Step on the screen.Switch Energy Saving Step to either Off or Minimum.
Adjust Contrast
Adjusts the contrast of the bright and dark areas of the picture. The closer to 100, the higher the contrast.Black Level
Adjusts the brightness of dark areas of the screen.The closer it is to 100, the lighter the screen becomes.Auto Dynamic Contrast
Corrects the difference between the bright and dark sides of the screen for optimal results depending on the brightness of the picture.Dynamic Tone Mapping
Suitable contrast settings based on image brightness of the HDR content.Expression Enhancer
It is a technology to improve the contrast and expression of foreground, background and object by analyzing the information of the HDR image.Gamma(Adjust Brightness)
Adjusts the medium brightness of the picture.- BT.1886 expresses the gradation in ITU-R BT.1886, which is an international standard.
Video Range
Adjusts the darkness of the screen in order to display a perfect black.Select Video Range to match the colour range of the external input device.- This feature can be used while watching content through an external input.
LED Local Dimming
Maximizes the contrast ratio by making the bright side of the screen brighter and the dark side of the screen darker.- Off: Disables the LED Local Dimming function.
- Low/Medium/High: Changes the contrast ratio.
- Turning this option Off may increase energy consumption.
Motion Eye Care
Automatically adjusts brightness and reduces image blur based on image data to reduce eyestrain.- Turning this option Off may increase energy consumption.
- Depending on the input signal or the selected picture mode, the available options may differ.
- The configurable items differ depending on model.
7.2.4. Colour
[Go to table of contents]- Press the button on the remote control.
- Enter the following path on the screen. Picture Advanced Settings Colour
Colour Depth
Tones down or up the colours displayed on the screen. The closer to 100, the deeper the colour.Tint
Adjusts the colour balance between red and green displayed on the screen. The closer to Red 50, the more red the colour will be. The closer to Green 50, the more green the colour will be.Colour Gamut
Selects the range of Colours to display.Native
Displays more vivid and richer colour.Auto Detect
It automatically sets the Colour Gamut to match the signal.Dynamic
It expands the Colour Gamut to match the scene.
Fine Tune
This is used when experts control it by using a test pattern. You can control it by selecting areas of six colours (Red/Green/Blue/Cyan/Magenta/Yellow).
For normal images, adjustments may not result in noticeable colour changes.Colour Adjustment
Adjusts the Colour and saturation of the picture to make the image more Colourful and lively.Select Colour
From Red/Green/Blue/Cyan/Magenta/Yellow, select a tone to adjust.Adjust Saturation/Adjust Tint/Adjust Luminance
Adjust the chroma/tint/luminance of the tone in the range of -30 to +30.
White Balance
The function to adjust each colour to be reproduced more accurately based on white allows you to adjust the overall colour tone of the screen to your preference.Colour Temperature
You can set the colour to make the display look cooler or warmer.Method
This method is used for fine-tuning the color temperature setting. You can control the colour temperature at two points of the bright part and dark part of the video if you select 2 Points, at each point of 10 levels if you select 10 Points Signal Level(%), and at each point of 22 levels of the video if you select 22 Points Signal Level(%).Point
Select screen brightness for color temperature adjustment.
If Method is set to 2 Points, use Low to select shadows and High to select highlights.
If Method is set to 10 Points Signal Level(%), you can select brightness using numbers indicating 10 levels.
When the Method is set to 22 Points Signal Level(%), you can select the brightness with the 22 levels of brightness.Signal Level(%)
Select screen brightness for color temperature adjustment.
If Method is set to 10 Points Signal Level(%), you can select brightness using numbers indicating 10 levels.
When the Method is set to 22 Points Signal Level(%), you can select the brightness with the 22 levels of brightness.Show brightness level at the maximum signal level(%)
Adjusts the luminance of the highest 100% signal level.Adjust brightness level at the selected signal level(%)
The brightness of the selected signal level can be adjusted.- You can do these settings only when the Picture Select Mode is the Cinema, Expert (Bright space, daytime) or the Expert (Dark space, night) and when the Method is set to 10 Points Signal Level(%) or 22 Points Signal Level(%).
- You can do these settings only when the Picture
Red/Green/Blue
Adjust the color temperature of the selected point.
Adjust the intensity of Red/Green/Blue in the range of -50 to 50.
You can adjust respective values for the brightness selected in Point.
- Depending on the input signal or the selected picture mode, the available options may differ.
- The configurable items differ depending on model.
7.2.5. Clarity
[Go to table of contents]- Press the button on the remote control.
- Enter the following path on the screen. Picture Advanced Settings Clarity
Adjust Sharpness
Adjusts the sharpness of the image. The closer to 50, the sharper and clearer the image.Super Resolution
Adjusts the resolution to make dim and blurred images clearer.Noise Reduction
Removes small dots that stand out so as to make the image clean.MPEG Noise Reduction
Reduces the noise produced during the creation of digital video signals.Smooth Gradation
It reduces the phenomenon that the outline of the image is rugged and in a staircase pattern and displays a smoother screen.Real Cinema
Optimise display for movies.TruMotion
Suitable the image quality of fast-moving pictures.- Off: Turns off the TruMotion.
- Cinematic Movement: Adjusts the shaking of the motion on the screen to make it feel like you are in a movie theatre.
- Natural: Sets images with a lot of motions to look natural and clear.
- Smooth Movement: Softens fast-moving pictures.
- User Selection: Sets TruMotion manually.
- De-Judder: Adjusts juddering on the screen.
- De-Blur: Reduces the blurring effects of motion.
- Motion Pro: You can make your video clearer by eliminating afterimages.
- The advanced settings can be changed only in User Selection mode.
- Depending on the input signal or the selected picture mode, the available options may differ.
- The configurable items differ depending on model.
7.2.6. Response Time
[Go to table of contents]- Press the button on the remote control.
- Enter the following path on the screen. Picture Advanced Settings Response Time
- Some models may not be supported.
7.2.7. Apply to All Inputs
[Go to table of contents]- Press the button on the remote control.
- Enter the following path on the screen. Picture Advanced Settings Apply to All Inputs
- To apply your current picture settings to all input modes, select Apply to All Inputs.
The settings you specify only apply to the currently selected input mode.
7.2.8. Reset
[Go to table of contents]- Press the button on the remote control.
- Enter the following path on the screen. Picture Advanced Settings Reset
- Select reset in each screen mode.
7.2.9. Reduce Blue light
[Go to table of contents]- Press the button on the remote control.
- Enter the following path on the screen. Picture Advanced Settings Reduce Blue light
On
Adjusts the colour temperature of the screen.Off
Turns off the Reduce Blue light.
- Some models may not be supported.
7.3. Sound
[Go to table of contents]7.3.1. Select Mode
[Go to table of contents]- Press the button on the remote control.
- Enter the following path on the screen. Sound Select Mode
AI Sound
Depending on the content you watch, you can enjoy the optimised sound and virtual surround in real time.Standard
Optimises the sound for all types of content.Cinema
Optimises the sound for cinemas.Clear Voice /Clear Voice Pro
Boosts voice clarity.Sports
Optimises the sound for sports games.Music
Optimises the sound for music.Game Optimiser
Optimises the sound for gameplay.
- The configurable items differ depending on model.
- If you connect an LG Soundbar that supports Monitor Sound Mode Share to the HDMI (eARC/ARC) terminal, you can select Sound Mode provided by the LG Soundbar on the monitor.
You can output the device's Sound Mode through the LG sound bar.Press the button on the remote control, then navigate to Sound Advanced Settings Monitor Sound Mode Share on the screen.Set Monitor Sound Mode Share to On.
7.3.2. Use Monitor Speaker
[Go to table of contents]- Press the button on the remote control.
- Enter the following path on the screen. Sound Sound Out Use Monitor Speaker
7.3.3. Use Wireless Speaker
[Go to table of contents]- Press the button on the remote control.
- Enter the following path on the screen. Sound Sound Out Use Wireless Speaker
Bluetooth Device
Wirelessly connect a Bluetooth audio device to enjoy the sound more conveniently.
Refer to the user manual of the Bluetooth audio device for details on how to connect and use the device.- Press to view the connected devices or the devices that can be connected to connect any one of them.
- For some Bluetooth devices, the device volume can be controlled by selecting from the connection list.
- LG Sound Sync devices will automatically try to connect to the recently used devices when you turn the monitor on.
- We recommend that you connect an LG audio device that supports LG Sound Sync, using LG TV mode or LG Sound Sync mode on device.
- Some models may not be supported.
- The audio codec that can be output via Bluetooth is SBC/aptXTM.
- If the device fails to connect, check the power of the device to connect to and check if the audio device is working properly.
- Using a Bluetooth headset is recommended when you connect two Bluetooth devices.
- Depending on the type of the Bluetooth device, the device may not connect correctly or an abnormal behavior may occur such as unsynchronized video and audio.
- The mobile-only headsets may not work.
- If two different Bluetooth devices are connected and used at the same time, the voice may not match.
- Sound may stutter or sound quality may be reduced if:
- the Bluetooth device is too far from the monitor;
- there are obstacles between the Bluetooth device and the monitor; or
- used together with radio equipment such as a microwave oven or wireless LAN
- If the Picture Select Mode is set to Game Optimiser and Sound Out is set to Bluetooth Device, the Picture Select Mode changes to Standard.
- If you continue to experience problems, we recommend using a wired connection.(Optical digital, HDMI (eARC/ARC) port)Depending on the model, some features may not be available.
- Press
Mobile Device
If you install the LG ThinQ app on a smart device and connect it to your monitor, you can use the device as a speaker for the monitor.
7.3.4. Use Wired Speaker
[Go to table of contents]- Press the button on the remote control.
- Enter the following path on the screen. Sound Sound Out Use Wired Speaker
Optical Out Device
You can connect an audio device that supports Optical to the optical digital audio output port to enjoy the monitor’s sound in richer quality and greater convenience.- Only available for models with an optical digital port.
- For some devices, you can adjust the volume using the monitor’s remote control.
HDMI(ARC) Device
Sound from the monitor can be output through an external audio device connected via a HDMI (eARC/ARC) port.- Some models may not be supported.
- Select HDMI(ARC) Device to automatically turn on SIMPLINK. Once SIMPLINK is turned off, the output speaker settings automatically revert to the default settings for uninterrupted audio output.
Audio Out Device/Wired Headphones
Select Wired Headphones or Audio Out Device to optimise audio output according to the device connected.- Some models may not be supported.
- If you connect the wired headphones while the monitor is powered on, it automatically detects the wired headphones and redirects audio through them.
7.3.5. Use External Speakers with Monitor Speaker
[Go to table of contents]- Press the button on the remote control.
- Enter the following path on the screen. Sound Sound Out Use External Speakers with Monitor Speaker
Bluetooth Device + Monitor Speaker
Both the internal speaker of the monitor and the Bluetooth speaker can be used to output the sound at the same time or a surround sound can be used.
Up to two Bluetooth devices of the same model can be connected.- Select to connect a Bluetooth speaker.
- Run Audio Delay to synchronise the monitor's internal speaker with the Bluetooth speaker.You can adjust the sync automatically or manually.
- When you set Sound Out as Bluetooth Device + Monitor Speaker, if Picture Select Mode is Game Optimiser, it will be changed to Standard and Dolby Atmos will be turned off.Depending on the model, some features may not be available.
- While using Screen Share function, the video and audio may be out of sync.We recommend using Use Monitor Speaker in Sound Out.
- You can adjust the volume using the volume buttons on the Bluetooth device.Press the button on the remote control, then navigate to General Accessibility Enjoy Monitor Sound Together on the screen.Set Enjoy Monitor Sound Together to Bluetooth Device.
For Bluetooth devices that do not have volume buttons, you can adjust the volume of the device in the detailed settings screen of Bluetooth Device + Monitor Speaker. - If Enjoy Monitor Sound Together is set to Bluetooth Device, only one Bluetooth device can be connected.
- Depending on the type of your Bluetooth device, two devices may not be connected at the same time.
- Depending on the type of the Bluetooth device, the device may not connect correctly or an abnormal behavior may occur such as unsynchronized video and audio.
- Select
Optical Out Device + Monitor Speaker
Audio is played through the monitor’s built-in speakers and the audio device connected to the digital optical audio output port simultaneously.- Only available for models with an optical digital port.
HDMI(ARC) Device + Monitor Speaker
It outputs sound simultaneously with the built-in speaker on the monitor and hearing aid or LG Soundbar with the WOW Orchestra function.- Some models may not be supported.
Connecting LG Soundbar with the WOW Orchestra function
If you connect the LG Soundbar to the HDMI (eARC/ARC) terminal, it will be connected automatically.Connecting a hearing aid
Connect the transmitter of the hearing aid to the HDMI (eARC/ARC) terminal.
Press the button on the remote control, then navigate to General Accessibility Enjoy Monitor Sound Together on the screen.
Set Enjoy Monitor Sound Together to HDMI(ARC) Device.- To adjust the volume of the connected hearing aid on the monitor, press
 next to the HDMI(ARC) Device + Monitor Speaker.
- To adjust the volume of the connected hearing aid on the monitor, press
Wired Headphones + Monitor Speaker
Audio is played through internal speakers and the Wired Headphones simultaneously.- Some models may not be supported.
- If you connect the wired headphones while the monitor is powered on, it automatically detects the wired headphones and redirects audio through them.
7.3.6. Balance
[Go to table of contents]- Press the button on the remote control.
- Enter the following path on the screen. Sound Advanced Settings Balance
- This setting only applies to the monitor's internal speaker.
7.3.7. Equalizer
[Go to table of contents]- Press the button on the remote control.
- Enter the following path on the screen. Sound Advanced Settings Equalizer
- This option can be enabled if Sound Select Mode is set to Standard.
- This setting only applies to the internal speakers of the monitor or HDMI (eARC/ARC) connected devices that support Monitor Sound Mode Share.
7.3.8. Apply to All Inputs
[Go to table of contents]To apply your current sound settings to all input modes, select Apply to All Inputs.
- Press the button on the remote control.
- Enter the following path on the screen. Sound Advanced Settings Apply to All Inputs
7.3.9. Reset
[Go to table of contents]- Press the button on the remote control.
- Enter the following path on the screen. Sound Advanced Settings Reset
- This setting only applies to the internal speakers of the monitor or HDMI (eARC/ARC) connected devices that support Monitor Sound Mode Share.
7.3.10. Automatic Volume Adjustment
[Go to table of contents]- Press the button on the remote control.
- Enter the following path on the screen. Sound Advanced Settings Automatic Volume Adjustment
- Set to On.
- This setting only applies to the internal speakers of the monitor or HDMI (eARC/ARC) connected devices that support Monitor Sound Mode Share.
7.3.11. Match Screen and Sound
[Go to table of contents]The closer the value is set to 60, the slower the voice output speed will be than the default speed.
If you select Bypass, the sound from external devices is output immediately without delay.The audio may be output before the video because of the time the monitor takes to process the video input.
- Press the button on the remote control.
- Enter the following path on the screen. Sound Advanced Settings Match Screen and Sound
- Available options vary by Sound Out setting.
7.3.12. Select Input Audio Format
[Go to table of contents]When connected to devices or content that support the latest surround sound technology, setting to Bitstream will enable you to listen to the intended sound quality.
When the voice delivered through the HDMI IN/USB-C™ port is not synchronised, set it to PCM.
- Press the button on the remote control.
- Enter the following path on the screen. Sound Advanced Settings Select Input Audio Format
- USB-C may not be supported on some models.
7.4. Accessibility
[Go to table of contents]7.4.1. Audio Guidance
[Go to table of contents]- Press the button on the remote control.
- Enter the following path on the screen. General Accessibility Audio Guidance
- Set Enable the function to On.
Speed
Adjust the speed of spoken guide.Volume
Adjust the volume of spoken guide.Pitch
Adjust the tone of spoken guide.
- This feature is available on certain languages only.
- Some models may not be supported.
- The configurable items differ depending on model.
- For visually impaired users.
- Setting the Audio Guidance to On automatically switches the Monitor Power Sound (only available on certain models) to On as well.
7.4.2. Monitor Power Sound
[Go to table of contents]- Press the button on the remote control.
- Enter the following path on the screen. General Accessibility Monitor Power Sound
- Some models may not be supported.
- Setting the Audio Guidance to On automatically switches the Monitor Power Sound to On as well.
7.4.3. Screen Zoom
[Go to table of contents]- Press the button on the remote control.
- Enter the following path on the screen. General Accessibility Screen Zoom
- Set to On.
- You can easily move to different parts of the screen by moving the Magic Remote pointer to the edge of the screen.
7.4.4. Enjoy Monitor Sound Together
[Go to table of contents]- Press the button on the remote control.
- Enter the following path on the screen. General Accessibility Enjoy Monitor Sound Together
Off
Turns off the Enjoy Monitor Sound Together.Bluetooth Device
Sound Out changes to Bluetooth Device + Monitor Speaker.The existing Bluetooth connection history will then be deleted.HDMI(ARC) Device
Sound Out changes to HDMI(ARC) Device + Monitor Speaker.
- The configurable items differ depending on model.
- If you connect a device other than a hearing aid, this feature may not work properly.
- For Bluetooth devices, earphone or headset type is recommended.
- For instructions on how to connect and set up Bluetooth devices, please refer to the following User Guide.
Path: Settings Sound Use External Speakers with Monitor Speaker
7.4.5. Closed Caption
[Go to table of contents]- Press the button on the remote control.
- Enter the following path on the screen. General Accessibility Closed Caption
- Set Closed Caption to On.
7.4.6. High Contrast
[Go to table of contents]- Press the button on the remote control.
- Enter the following path on the screen. General Accessibility High Contrast
- Set to On.
7.4.7. Greyscale
[Go to table of contents]- Press the button on the remote control.
- Enter the following path on the screen. General Accessibility Greyscale
- Set to On.
7.4.8. Invert Colours
[Go to table of contents]- Press the button on the remote control.
- Enter the following path on the screen. General Accessibility Invert Colours
- Set to On.
7.5. AI Service
[Go to table of contents]7.5.1. Voice Recognition Help
[Go to table of contents]- Press the button on the remote control.
- Enter the following path on the screen. General AI Service Voice Recognition Help
7.5.2. Voice Recognition Settings
[Go to table of contents]- Press the button on the remote control.
- Enter the following path on the screen. General AI Service Voice Recognition Settings
7.5.3. AI Recommendation
[Go to table of contents]- Press the button on the remote control.
- Enter the following path on the screen. General AI Service AI Recommendation
Smart Tips
You can get an introduction to useful smart features when using an app.Next Picks
You can get recommendations based on your viewing patterns.- This feature may not be available in some countries.
Usage Data Management
Reset Usage Data
It resets the content view history and the app usage history.If you reset them, it takes some time to receive recommendations for contents again.
- The configurable items differ depending on model.
7.6. Game Optimiser
[Go to table of contents]- Press the button on the remote control.
- Enter the following path on the screen. General Game Optimiser
- Set to On.
- Some models may not be supported.
- It only works with HDMI inputs.
- If you set Picture Mode/Sound Mode to a mode other than Game Optimiser, some items in Game Optimiser cannot be set.
- If you turn this feature On, you cannot change some video settings items.
- When Game Optimiser is set to On, audio delays may occur if you set Sound Out to Bluetooth Device/Optical Out Device/HDMI(ARC) Device.Switch Sound Out option to Use Monitor Speaker or switch Sound Advanced Settings Select Input Audio Format option to PCM.
Depending on the model, some features may not be available. - The configurable items differ depending on model.
Game
Game Genre
You can optimise the screen depending on the genre of the game.Reduce Blue Light
You can adjust the blue light output to rest your eyes while watching the screen.Dark Room Mode
You can adjust the brightness of the entire screen to reduce eye strain in a dark environment or when watching for a long time to make the screen easier to watch.Prevent input delay (input lag)
Minimize the input delay according to the image signal.Game Dashboard
Set to On.Press the button on the remote control during a game to display the Game Dashboard.Set to Off to display as Quick Settings during a game.
For more details, please refer to the following User Guide.
Path: Settings Quick Settings Game DashboardVRR
This reduces screen cracking and video lagging during game play.VRR & G-Sync
NVIDIA's display adaptive sync technology adjusts frames to minimize screen tearing and stuttering.AMD FreeSync Premium
Set to On.AMD's display adaptive sync technology adjusts the injection rate to minimize screen breaks and stuttering.- The LED/QNED model can be set up as follows:
High: The range of supported refresh rates is 90 Hz - 120 Hz.
Wide: The range of supported refresh rates is 48 Hz - 120 Hz.
Screen flickering may occur in some gaming environments.In this case, set it to High.
- The LED/QNED model can be set up as follows:
ALLM
The monitor will automatically switch to low-latency mode if this feature is turned on while playing games.In this case, some picture settings on the monitor may not be applied.- The device connected should support this service.
Fine Tune Dark Areas
You can calibrate the brightness of the dark areas with VRR, VRR & G-Sync or AMD FreeSync Premium set to On.- It may not operate normally depending on the features or settings of the connected PC or game console.
Menu Colour
Menu colour of Game Optimiser and Game Dashboard can be changed.User Guide
Move to the User Guide app.
Picture
Black Stabiliser
You can fine-tune dark areas.White Stabiliser
You can fine-tune light areas.Game Contrast
Adjusts the contrast of the bright and dark areas of the picture.Game Black Level
Adjusts the overall screen brightness.
You may use the Game Black Level settings particularly to set the dark part of the image.Adjust Game Sharpness
Adjusts the sharpness of the image.Game Colour Depth
Tones down or up the colours displayed on the screen.Dynamic Tone Mapping
Suitable contrast settings based on image brightness of the HDR content.Reset
You can reset the settings.Wide Aspect Ratio
Supports resolutions with a screen ratio of 21:9 or 32:9.- It only works when the game or PC input supports a 21:9 or 32:9 screen ratio.
- To display the screen in the selected screen ratio, the resolution must be set up as shown below to match the desired screen ratio, even on the connected PC.
- 21:9: 3840 × 1600 (60 Hz signals only), 2560 × 1080
- 32:9: 3840 × 1080
Screen Position
You can change the position of the screen when you set it to a widescreen ratio.Advanced Picture Settings
Move to the Picture Advanced Settings.
Sound
AI Game Sound
Optimises the sound for gameplay.- This setting only applies to the internal speakers of the monitor or HDMI (eARC/ARC) connected devices that support Monitor Sound Mode Share.
Game Equaliser
The sound can be adjusted by increasing or decreasing certain frequency bands of the voice signal.Dolby Atmos
The Dolby Atmos effect applies to the Dolby Atmos content.For more details, please refer to the following User Guide.
Path: Settings Sound Dolby AtmosSound Out
You can select an audio device that outputs sound from the monitor.Advanced Sound Settings
Move to the Sound Advanced Settings.
7.7. Family Settings
[Go to table of contents]7.7.1. Usage Limit Setting
[Go to table of contents]- Press the button on the remote control.
- Enter the following path on the screen. General Family Settings Usage Limit Setting
- Set Enable the function to On.
- Set Start Time and End Time.
Selecting Repeat will activate this feature every day. - Select Set.
- If you lose the password you set, you can reset it as follows:For more details, please refer to the following User Guide.
Path: Settings System Safety
7.7.2. Eye Care Mode
[Go to table of contents]- Press the button on the remote control.
- Enter the following path on the screen. General Family Settings Eye Care Mode
- Set Enable the function to On.
- Some models may not be supported.
- Using Eye Care Mode sets Picture Advanced Settings Reduce Blue light to On.
7.7.3. Volume Limit Mode
[Go to table of contents]- Press the button on the remote control.
- Enter the following path on the screen. General Family Settings Volume Limit Mode
- Set Enable the function to On.
- Volume Limit Mode may not work for audio devices connected to the optical digital/HDMI (eARC/ARC)/headphone port.Depending on the model, some features may not be available.
7.7.4. Screen Time Report
[Go to table of contents]- Press the button on the remote control.
- Enter the following path on the screen. General Family Settings Screen Time Report
7.8. Programmes
[Go to table of contents]7.8.1. Programme Manager
[Go to table of contents]- Press the button on the remote control.
- Enter the following path on the screen. General Programmes Programme Manager
Edit All Programmes
You can lock or unlock the selected programmes from all the stored programmes, or you can set them to be skipped when switching programmes.- Lock / Unlock: Lock the selected programmes or unlock the locked programmes.
- Delete / Restore: Set the selected programmes to be skipped when switching programmes, or disable the skipping option of the programmes previously set to be skipped.
Edit Favourites
You can add/delete desired programmes to/from the favourite programmes, change their positions, etc.- Move: Select one or more programmes in the Preferred Programmes list, press the Move button, and then select the position to move it to. The selected programmes will move to the position you selected.
- Change Group Name: Change the name of the favourite programmes list.
- Sort by Programme: Sorts the list of favourite programmes by programme.
7.9. Network
[Go to table of contents]Path: Getting Started with LG webOS
Connecting to the Network- Press the button on the remote control.
- Enter the following path on the screen. General Network
Wired Connection (Ethernet)
If the router connected to the network supports the DHCP feature, connecting the monitor and router by wire will automatically connects to the network.If the automatic setup is not supported, you can select Edit to manually set up the network connection.- Some models may not be supported.
Wi-Fi Connection
If you have set the monitor up for a wireless network, you can check and connect to the available wireless Internet networks.Select the wireless router to connect.
For more detailed settings, select Other Network Settings.Add a hidden wireless network
If you input the name of network directly, you can add a wireless network.Connect via WPS PBC.
If the wireless router you want to connect to has a Wi-Fi Protected Setup-Push Button Configuration (WPS-PBC) feature, you can easily connect to the wireless router by pressing the WPS-PBC button on the router.Press the wireless router’s WPS-PBC button and then press the monitor’s [Connect] button.Connect via WPS PIN.
This is a method to connect to an access point using a Wi-Fi Protected Setup-Personal Identification Number (WPS-PIN).Select the access point you want to connect to.Enter the PIN displayed on the access point’s Wi-Fi device.Advanced Wi-Fi Settings
Once you connect to a wireless network, you can view connection information such as detailed IP address information.In addition, you can change the IP address and DNS server address you want to connect to by pressing the Edit button.
7.10. External Devices
[Go to table of contents]7.10.1. Connect Bluetooth Controller
[Go to table of contents]- Press the button on the remote control.
- Enter the following path on the screen. General External Devices Connect Bluetooth Controller
- Turn on the device, set it to pairing mode, and then click Connect on your monitor screen.
When a device you've connected before is turned on, it automatically connects to your monitor.To disconnect the existing connection, click Disconnect.
- It is recommended that you use a product that has been tested for compatibility with LG monitors.
Bluetooth Mouse: Logitech M535, Logitech MX Master 2S, Apple Magic Mouse2
Bluetooth Keyboard: Logitech K480, Arteck HB030B, Arteck HB192, Apple Magic Keyboard
Bluetooth Gamepad: Sony Dualshock4, Microsoft Xbox One S Controller, Microsoft Xbox Series X Controller, NVIDIA SHIELD Controller, Amazon Luna Controller, Shaks S3b, Shaks S2b - This feature is available for Bluetooth-enabled models only.
- Connecting multiple Bluetooth devices may result in poor connection or operation.
- If the Bluetooth device is too far from the monitor, or there are obstacles between them, they may not operate normally.
- Depending on the peripherals (wireless router, microwave oven, etc.), communication failures may occur.
- If the device you selected from Registered Devices does not reconnect, Disconnect and then reconnect the device.
- It’s differ form devices. For more information on the device you want to connect to, refer to its user guide.
7.10.2. Camera
[Go to table of contents]- Press the button on the remote control.
- Enter the following path on the screen. General External Devices Camera
7.10.3. Universal Control Settings
[Go to table of contents]For more details, please refer to the following User Guide.
Path: How to Operate Monitor
Setting Universal Control- Press the button on the remote control.
- Enter the following path on the screen. General External Devices Universal Control Settings
7.10.4. HDMI Settings
[Go to table of contents]- Press the button on the remote control.
- Enter the following path on the screen. General External Devices HDMI Settings/Input Settings
- The configurable items differ depending on model.
- USB-C may not be supported on some models.
SIMPLINK (HDMI-CEC)
You can conveniently control and use various multimedia devices connected through HDMI with the monitor remote control.For more details, please refer to the following User Guide.
Path: How to Operate Monitor Connecting to SIMPLINK (HDMI-CEC)
7.10.5. Monitor On With Mobile
[Go to table of contents]- Press the button on the remote control.
- Enter the following path on the screen. General External Devices Monitor On With Mobile
- The monitor should be connected to a network.
- The monitor and the device to be used should be connected to the same network.
- The Turn on via Wi-Fi/Turn on via Wi-Fi(Networked Standby Mode) feature must be used in an app on a smart device that supports the feature.
- Turn on via Bluetooth/Turn on via Bluetooth(Networked Standby Mode) is only available on some smartphones.
- The monitor must be plugged in.
- To connect for the first time, make sure the device to be used is ready to connect.
- Some models may not be supported.
7.10.6. Delete Connection History
[Go to table of contents]- Press the button on the remote control.
- Enter the following path on the screen. General External Devices Delete Connection History
7.11. System
[Go to table of contents]7.11.1. Language
[Go to table of contents]- Press the button on the remote control.
- Enter the following path on the screen. General System Language
Menu Language
You can select one of the menu languages to be displayed on the screen.The language for the speech recognition will be automatically set to the selected language for the menu.Keyboard Languages
Select the language to use the on-screen keyboard.
7.11.2. Location
[Go to table of contents]- Press the button on the remote control.
- Enter the following path on the screen. General System Location
Address Setting
You can set the location in detail.Country
Select the country for your country's special services.Postcode
This function is used to set the location of the monitor by entering your postcode.LG Services Country
Specialized services are available for selected countries.Services provided may vary depending on the settings.Weather Location Setting
Please set your region to display the weather on the screen saver and, etc.
- The configurable items differ depending on model.
- Unable to set city when you are not connected to the network.
- You must set the country manually when you are not connected to the network.
7.11.3. Time & Timer
[Go to table of contents]- Press the button on the remote control.
- Enter the following path on the screen. General System Time & Timer
Set Automatically
The monitor time is automatically set to the time sent from the server.Time/Date/Time Zone
You can manually set the time and date if the automatically set current time is incorrect.Custom Time Zone
When select the Custom in Time Zone, Custom Time Zone menu is activated.Timers
Sleep Timer
Sets the monitor to turn off at a specified time.
If you do not want to use Sleep Timer, select Off.Power On Timer
Set Enable the function to On.
The monitor is turned on at the set time.- Time: Set the time at which to turn the monitor on.
- Timer Repeat: Set the day of the week.Set the option to None to operate the feature only once.
- Input: Set an external input to display when the power is turned on.
- Volume: Set audio volume to use when the power is turned on.
Power Off Timer
Set Enable the function to On.
The monitor is turned off at the set time.- Time: Set the time at which to turn the monitor off.
- Timer Repeat: Set the day of the week.Set the option to None to operate the feature only once.
Auto Power Off after 4 Hours
If you do not press any button for 4 hours after the monitor is turned on by a feature such as Power On Timer, the monitor will be turned off automatically.
To ensure the monitor does not automatically turn off, set Auto Power Off after 4 Hours to Off.- Some models may not be supported.
- To use Power On Timer/Power Off Timer, set the time correctly.
7.11.4. Safety
[Go to table of contents]- Press the button on the remote control.
- Enter the following path on the screen. General System Safety
- Set Enable the function to On.
Application Locks
You can lock or unlock the application.- The lock function is not immediately available for the currently running application.
Input Locks
You can lock or unlock the Inputs.Reset Password
Set or change the password for the monitor.- The default password is set as “0000”.
When France, Norway or Belgium is selected for Country, the password is not “0000” but “1234”.
- The default password is set as “0000”.
Resetting a Lost Password
If you lose the password you set, you can reset it as follows:- Press the button on the remote control.
- Enter the following path on the screen. General System Safety
- Press the programme buttons on the remote control in the order: .The master password input window will appear.
- Enter the numbers “0313” in the master password input window.The password will be reset.
7.11.5. Quick Start+
[Go to table of contents]- Press the button on the remote control.
- Enter the following path on the screen. General System Additional Settings Quick Start+
- Set to On.
- Some models may not be supported.
- Turning this option on may increase energy consumption.
7.11.6. Home Settings
[Go to table of contents]- Press the button on the remote control.
- Enter the following path on the screen. General System Additional Settings Home Settings
Power On Screen
You can select the screen to be displayed when the monitor is turned on.Home Promotion
You can turn on or off the advertisements on the Home screen.Content Recommendation
You can receive content recommendations on the Home screen.
- The configurable items differ depending on model.
7.11.7. Screen Saver Promotion
[Go to table of contents]- Press the button on the remote control.
- Enter the following path on the screen. General System Additional Settings Screen Saver Promotion
- Setting to Off enables you to turn off the advertisements displayed on the screen saver.
7.11.8. Standby Light
[Go to table of contents]- Press the button on the remote control.
- Enter the following path on the screen. General System Additional Settings Standby Light
- Some models may not be supported.
7.11.9. Pointer Options
[Go to table of contents]- Press the button on the remote control.
- Enter the following path on the screen.
General System Additional Settings Pointer Options
Tracking Speed
Sets the pointer speed.Pointer Size
Selects the pointer size.
- You can purchase the Magic Remote separately if it is not provided.
7.11.10. Advertisement
[Go to table of contents]This information is used to help limit the number of times the same ad is displayed.You can clear this cookie or turn it on or off at any time by going to the Advertisement setting on your monitor.
No personally identifiable information is tied to this cookie.
- Press the button on the remote control.
- Enter the following path on the screen. General System Additional Settings Advertisement
Limit AD Tracking
If set to On, personalised advertisements based on user interests may not be provided.Reset AD ID
User interest information is newly collected, and advertisements are provided according to the information.
- Some models may not be supported.
7.11.11. Use Provided Remote Only
[Go to table of contents]- Press the button on the remote control.
- Enter the following path on the screen.
General System Additional Settings Use Provided Remote Only
- The functions of certain buttons on device remote controls may vary.
7.11.12. Live Plus
[Go to table of contents]For more details, please refer to the following User Guide.
Path: Making the Most of Smart Monitor
Live Plus- Some models may not be supported.
7.11.13. Settings Help
[Go to table of contents]- Press the button on the remote control.
- Enter the following path on the screen. General System Additional Settings Settings Help
7.11.14. DPM (Standby Mode)
[Go to table of contents]- Press the button on the remote control.
- Enter the following path on the screen. General System Additional Settings DPM (Standby Mode)
Off
Turns off the DPM (Standby Mode).On
The monitor will be in the same state as when you press the power button on the remote control.
When connected to the HDMI IN/USB-C port, the monitor turns on when the PC becomes active.
- USB-C may not be supported on some models.
7.11.15. Set ID
[Go to table of contents]- Press the button on the remote control.
- Enter the following path on the screen. General System Additional Settings Set ID
- This feature is for administrators.It is not recommended for use in a typical home environment.
7.11.16. Reset to Initial Settings
[Go to table of contents]- Press the button on the remote control.
- Enter the following path on the screen. General System Reset to Initial Settings
Reset All
All items on the monitor are changed to their default settings.Reset all except network settings
All items except the network settings are changed to their default settings.
- If Safety is set to On, you should type the password to Reset to Initial Settings.
- Do not turn off the power during initialization.
- We recommend that you reset the monitor to Reset to Initial Settings before you sell it or transfer it to a third party.
7.12. Energy Saving
[Go to table of contents]- Press the button on the remote control.
- Enter the following path on the screen. General Energy Saving
Energy Saving Step
- Auto: The monitor sensor detects the ambient lighting and automatically adjusts the screen brightness.
- Some models may not be supported.
- Minimum Brightness: You can set how dark the screen is when the Energy Saving Step is set to Auto.
- Off: Turns off the Energy Saving Step.
- Minimum/Medium/Maximum: Use the power saving feature according to Energy Saving Step set on the monitor.
- The configurable items differ depending on model.
- If you use Energy Saving Step function, brightness of your monitor will be affected.
- Auto: The monitor sensor detects the ambient lighting and automatically adjusts the screen brightness.
Auto Power Off
When the monitor is on, it turns off automatically if you do not press any button within the set period of time.- Some models may not be supported.
Screen Off
Screen is turned off and only sound is played.
Press any button except the power and the volume buttons to turn the screen back on.- It may not be supported, depending on the running app or function.
7.13. Support
[Go to table of contents]7.13.1. Software Update
[Go to table of contents]- Press the button on the remote control.
- Enter the following path on the screen. Support Software Update
Auto Update
When it is set to On, updates are automatically made without a separate confirmation procedure except for some important updates.Check for Updates
When checking for the latest update version, you can only perform updates if an update file of a later version is available.The monitor automatically checks your software version but, if necessary, you can perform a manual check.
- The configurable items differ depending on model.
- The latest version can be obtained via internet connections.
- If software is not updated, certain functions may not work properly.
- In some countries, Auto Update is not displayed if you are not connected to the Internet.
- Your device will have to occasionally download and install software updates in order to maintain optimal functionality.While the software is updated the screen of your device may, in the absence of any user interaction within 4 hours, turn off, but the device will not completely enter standby mode until the installation is finished.This can result in an increased power consumption during software update.
7.13.2. Screen Self-diagnosis
[Go to table of contents]- Press the button on the remote control.
- Enter the following path on the screen. Support Screen Self-diagnosis
- After running a test to verify that the image signal is output normally, you can select whether there is an error with the signal on the screen.
If there are no problems in the test, check the connected external device or broadcast signal.
7.13.3. Sound Self-diagnosis
[Go to table of contents]- Press the button on the remote control.
- Enter the following path on the screen. Support Sound Self-diagnosis
- Start the Sound Test to check that the sound signal output is normal, and then select whether there is an error.
If there are no problems in the test, check the connected external device or broadcast signal.
7.13.4. Home/Store Mode
[Go to table of contents]- Press the button on the remote control.
- Enter the following path on the screen. Support Home/Store Mode
- You can choose between Home Mode and Store Mode.
To use the monitor at home, select Home Mode.
Select Store Mode only when the monitor will be displayed in store.
7.13.5. Monitor Information
[Go to table of contents]- Press the button on the remote control.
- Enter the following path on the screen. Support Monitor Information
7.13.6. IP Control Settings
[Go to table of contents]- Press the button on the remote control.
- Enter the following path on the screen. Support IP Control Settings
7.13.7. Privacy & Terms
[Go to table of contents]- Press the button on the remote control.
- Enter the following path on the screen. Support Privacy & Terms
User Agreements
These are the terms and conditions related to use of the Smart Monitor service and protection of privacy.Legal Notice
It's a legal notice for services provided via monitor.Open Source Software Notice
You can view the instructions for each item.
8. Troubleshooting
[Go to table of contents]8.1. Perform Check-up with the Quick Help
[Go to table of contents]- Press the button on the remote control.
- Enter the following path on the screen. Support Quick Help
You can also long-press the number 9 button of the remote control to run the Quick Help.
Optimisation Settings
You can automatically check the overall status of your monitor and view and change the recommended setting values.Check Items
Select the problematic item, and you can get help to solve the problem.- Self-Diagnosis of Monitor Settings: Select the item that matches the symptom to find instructions that can help you solve the problem.
- Check the status of monitor: You can check your monitor's current status for the selected item.
- If you still fail to solve the problem, please contact our Customer Service Centre.
8.2. Troubleshooting Power/Remote Control Issues
[Go to table of contents]- I cannot turn on the monitor.
- If you are using a multi-outlet, check if it is working properly.To check whether a power strip is working properly, plug the monitor’s power plug directly to a wall outlet and observe its operation.
- Try to power on using the button on your monitor set.
- The power is on, but the screen comes on later.
- This is because there is a noise-removal process to eliminate any possible noise that may appear during power-on. This does not mean the product is defective.
- The pointer of Magic Remote is not appear in the screen.
- You can purchase the Magic Remote separately if it is not provided.
- Hold the remote control towards the monitor and press the and buttons at the same time for more than 5 seconds until instructions appear.The previously registered remote control is deregistered and then registered again.
- Replace the batteries when you are prompted to do so on your monitor screen.(Use alkaline batteries.)
- If Audio Guidance is set to On, the pointer of the Magic Remote does not appear.
- Press the button on the remote control.
- Enter the following path on the screen. General Accessibility Audio Guidance
(Some models may not be supported.) - Set to Off.
- Press the
- I cannot turn the monitor on with the remote control.
- Please make sure your monitor power plug is correctly connected to the outlet.
- Replace the batteries in the remote control.(Use alkaline batteries.)
- If you place an obstacle, such as a soundbar, in front of the monitor’s remote control receiver, it may interfere with the reception of the remote control signal.Install it at least 10 cm away from the monitor’s remote control receiver.
- When using a set-top box remote control, if the integrated control function of the set-top box remote control is turned off, you cannot power on or off the monitor with the set-top box remote control.Please contact your set-top box provider.
- The power turns off suddenly.
- Check if Power Off Timer is set.
- The monitor will be turned off automatically if you do not press any buttons for 4 hours even after the monitor is turned on at the time set by Reminder or Power On Timer.
- There is also a chance that the internal protection circuitry has activated because the internal temperature of the product has risen unusually or excessively.
- If you are using a set-top box, the monitor may be set to turn off when the set-top box is turned off.To prevent the monitor from turning off when you turn off the set-top box, switch the power sync function off on the set-top box.
- Every time I turn on the monitor, the Home screen appears.
- The Home screen is automatically displayed whenever you turn on the monitor.You can change settings to prevent the home screen from being displayed every time you turn on the device.
Press the button on the remote control, then navigate to General System Additional Settings Home Settings on the screen.Set Power On Screen to Recent Input. - I cannot turn on or operate the device with the monitor remote control even after setting the universal remote control.
- This feature can only be used with the Magic Remote.
You can purchase the Magic Remote separately if it is not provided. - Make sure that the device's power plug is plugged into the outlet.
- Replace the batteries in the remote control.(Use alkaline batteries.)
- Check if there are any obstacles blocking the signal in front of the connected device’s remote control receiver.
8.3. Troubleshooting Screen Issues
[Go to table of contents]First of all, perform Screen Self-diagnosis for check any abnormalities in the monitor.
- Press the button on the remote control.
- Enter the following path on the screen. Support Screen Self-diagnosis
Make sure that the set-top box is correctly connected to your monitor.
- It says there is no signal on the screen.
- Check whether the cable connected to the external device is properly connected to the monitor.
- Go to button on the remote control to choose the connected input.
- Check if your external device, such as set-top box or Blu-ray player, is turned on.
- I cannot see some programmes.
- If you are using a set-top box, consult its supplier.
- The screen is cut off.
- Change the settings as follows:
- Press the button on the remote control.
- Enter the following path on the screen. Picture Aspect Ratio
- Try changing the Aspect Ratio.
- Press the
- When viewing videos through an external device (set-top box, game console, etc.) or content app, check the screen size settings in the settings menu of the device/app.There may be differences in the screen ratio provided by each device/app.
- Each programme has a different image quality.
- Depending on the type of videos provided by the broadcasters, programmes may have different image qualities.
- If you are using a set-top box, consult its supplier.
- Run Screen Self-diagnosis first. If it is normal, there may be a problem with the broadcast signal.
- There is a difference in image quality from those seen at the store.
- Depending on the type of video provided by the broadcasters, there may be a difference in image quality from those displayed at the store.
- Run Screen Self-diagnosis first. If it is normal, there may be a problem with the broadcast signal.
- A digitally broadcasted programme stops or its screen is broken.
- If you are using a set-top box, consult its supplier.
- When HDMI or USB-C™ input is in use, a vertical solid line or colour blurring appears on the upper/lower/left/right edges of the screen.
- USB-C may not be supported on some models.
- Just Scan shows you the original image as it is.If the signal is weak, the top/bottom/left/right sides of the screen may be snowy.
- Press the button on the remote control.
- Enter the following path on the screen. Picture Aspect Ratio Just Scan
- Set Just Scan to Off.
- Press the
- I don’t see anything, or the image keeps flickering when I try to connect the HDMI or USB-C™ cable.
- USB-C may not be supported on some models.
- Check whether your cable is compliant with the specifications.You may experience flickering or a blank screen if the cable is faulty (bent, broken).
- Make sure that the cable is correctly connected to the port.Bad or loose contact may cause display problems on the screen.
- If you're using a UHD set-top box, adjust HDMI Deep Colour.(ULTRA HD models only)
- Press the button on the remote control.
- Enter the following path on the screen. General External Devices HDMI Settings
- Select HDMI Deep Colour.
- Press the
- The screen looks too dim or dark.
- Change the settings as follows:
- Press the button on the remote control.
- Enter the following path on the screen. Picture Select Mode
- Switch Select Mode to your desired picture mode.(Standard, Vivid, etc.)
This applies to the current input mode only.
- Press the
- Change the settings as follows:
- Press the button on the remote control.
- Enter the following path on the screen. Picture Advanced Settings Brightness Motion Eye Care
- Switch Motion Eye Care to Off.
This applies to the current input mode only.
- Press the
- Change the settings as follows:
- Press the button on the remote control.
- Enter the following path on the screen. Picture Advanced Settings Reduce Blue light
- Switch Reduce Blue light to Off.
- Press the
- Change the settings as follows:
- Press the button on the remote control.
- Enter the following path on the screen. General Energy Saving
- Switch Energy Saving Step to either Off or Minimum.
- Press the
- The screen brightness keeps changing.
- Change the settings as follows:
- Press the button on the remote control.
- Enter the following path on the screen. General Energy Saving
- Switch Energy Saving Step to either Off or Minimum.
- Press the
- ULTRA HD video does not display.(ULTRA HD models only)
- With some HDMI or USB-C™ cables, signals may not be received.
- Change the settings of the connected device to the supported signal.
8.4. Troubleshooting Sound Issues
[Go to table of contents]- Press the button on the remote control.
- Enter the following path on the screen. Support Sound Self-diagnosis
Make sure that the set-top box is correctly connected to your monitor.
- The screen is fine, but it does not play any sound.
- Try another programme.
- Adjust the volume with the remote control for the monitor.
- When using a set-top box, no sound will be produced if the volume of the set-top box is set to 0 or mute.Set the volume to your preference with the volume button on the set-top box remote control.
- Change the settings as follows:
- Press the button on the remote control.
- Enter the following path on the screen. Sound Sound Out
- Set the Sound Out to Optical Out Device + Monitor Speaker or Use Monitor Speaker, and then check it once again.If you can hear the sound without any problem, check the connection with external speakers such as sound bar and the settings of the external speakers.Depending on the model, some features may not be available.
- Press the
- There is no sound coming from one of the speakers.
- Change the settings as follows:
- Press the button on the remote control.
- Enter the following path on the screen. Sound Advanced Settings Balance
- Adjust the balance as necessary with the Navigation button in Balance.
- Press the
- The monitor sound is not synchronised with the picture, or the sound sometimes breaks up.
- If all of the programmes are out of sync, adjust the sync in Match Screen and Sound.
- Press the button on the remote control.
- Enter the following path on the screen. Sound Advanced Settings Match Screen and Sound
- Press the
- If you are using a set-top box, consult its supplier.
- The volume changes when I change the programme.
- The volume of different broadcasting stations’ transmission output may vary.
- Change the settings as follows:
- Press the button on the remote control.
- Enter the following path on the screen. Sound Advanced Settings Automatic Volume Adjustment
- Set Automatic Volume Adjustment to On.
- Press the
- If you are using a set-top box, consult its supplier.
- The volume keeps changing.
- Change the settings as follows:
- Press the button on the remote control.
- Enter the following path on the screen. Sound Advanced Settings Automatic Volume Adjustment
- Set Automatic Volume Adjustment to On.
- Press the
- It is making an excessive whirring (thumping) sound.
- Change the settings as follows:
- Press the button on the remote control.
- Enter the following path on the screen. Sound Select Mode
- Set Select Mode to Clear Voice/Clear Voice Pro.
- Press the
- A voice is emitted when setting menus or operating programmes, volume, etc. with the remote control.
- Change the settings as follows:
- Press the button on the remote control.
- Enter the following path on the screen. General Accessibility Audio Guidance
- Set Audio Guidance to Off.
Some models may not be supported.
- Press the
8.5. Troubleshooting Device Connection Issues
[Go to table of contents]- The screen remains blank after it is connected to a PC.
- Check that the PC is properly connected to the monitor.
- Turn the monitor off and back on using the remote control.
- Restart the PC with the monitor on.
- Make sure that the output resolution set on the PC is set to the PC supported resolution of the monitor.
- To use dual monitors, check that the PC or notebook supports dual-monitor mode.
- Try reconnecting the HDMI or USB-C™ cable.
USB-C may not be supported on some models. - If you have connected the RGB output port of your PC to the HDMI IN of your monitor, you need an RGB to HDMI gender.
You will not see anything on the screen if you use an HDMI to RGB gender. - The screen is not fully shown or is lopsided when connected to a PC.
- Set the PC’s resolution to one supported by the monitor.
For more details, please refer to the following User Guide.
Path: Being Aware of the Information Supported Resolution : HDMI/USB-C™ PC - Set the connected device's name to PC.
- Press the button on the remote control and launch Home Hub on the screen.
- Select Edit Inputs in the upper right corner.
- Change the icon of the terminal to which the PC is connected to PC and select Save.
- Press the
- The sound does not play when the PC is connected with an HDMI cable.
- Set LG Monitor as the default device in Sound Playback in Control Panel of PC settings.
- Consult your manufacturer on whether your graphics card supports audio output.
- Screen Share does not work.
- Check if your smart device supports the Screen Share function.
- If the monitor is not detected on your smart device, turn off both the smart device and the monitor and turn them on again.
- Make sure you have selected the monitor from the list of devices found on your smart device.
- Change the settings as follows:
- Press the button on the remote control.
- Enter the following path on the screen. Support Monitor Information Device Name
- Change the device name.
- Press the
- When using the AirPlay 2 function, make sure that the monitor and the device are connected to the same Wi-Fi.
Make sure that Home Hub AirPlay is set to On.
Some models do not support AirPlay 2.
8.6. Troubleshooting Movie Playback Issues
[Go to table of contents]For detailed information about supported files, please refer to the following User Guide.
Path: Being Aware of the Information
Supported Video File Formats- I cannot find a file in the Media Player.
- Check whether the files saved on your USB storage device can be read by the PC.
- Check that the file extension is supported.
- Change the filter to All.
- I see a message that says the file is not supported.
- Check that the file plays without any problems on the video player on a PC. (Check for file damage.)
- Check that the file extension is supported.
- Check that the resolution is supported.
- Check that the video codec is supported.
- Check that the frame rate is supported.
- I get a message saying “This audio is not supported” or the video is playing normally but the audio is not.
- Check that the file plays without any problems on the video player on a PC. (Check for file damage.)
- Check that the file extension is supported.
- Check that the audio codec is supported.
- Check that the bit rate is supported.
- Check that the sample frequency is supported.
- Check that the number of audio programmes is supported.
- I cannot see the subtitles.
- Check that the file plays without any problems on the video player on a PC. (Check for file damage.)
- Check that the video and subtitle files have the same name.
- Also check that both the video file and the subtitle file are in the same folder.
- Check that the subtitle file format is supported.
- Check that the language is supported.
(You can check the language of the subtitle file by opening the file in the Notepad.) - If subtitles encoding is incorrectly set, subtitles may not be displayed properly.
Press the button on the screen while using the playback control.Select and change the Code Page value. - If you play a video file stored on another device by using the content sharing feature, subtitles may not be available depending on the programme you use.
- Some NAS devices may not support captions when playing a video.
- My USB storage device is not recognised when connected.
- Check whether it is a USB storage device supported by the monitor.
For more details, please refer to the following User Guide.
Path: Connecting External Devices Connecting USB
8.7. Troubleshooting Network Connection Issues
[Go to table of contents]Before connecting to a wireless network, check the name and password of the Wi-Fi device to connect.
You can check the network connection status as shown below.
- Press the button on the remote control.
- Enter the following path on the screen. General Network Wired Connection (Ethernet) General Network Wi-Fi Connection Other Network Settings Advanced Wi-Fi Settings
- Some models may support the Wi-Fi Connection function only.
- The wireless network connection is not working.
- Change the settings as follows:
- Press the button on the remote control.
- Enter the following path on the screen. General System Additional Settings Quick Start+
- Set to Off.
- Turn off the monitor and turn it back on, then connect to the wireless network.
- Press the
- If it cannot connect to the router, try connecting it to the mobile hotspot on your smartphone.If it can be connected to the mobile hotspot, this indicates that it is a router problem. In this case, please check the router.
If you use the network with a monitor connected to a mobile hotspot, you may be charged according to the contract with your carrier. 
When X appears next to monitor- Check the monitor or the AP (Router).
- Check the connection status of the monitor, AP (Router) and cable modem.
- Power off and power on in the following order;
1. Turn your cable modem off and back on, and wait for the device to reset.
2. Turn the wired/wireless router off and back on, and wait for the device to reset.
3. Turn the monitor off and on.- If you want to establish a wired LAN connection, check whether an IP address can be obtained from your router properly.If you are setting up your network manually, check whether all settings are correct.
- If you want to establish a wireless connection, check the following points as well.
①Set your router’s SSID (network name) or wireless channel.
②Set your router’s security key.
If you can't complete this setting, refer to the router's user manual and the instructions provided by your Internet provider.If you are still unable to establish your configuration, consult your router’s manufacturer or your Internet service provider.- If you are using a static IP, enter the IP directly.

When X appears next to Gateway- Check the AP (Router) or consult your Internet service provider.
- Unplug the router/cable modem from the wall outlet, wait 10 seconds and reconnect it.
- Initialize (Reset) the AP (Router) or cable modem.
- Check the AP (Router) manufacturer’s website to make sure your router has the latest firmware version installed.
- If you can't complete this setting, refer to the router's user manual and the instructions provided by your Internet provider.If you are still unable to establish your configuration, consult your router’s manufacturer or your Internet service provider.

When X appears next to DNS- Check the AP (Router) or consult your Internet service provider.
- Unplug the router/cable modem from the wall outlet, wait 10 seconds and reconnect it.
- Initialize (Reset) the AP (Router) or cable modem.
- Check that the MAC address of the monitor/AP (Router) is registered with your Internet service provider. (The MAC address displayed on the pane of the network status window should be registered with your Internet service provider.)
- If you can't complete this setting, refer to the router's user manual and the instructions provided by your Internet provider.If you are still unable to establish your configuration, consult your router’s manufacturer or your Internet service provider.
8.8. Troubleshooting LG Account Issues
[Go to table of contents]- I’ve signed up for the membership on monitor. Do I have to sign up again on the website (www.lgappstv.com)?
- You can use the website with the membership information that you used when signing up on monitor.
- I forgot my password. What should I do?
- On the monitor's login screen, select the Forgot Password? button to go to the find password page.Enter your email address on the find password page, and we'll send you a link to reset your password.
- You can also reset your password in LG Account Reset Password on the website (www.lgappstv.com).
- I wish to delete the account saved on the monitor.
- When you log in to your LG account on the monitor, the account will be saved to the monitor.
You can delete accounts stored on the monitor at any time, as follows.- Press the button on the remote control and select LG Account on the screen.
- Select Edit Account List at the top of the screen.
- Pressing Delete will delete the account.
It will not delete the login history or close the account.
- Press the
- I wish to delete the usage history on the monitor.
- When you use the monitor after logging in to your LG account, the usage history will be saved and you can delete it at any time.
- Press the button on the remote control and select LG Account on the screen.
- Select Account Management for the account you wish to set up.
- Select Usage Data Management.
- Pressing Delete will delete the usage history.
- Press the
- I wish to close my account on the monitor.
- You can also close your LG account on the monitor as follows.
- Press the button on the remote control and select LG Account on the screen.
- Select Account Management for the account you wish to set up.
- Select Terminate My Account.
- Enter your password and press OK to close your account.
- Press the
- In some countries, access to the website (www.lgappstv.com) may be restricted.
8.9. Troubleshooting Contents Issues
[Go to table of contents]- I cannot see any content in HOME.
- You may not be able to see the content if the service country setting has been changed.
- Press the button on the remote control.
- Enter the following path on the screen. General System Location LG Services Country
(Some models may not be supported.) - Change to the country you want to use.
- Press the
- If you cannot see some apps, it may be because you deleted them.Please reinstall the appropriate app.
- If the app is deleted, you can download the app at Apps and reinstall it.Press the button on the remote control, then search for the desired app in Apps on the screen and install it.
- The type of supported content differs by country.
- The content offerings are subject to change or interruption by the service provider.
8.10. Troubleshooting Internet Browser Issues
[Go to table of contents]- Some parts of a particular website are not visible when I am using the Internet.
- The Web Browser supports only HTML5 media and not Flash Plug-in.
- The Web Browser does not support plug-in installation.
- On the Web Browser, it may not be possible to play media files in formats other than :
JPEG/PNG/GIF - You cannot save attachments or images.
- If the Use Block Ads feature is turned on, the area on the website that appears to show an ad will appear blank.If some content on the website is hidden and invisible, try setting Settings Use Block Ads to Off in Web Browser.Sponsored AD on the new tab page will be displayed even if you set the Use Block Ads feature to Off.
- The Internet browser automatically shuts down when I visit a website.
- The Internet browser may be forced to shut down if the available memory size is not sufficient to accommodate the image information for a website.Check if you can access the site with the issue on your PC.
- When watching a video in Web Browser, the video is forced off.
- You may be able to fix this by setting Settings Adaptive Streaming using JavaScript to Off in Web Browser.The setting is not applied to tabs that were open before the change, and is only applied to tabs opened after the change.
9. Being Aware of the Information
[Go to table of contents]9.1. Supported Photo File Formats
[Go to table of contents]| Extension | Resolution |
|---|---|
| jpeg jpg jpe | Minimum: 64 × 64 Maximum Normal Type: 15360 (W) × 8640 (H) Progressive Type: 4800 (W) × 3600 (H) |
| png | Minimum: 64 × 64 Maximum: 5760 (W) × 5760 (H) |
| bmp | Minimum: 64 × 64 Maximum: 1920 (W) × 1080 (H) |
| avif heic heif | Minimum: 64 × 64 Maximum: 4800 (W) × 3600 (H) |
9.2. Supported Video File Formats
[Go to table of contents]Maximum Data Transfer Rate
- Full HD video
H.264 1920 × 1080@60P BP/MP/HP@L4.2 Maximum 40Mbps
HEVC 1920 × 1080@60P Main/Main10@L4.1 Maximum 40Mbps
MPEG-2/MPEG-4 1920 × 1080@30P - ULTRA HD video(ULTRA HD models only)
H.264 3840 × 2160@30P BP/MP/HP@L5.1 Maximum 50Mbps
HEVC 3840 × 2160@60P Main/Main10@L5.1 Maximum 60Mbps - HFR video(HFR supported models only)
HEVC 3840 × 2160@120P Main/Main10@L5.2 Maximum 60Mbps - Dolby Vision video(Dolby Vision supported models only)
HEVC 3840 × 2160@60P Main/Main10@L5.1 Maximum 50Mbps
Supported External Subtitles
- smi, srt, sub (MicroDVD, SubViewer 1.0/2.0), ass, ssa, txt (TMPlayer), psb (PowerDivX), dcs (DLP Cinema)
Supported Embedded Subtitles Format
- Matroska (mkv): Sub Station Alpha (SSA), Advanced Sub Station Alpha (ASS), SRT
- MP4: Timed Text
Supported Video Codecs
| Extension | Codec |
|---|---|
| asf wmv | Video: VC-1 Advanced Profile (except for WMVA), VC-1 Simple and Main Profiles Audio: WMA Standard (except for WMA v1/WMA Speech) |
| avi | Video: Xvid (GMC is not supported), H.264/AVC, Motion Jpeg, MPEG-4 Audio: MPEG-1 Layer I, II, MPEG-1 Layer III (MP3), Dolby Digital, LPCM, ADPCM |
| mp4 m4v mov | Video: H.264/AVC, MPEG-4, HEVC, AV1 Audio: Dolby Digital, Dolby Digital Plus, AAC, MPEG-1 Layer III (MP3), Dolby AC-4, DTS, DTS-HD, DTS:X |
| 3gp 3g2 | Video: H.264/AVC, MPEG-4 Audio: AAC, AMR-NB, AMR-WB |
| mkv | Video: MPEG-2, MPEG-4, H.264/AVC, VP8, VP9, HEVC, AV1 Audio: Dolby Digital, Dolby Digital Plus, AAC, PCM, DTS, DTS-HD, DTS:X, MPEG-1 Layer I, II, MPEG-1 Layer III (MP3) |
| ts trp tp mts | Video: H.264/AVC, MPEG-2, HEVC Audio: MPEG-1 Layer I, II, MPEG-1 Layer III (MP3), Dolby Digital, Dolby Digital Plus, AAC, PCM, DTS, DTS-HD, DTS:X, Dolby AC-4 |
| mpg mpeg dat | Video: MPEG-1, MPEG-2 Audio: MPEG-1 Layer I, II, MPEG-1 Layer III (MP3) |
| vob | Video: MPEG-1, MPEG-2 Audio: Dolby Digital, MPEG-1 Layer I, II, DVD-LPCM |
- Dolby AC-4,DTS,DTS-HD,DTS:X: Some models may not be supported.
Cautions for Video Playback
- Some user-created subtitles may not work properly.
- A video file and its subtitle file must be in the same folder. For subtitles to be displayed properly, make sure that the video file and the subtitle file have the same name.
- Subtitles on a Network Attached Storage (NAS) device may not be supported depending on the manufacturer and model.
- Streams that include Global Motion Compensation (GMC) and Quarterpel Motion Estimation (Qpel) are not supported.
- ULTRA HD video(ULTRA HD models only): 3840 × 2160, 4096 × 2160
Some HEVC-encoded ULTRA HD videos other than the content officially provided by LG Electronics may not be played.
Some codecs can be supported after a software upgrade.Extension, Codec Extension Codec mkv
mp4
tsVideo: H.264/AVC, HEVC
Audio: Dolby Digital, Dolby Digital Plus, AAC - Only Window Media Audio V7 and later are supported.
- The AAC main profile is not supported.
- Video files created by some encoders may not be played.
- Video files in a different format than specified may not be played properly.
- Video files stored on a USB storage device that does not support High Speed may not be played properly.
9.3. Supported Music File Formats
[Go to table of contents]| Extension | Info |
|---|---|
| mp3 | Bit rate: 32 kbps ~ 320 kbps Sample freq.: 16 kHz ~ 48 kHz Support: MPEG-1, MPEG-2 Channels: mono, stereo |
| wav | Bit rate: - Sample freq.: 8 kHz ~ 96 kHz Support: PCM Channels: mono, stereo |
| ogg | Bit rate: 64 kbps ~ 320 kbps Sample freq.: 8 kHz ~ 48 kHz Support: Vorbis Channels: mono, stereo |
| wma | Bit rate: 128 kbps ~ 320 kbps Sample freq.: 8 kHz ~ 48 kHz Support: WMA Channels: up to 6 ch |
| flac | Bit rate: - Sample freq.: 8 kHz ~ 96 kHz Support: FLAC Channels: mono, stereo |
- The number of supported programmes may vary depending on the sample frequency.
9.4. Supported Resolution : HDMI/USB-C™ DTV
[Go to table of contents]| Resolution | Horizontal Frequency (kHz) | Vertical Frequency (Hz) |
|---|---|---|
| 640 × 480p | 31.46 | 59.94 |
| 31.5 | 60 | |
| 720 × 480p | 31.46 | 59.94 |
| 31.5 | 60 | |
| 720 × 576p | 31.25 | 50 |
| 1280 × 720p | 37.5 | 50 |
| 44.95 | 59.94 | |
| 45 | 60 | |
| 1920 × 1080i | 28.12 4) | 50 4) |
| 33.71 | 59.94 | |
| 33.75 | 60 | |
| 1920 × 1080p | 26.97 | 23.97 |
| 27 | 24 | |
| 28.12 4) | 25 4) | |
| 33.71 | 29.97 | |
| 33.75 | 30 | |
| 56.25 | 50 | |
| 67.43 | 59.94 | |
| 67.5 | 60 | |
| 2560 × 1080p 2) 3) (ULTRA HD models only) | 66 | 60 |
| 3840 × 2160p (ULTRA HD models only) | 53.94 | 23.97 |
| 54 | 24 | |
| 56.25 | 25 | |
| 67.43 | 29.97 | |
| 67.5 | 30 | |
| 112.5 | 50 | |
| 134.86 | 59.94 | |
| 135 | 60 |
2) Supported when Wide Aspect Ratio is set to 21:9.
3) Supported when Wide Aspect Ratio is set to 32:9.
4) Some models may not be supported.
- USB-C may not be supported on some models.
9.5. Supported Resolution : HDMI/USB-C™ PC
[Go to table of contents]| Resolution | Horizontal Frequency (kHz) | Vertical Frequency (Hz) |
|---|---|---|
| 640 × 350 5) | 31.46 | 70.09 |
| 720 × 400 | 31.46 | 70.08 |
| 640 × 480 | 31.46 | 59.94 |
| 800 × 600 | 37.87 | 60.31 |
| 1024 × 768 | 48.36 | 60 |
| 1152 × 864 | 54.34 | 60.05 |
| 1360 × 7682) | 47.71 | 60.01 |
| 1280 × 1024 (Full HD, ULTRA HD model only) | 63.98 | 60.02 |
| 1920 × 1080 | 67.5 | 60 |
| 2560 × 1080 3) 4) (ULTRA HD models only) | 66 | 60 |
| 2560 × 14401) (ULTRA HD models only) | 88.78 | 59.95 |
| 3840 × 1080 4) (ULTRA HD models only) | 66.62 | 60 |
| 3840 × 1600 3) (ULTRA HD models only) | 99.41 | 60 |
| 3840 × 2160 (ULTRA HD models only) | 53.94 | 23.97 |
| 54 | 24 | |
| 56.25 | 25 | |
| 67.43 | 29.97 | |
| 67.5 | 30 | |
| 112.5 | 50 | |
| 134.86 | 59.94 | |
| 135 | 60 |
2) Supported when HDMI Deep Colour/HDMI/USB-C Deep Colour is set to Off.
3) Supported when Wide Aspect Ratio is set to 21:9.
4) Supported when Wide Aspect Ratio is set to 32:9.
5) Some models may not be supported.
- USB-C may not be supported on some models.
- Supported HDMI-PC port is differ by model. Refer the manual that provide with product.
9.6. LG TV Content Policy
[Go to table of contents]Vorwort
LG Electronics Deutschland GmbH (nachfolgend „LG“ genannt) vertreibt in Deutschland unter anderem auch TV-Geräte.Mit Inkrafttreten des Medienstaatsvertrages fallen Hersteller von TV-Geräten unter die Aufsicht der Medienanstalt des jeweiligen Bundeslandes, in dem der Hersteller seinen (Vertriebs-)Sitz hat. Für LG ist somit die Landesmedienanstalt Hessen zuständig. Aus dem Inhalt des Medienstaatsvertrags (MStV) ergeben sich Rechte und Pflichten aller Anbieter von TV-Geräten und deren Benutzeroberflächen in Deutschland.
Im Vorwort zum Medienstaatsvertrag heißt es „Der Staatsvertrag enthält grundlegende Regelungen für die Veranstaltung und das Angebot, die Verbreitung und die Zugänglichmachung von Rundfunk und Telemedien in Deutschland“.
Unter anderem werden Hersteller von sogenannten Benutzeroberflächen durch den deutschen Medienstaatsvertrag verpflichtet, eine Transparenzerklärung abzugeben. LG TV-Geräte fallen somit unter die Vorschriften des Medienstaatsvertrages und müssen damit auch eine Transparenzerklärung enthalten, die unter Punkt II. dargestellt wird.
Die Vorschrift zur Transparenzerklärung nach dem Wortlaut des § 85 MStV:
Die einer Medienplattform oder Benutzeroberfläche zugrunde liegenden Grundsätze für die Auswahl von Rundfunk, rundfunkähnlichen Telemedien und Telemedien nach § 19 Abs. 1 und für ihre Organisation sind vom Anbieter transparent zu machen. Dies umfasst die Kriterien, nach denen Inhalte sortiert, angeordnet und präsentiert werden, wie die Sortierung oder Anordnung von Inhalten durch den Nutzer individualisiert werden kann und nach welchen grundlegenden Kriterien Empfehlungen erfolgen und unter welchen Bedingungen Rundfunk oder rundfunkähnliche Telemedien nach § 80 nicht in ihrer ursprünglichen Form dargestellt werden. Informationen hierzu sind den Nutzern in leicht wahrnehmbarer, unmittelbar erreichbarer und ständig verfügbarer Weise zur Verfügung zu stellen.
Informationen für den TV-Benutzer:
Der einfachen Verständlichkeit halber beschreibt LG seine Transparenzgrundsätze mit Fragen und Antworten:1. Nach welchen Grundsätzen wählt LG Sender, sendernahe Angebote und reine „Video on demand“ (VOD) Anbieter aus?
- Begriffsdefinition Sender: Unter einem Sender versteht LG einen Anbieter eines linearen Fernsehprogrammes. „Linear“ bedeutet vereinfacht, dass der Sender ein Programm ausstrahlt, auf das der TV-Benutzer keinen Einfluss nehmen kann.
- Begriffsdefinition sendernahes Angebot: Hier handelt es sich beispielsweise um die Mediatheken linearer TV-Sender, die durch den Benutzer abgerufen werden können.
- Begriffsdefinition reine „VOD“ Anbieter: Hierbei handelt es sich um Anbieter von Fernsehinhalten ohne einen angeschlossenen linearen Sender.
2. Wie werden bei LG Programminhalte ausgewählt, angeordnet und präsentiert?Eine Auswahl der sendernahen Angebote und der reinen VOD Anbieter findet nur insofern statt, als hierfür eine vom Anbieter programmierte Applikation für unser Betriebssystem zur Verfügung gestellt werden muss.
Sobald eine solche Applikation alle notwendigen Tests durchlaufen hat, um eine einwandfreie Funktion sicherzustellen, wird diese in unserem „Content Store“ zur Verfügung gestellt. Hier ist sie dann auch diskrimierungsfrei auffindbar mittels Suchfunktion oder Genre-Sortierung.
Die Anzeige und Reihenfolge der aus dem Content Store ausgewählten Applikationen kann vom Benutzer selbst festgelegt werden, nachdem diese auf den TV heruntergeladen wurden. Weitere Informationen dazu sind im Benutzerhandbuch zu finden.
Die „Kacheln“ der verschiedenen VOD Anbieter werden zufällig sortiert im „Home Menu“ (Home-Taste) des TV-Gerätes angezeigt. Es findet jede Stunde eine zufällige Neusortierung dieser Kacheln Server-seitig statt. Das bedeutet, wird das TV-Gerät ausgeschaltet und nach mehr als einer Stunde später wieder eingeschaltet, wird eine neue Sortierung vom Server abgerufen und angezeigt. Auf die Inhalte und deren Sortierung innerhalb der einzelnen „Kacheln“ der jeweiligen Anbieter hat LG keinerlei Einfluss.
Empfehlungen durch LG, auf Basis bestehender Marketing-Kooperationen, beschränken sich auf die Vorauswahl von Apps in der Schnellstart-Leiste. Diese können selbstverständlich vom Benutzer komplett verändert oder entfernt werden und mit einer eigenen Auswahl von Applikationen aus dem Content-Store ersetzt werden.
3. Kann die Anordnung von Inhalten durch den Nutzer individualisiert werden und wenn ja, wie?
Der Benutzer kann die gewünschten Applikationen (siehe dazu Punkt 4.) und deren Reihenfolge selbst bestimmen. Dafür gibt es ein Bearbeitungssymbol in der Schnellstartleiste.
Die linearen Sender können ebenfalls frei nach eigenen Wünschen sortiert werden. Es können hierfür auch verschieden Favoritenlisten erstellt werden.
4. Apps im LG Content Store
Auf der Startseite des LG Content Stores zeigt LG drei Arten von App-Kategorien an.
- Neu aktualisierte Apps: enthält neu herausgegebene und kürzlich aktualisierte Apps. Die Liste wird jeden Tag aktualisiert.
- Beliebteste Apps: besteht aus den am häufigsten heruntergeladenen und am besten bewerteten Apps innerhalb der letzten 30 Tage, basierend auf den LG Smart TV-Nutzerverhalten des jeweiligen Landes. Apps im Launcher und im Premium-Bereich sind in dieser Liste nicht enthalten. Die Reihenfolge wird in den Top 50 für jeden Aufruf zufällig geändert. Die Top 50 App-Liste wird ebenfalls täglich aktualisiert.
- Apps in der Premium-Kategorie: werden in Übereinstimmung mit der Anzahl der jährlichen Nutzung durch alle LG Smart TV-Nutzer eines Landes (Anzahl der App-Zugriffe) sortiert. (Die am häufigsten verwendeten Apps werden zuerst dargestellt.) Die Anzahl der Apps kann je nach Plattform zwischen 7 und 20 variieren, und die Anordnung kann nicht angepasst werden.
5. Nach welchen grundlegenden Kriterien erfolgen Empfehlungen / Vorauswahlen?
LG möchte in seinen TV-Geräten möglichst viele qualitativ hochwertige Programmangebote und Applikationen anbieten. Daher gibt es mit vielen Medienschaffenden Kooperationen.
LG installiert einige der meistgenutzen Applikationen bereits vor, damit diese leicht vom Benutzer gefunden werden können. Selbstverständlich können diese - wie in Punkt 3 erwähnt - jederzeit vollständig entfernt werden und durch Applikationen ersetzt werden, die im „Content Store“ verfügbar sind.
Über die Suchfunktion werden, basierend auf einem Algorithmus, Empfehlungen angezeigt, die auf Basis der Nutzung des TV-Gerätes die passenden Informationen findet. (Über Fernbedienung, Sprachsuche usw.)
LG zeigt einige weitere Inhaltsempfehlungen basierend auf den Suchinformationen wie Genre, Besetzung, Regisseur usw. an, welche die meistgesehenen und kürzlich veröffentlichten Inhalte der letzten 30 Tage berücksichtigt. Die Liste der empfohlenen Inhalte wird täglich aktualisiert.
6. Wie findet Werbung auf den TV-Geräten statt?
LG benutzt ab der WebOS Version 4.5 (ab Modelserie 2019) kleine „Werbekacheln“ im Home-Menü. Das heisst, es findet keine automatische Überblendung des laufenden Programms statt, sondern der Benutzer muss beispielsweise das Abspielen eines Videos selbst auslösen, indem er auf diese „Werbekachel“ klickt.
7. Werden bei LG laufende Programme überlagert? Wenn JA, wie und aus welchem Grund?
LG unterscheidet drei Arten von Überlagerungen:
- Systemmeldungen
- Vom Benutzer ausgelöste Menüs oder Anzeigen
In Betriebssystemen früherer Geräte gibt es vom Benutzer ausgelöste Überlagerungen, da hier noch nicht mit einem Vollbildmenü gearbeitet werden konnte.
- Überlagerungen die von den Sendern selbst eingespielt werden (via HbbTV)
8. Warum werden Sender mit öffentlichem Wert („Public Value“) prominent dargestellt?
Auf Grund der aktuellen Rechtslage, hier im Besonderen des Medienstaatsvertrages, ergibt sich die Notwendigkeit für eine einfache Auffindbarkeit, der durch die Behörden definierten Anbieter von Inhalten, zu sorgen.
9. Was ist der „Magic Link“?
Empfehlungen auf der Magic Link-Seite beinhalten empfohlene Inhalte von YouTube, anderen Kanälen und zusätzliche Inhalte, die den Inhalten (Titel, Genre, Beschreibung, Besetzung, Regisseur usw.) der Programme ähneln, die der Nutzer gerade anschaut.Diese Funktion kann über die Fernbedienung aktiviert werden (Siehe Bedienungsanleitung des TV-Gerätes, da es unterschiedliche TV-Versionen gibt).
10. Was wird mir im EPG (Electronic Program Guide) angezeigt?
Hier werden das laufende Fernsehprogramm und folgende Sendungen in Textform und auch grafisch dargestellt. Die Inhalte, Logos und Vorschaubilder werden durch einen externen Anbieter in Kombination mit DVB-eigenen Informationen angezeigt.
11. Gibt es regelmäßige Updates für mein TV-Gerät?
Da es sich bei Ihrem TV-Gerät um ein Gerät mit „digitalen Elementen“ handelt, gibt es kontinuierliche Aktualisierungen (Leistungsverbesserungen, Sicherheitsupdates) um eine optimale Funktion sicherzustellen. Es gilt allerdings zu beachten, dass LG keinen Einfluss auf die Aktualisierungen der „Dritt-Anbieter-Applikationen (Apps)“ auf Ihrem TV-Gerät hat. Die Verantwortung hierfür liegt allein bei dem jeweiligen Eigentümer der App. Es werden jedoch umgehend Aktualisierungen vorgenommen, sobald diese uns vom Eigentümer der App zur Verfügung gestellt werden.
Kontakt
Bei Fragen oder Anregungen zu dieser Transparenzerklärung wenden Sie sich bitte an:E-MAIL: smart.affairs@lge.com
Sonstiges
Alle in diesem Dokument beschriebenen Funktionen beziehen sich auf die aktuelle Benutzeroberflächen-Version WebOS 6.0. Dies kann je nach technischen Gegebenheiten in den Vorgängerversionen abweichen. Die Funktionalitäten einer Benutzeroberflächen-Version richten sich stets nach den zur Verfügung stehenden technischen Möglichkeiten (Prozessoren/Speicherkapazitäten usw.).Diese Transparenz-Erklärung finden Sie online und auch in Ihrem LG TV-Gerät.